Folder Redirection GPO
Windows Server 2003 includes a very powerful GPO called Folder Redirection. Folder redirection allows the administrator to take specific folders that are normally kept on a user 's local hard drive, and move them up to a server on the network. Currently, there are four folders that may be redirected to the server:
-
Application Data
-
Desktop
-
My Documents/My Pictures
-
Start Menu
Why would one want to do this? There are several reasons:
Standard configuration:
Our company may wish to ensure that all users in a specific OU have the same items on their Start Menus. By creating and sharing a folder with these items and then directing all users in an OU via a GPO to use this standard folder, the users all have the same appearance and functionality in the programs displayed on their Start Menus.
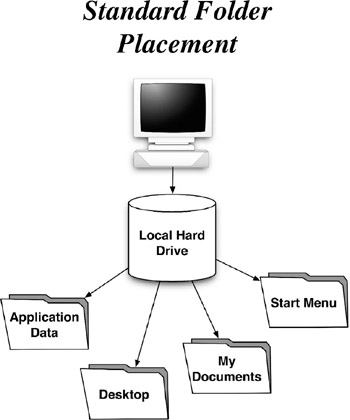
Figure 4-4: On a standard Windows 2000 or XP system, the folders that store application and user data are kept locally on the computer's hard drive. If the hard drive should fail, or if the user upgrades to a new or different computer, the data must be transferred to the new machine.
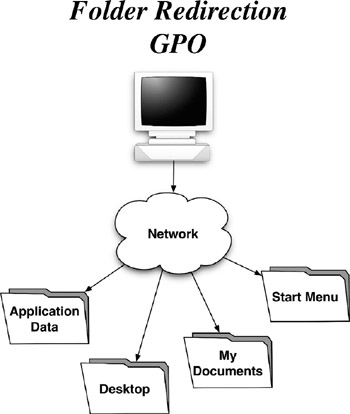
Figure 4-5: When using a folder redirection group policy object, data that is normally stored on the user's local hard drive is instead redirected to the network server. This facilitates ease of movement from one computer to another, and safeguards data in the event of a computer crash.
Easy backup of data:
Let's say that a user in our company has a computer problem; specifically , his hard drive has crashed and is unrecoverable. The policy of his department is to keep all his work in his My Documents folder. The user never backs up to any external device, and the data lost on his hard drive goes back an entire year, making it almost impossible to reconstruct ( Note: you'll find that getting users to back up their data on their own recognizance is similar to raising the Titanic with tweezers ). Is our user going to be hitting the unemployment lines? He won't if his system administrator has employed a folder redirection GPO for the My Documents folder. Because all the data in My Documents has been redirected to a server on the network, which gets backed up every day and night, our user's data is perfectly safe.
Roaming data:
Building upon the example above, when our user receives his new hard drive (or, dare we say, new computer), and he logs back into the domain using his username and password, all of his data in his My Documents folder appears just as he left it before his old computer went belly-up. Again, this is because his data is stored on the server. As a matter of fact, our user can log in from any computer in his department, and his data always follows him thanks to folder redirection.
Tutorial: Folder Redirection for the My Documents folder (Part I - Folder Permissions)
Using the scenario described earlier regarding the My Documents folder, we can create a GPO rule that redirects a user's My Documents folder up to the network. We can also control access to each user's Documents folder based on the following permissions scheme:
-
The user must have Full Control permissions over his/her own My Documents folder
-
The members of the user's group must have Modify Permissions over the user's My Documents folder. The reason for this is so that data may be interchanged among group members while still allowing the owner of the folder to maintain Full Control.
-
All other groups must not have access to the user's My Documents folder.
-
The Administrators group must have Full Control permissions over the user's My Documents folder.
-
The user's network My Documents folder must be created dynamically with the above described permissions.
-
Any existing data in the user's local My Documents folder must be copied to the network My Documents folder.
-
To begin, we must create a new shared folder that will house the redirected data. Using Windows Explorer, create a new folder inside the shares folder, and name it redirected_data .
-
Inside the redirected_data folder, create a folder named re_accounting .
-
Right-click re_accounting and choose Properties . On the window that appears, click the Security tab. The default user/group NTFS permissions assigns Full Control to the Administrators group (recall that these permissions are inherited from the folder's parent).
-
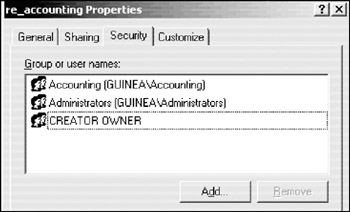
We must now modify the permissions on this new folder. Click the Add button. In the window that appears, add the Accounting group and the Creator Owner user and click OK . Your NTFS permissions window should appear similar to this:
-
In the Group or user name field, click the Accounting group and set its permissions to Modify by clicking the checkbox next to Modify in the bottom pane.
-
Now click the Creator Owner entry in the top pane and set its permissions to Full Control by clicking the checkbox next to Full Control in the bottom pane. Click OK .
-
Open Computer Management ( Start Menu ˆ’ > Administrative Tools ).
-
In the left pane, expand the Shared Folders item and click the Shares icon. On the Action menu, click New Share .
-
When asked to specify the path to the new share, browse to (or type) the local path to the new folder we just created. For example:
D:\shares\redirected_data\re_accounting
-
When asked to specify the share permissions, choose Use custom share and folder permissions and click Customize .
-
On the window that appears, the default group is Everyone with Read permissions. Give the Everyone group Full Control permissions.
-
Add the Administrators group and give it Full Control as well. Click OK and Finish .
So what have we done here? We seem to have already broken an accepted rule of never giving the Everyone group the Full Control network share permission. However, there is method to the madness. As of right now, our user's redirected My Documents folder does not exist; that is because it has not been created yet, and will not be created until our user logs into the domain. Recall that our user needs to have Full Control NTFS permissions to his new My Documents folder. So if this new network folder is created when our user logs into the server, he needs to be able to take ownership of his new folder after he creates it. The only way this can be done is to allow Full Control on the network share permissions, because it is the only share permission that allows a user to take ownership on network shares.
But who is the Creator Owner user that we assigned Full Control NTFS permissions to back in step 6? The Creator Owner user is a variable that represents whatever user creates a file or folder. So when our user logs in and his My Documents folder is dynamically created, he (the Creator Owner) automatically becomes its owner. And because we assigned Full Control NTFS file permissions to the Creator Owner, our user is automatically given Full Control over his new My Documents folder.
Why did we give the Accounting group Modify NTFS file permissions? This allows other members of our user's group, the Accounting group, to have access to his files. But because we did not give the Accounting group Full Control NTFS permissions, no one except our user is able to change ownership on files in his My Documents folder. This is a privilege reserved only to our user and to the administrators.
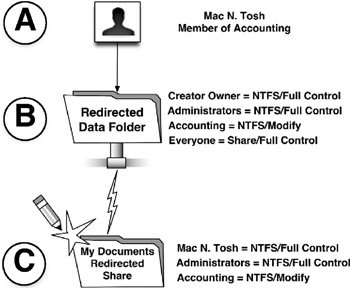
Figure 4-6: The dynamic creation of redirected folders.
A . User Mac N. Tosh logs into the domain. A GPO is configured to redirect his My Documents folder to a network share.
B . The NTFS and network share permissions on the Redirected Data share are configured to allow Mr. Tosh Full Control privileges over whatever folders/files he creates inside.
C . Once logged in, Mr. Tosh's My Documents folder is dynamically created giving him Full Control and his group Modify permissions.
Tutorial: Folder Redirection for the My Documents folder (Part II - Redirection GPO)
Now that our folder is shared with the proper network share permissions and the proper NTFS permissions, we now need to configure the GPO to redirect our users' My Documents folders to the network. For this tutorial, we use the North Wing (Accounting) OU.
-
Open Active Directory Users and Computers . In the left window pane, right-click North Wing and choose Properties .
-
On the window that appears, click the Group Policy tab. The North Wing OU (Accounting) GPO appears in the list of group policy objects. We need to add a new rule to this GPO. Double-click it.
-
Once again, the Group Policy Object Editor appears. In the left pane, expand the Windows Settings folder, and then expand the Folder Redirection item.
-
Four entries appear: Application Data, Desktop, My Documents, and Start Menu. Right-click My Documents and click Properties .
-
The My Documents Properties window appears. By default, this rule is not configured. Next to Setting , select Basic - Redirect everyone's folder to the same location from the drop down list of items.
-
In the Target folder location field, select Create a folder for each user under the root path item from the drop down list of items. This creates a custom My Documents folder for each user once he or she logs in, and satisfies our need for dynamic folder creation.
-
In the Root Path field, either browse to or type in the network path to our re_accounting share that we created earlier. For this example, we have:
\\DC01\re_accounting
-
Click the Settings tab at the top of the window.
-
Uncheck the item labeled Grant the user exclusive rights to My Documents and place a check in Move the contents of My Documents to the new location . Under the Policy Removal area, select the option labeled Redirect the folder back to the local_userprofile location when policy is removed . Click OK .
| Get Info | What exactly have we done? We disabled the option to grant the user exclusive rights (or full control) to the dynamically generated My Documents folder for one reason: all other users, including administrators, are locked out of our user's network My Documents folder. Only our user has access to the share. There are times when this scenario may be desirable, but it is our experience that administrators may need to enter a user's share from time to time for administrative purposes. By unchecking this box, the permissions are left alone on the share and take on the attributes that we assigned in Part I of this tutorial. The Move contents checkbox moves any files or folders that are stored in the user's local My Documents to the new network My Documents. And the Redirect checkbox allows the user to redirect the network data back to his or her local hard drive if this policy should ever be removed. |
Tutorial: Testing Folder Redirection
As with all group policy objects, we must run tests to ensure that we are getting the desired results.
-
Log into the domain as a member of the Accounting group from either a Windows 2000 or XP station. For this example, we use our Mac N. Tosh user.
-
After the logon completes, right-click the My Documents folder and choose Properties . ( Note: My Documents is located on the Desktop in Windows 2000 and on the Start Menu for Windows XP ).
-
Inspect the Target field. Normally, you would see a local path such as C:\documents and settings\; however, since we have redirected this folder up to the network, you should see a network path similar to this:

-
Log out and log back in as a different user in the Accounting group. Check the same Properties for My Documents. Again, the folder is redirected to the server instead of the local hard drive ( Note: under some circumstances, you may need to reboot Windows XP/2000 in order for the folder redirection GPO to take effect ).
-
Open My Network Places and browse to our domain controller DC01. The DC01 domain controller is located in Entire Network ˆ’ >Microsoft Windows Network ˆ’ > guinea ˆ’ > DC01 .
-
Inside DC01, double-click the re_accounting shared folder. Notice that you may browse this folder freely .
-
Log out and log back in as a member of a different group, such as Marketing. Check the My Documents Properties. Notice that the location is local, and not up on the network.
-
Now browse to the re_accounting shared folder and double-click it. Windows warns us that we do not have the proper privileges to enter the folder. This satisfies our conditions that only Accounting members have access to this share.
Tutorial: Folder Synchronization
You may have noticed that when you log out of the Windows client, the system tells you that it is synchronizing with the server. The reason for this is that Windows clients have the ability to cache all information going to the redirected folder. So in the event that the server becomes unavailable (due to a bad network cable, for example), the client continues on with minimal interruption. When the server becomes available once again (or when the user logs out of the client), the cached data is synchronized with the server.
To test this, we're going to do something really fun: we're going to try to break something!
-
Log into the domain using our Mac N. Tosh user. Once the logon process completes, unplug the client from the network by disconnecting its ethernet cable. Windows may warn you that a network cable has been unplugged.
-
Double-click the My Documents folder. After a short pause, Windows warns you that you are no longer connected to you domain controller, but that you may continue working normally. This is because Windows will cache all additions and changes to the redirected My Documents folder to the local hard drive. To let you know that Windows is working in offline mode, a new icon appears in the bottom right corner of the screen resembling a computer.
-
Create a new folder inside My Documents . Name it anything you wish. For this example, we name it test folder .
-
Plug the Windows client back into the network.
-
Log out of Windows. A window appears showing the synchronization process.
-
Back on our Windows server, open the re_accounting folder and browse to our Mac N. Tosh's folder. Double-click his My Documents folder. Inside, safe and sound, is the test folder that we created back on the client when the client was disconnected from the network. It was uploaded to the redirected folder on the server as soon as the network connection was restored and we logged out of Windows.
| Get Info | Did you know that you can fine tune the behavior of offline file synchronization? This is, of course, handled through yet another Group Policy Object. It's called Offline Files , and is located in either Computer Configuration or User Configuration under Administrative Templates ˆ’ > Network ˆ’ > Offline Files in the Group Policy Object Editor. |
EAN: 2147483647
Pages: 88