Software Installation GPO
For network administrators, one of the most tedious tasks is software deployment to various client computers. For example, our Marketing Department may need a specific application installed on each computer, while our art department may need a different application. While perhaps a good weight-loss plan, running to and from each department can take up valuable time better spent performing other tasks such as network improvement plans or similar strategies. If only there was a group policy object that could do this but of course there is! Just read the sub-title above!
Windows Server 2003, through GPO and Active Directory, allows an administrator to place software installers on a network server, where they can be automatically installed or simply "advertised" in the Add/Remove Programs control panel.
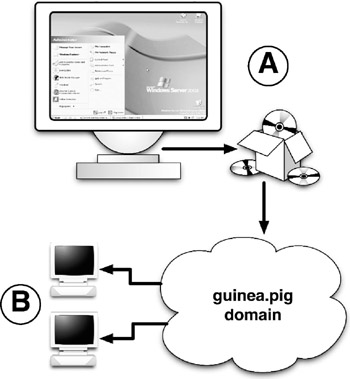
Figure 4-6: Software Installation Group Policy Object.
A : Software installer packages are stored on the network server; in this case, our Domain Controller for the guinea.pig domain. Through a GPO, these installer packages are advertised to the domain.
B . This software becomes available to network clients logging into the domain. It can then be installed on these client computers, eliminating the need to carry installer CDs to each client for installation.
Windows Server 2003 requires that these software installation packages be in a special format, called a Microsoft Installer File (an MSI file). An MSI file is Microsoft's native installation format, and has several key features:
-
Applications install on client computers unattended.
-
Applicators install with elevated privileges even if the user logged in does not have the necessary privileges to install applications.
-
Shortcuts can be placed on the Start Menu and Desktop referring to the new application, and Windows Registry entries are added to the client making the client "aware" of files that may need the new application. The application can then be installed when the user launches a shortcut to the program or opens a file referring to the new application.
-
Applications may be automatically installed upon client logon on Windows XP Professional systems.
-
Instead of the auto-install or shortcut creation described above, applications can simply be advertised in the Add/Remove Programs control panel.
-
The installed applications can be "self-healing." In the event that some or all of the application becomes damaged or deleted, the client simply reinstalls the damaged application from the network.
-
Applications can be easily uninstalled , again all without user or administrator intervention.
Regarding MSI packages, there's good news and there's bad news. The good news is that most software companies package their installers using the MSI standard. This was rare when Microsoft first introduced the standard a few years back. But, the bad news is that not all MSI packages are created equal. There are times when an MSI package will simply not function correctly in the software installer GPO. The reasons for this may range from licensing issues (e.g., you are trying to mass install a copy of software only licensed for a single computer) to a poorly designed MSI file. And, of course, there are still software packages that still do not use the MSI standard.
So what is a good administrator to do? For packages where the MSI package will not work and licensing issues may be involved, consider volume licensing, where a single package is licensed to run on multiple computers. The last thing you want is to run into legal difficulties with the software industry. For software packages that have a poorly written MSI package, or no MSI package at all, consider using an MSI packager that lets you create your own packages. In the days of Windows 2000 Server, Microsoft included just such a program on its server extras CD called WinInstall LE , which was licensed from Veritas Software. Unfortunately, Windows Server 2003 does not include this utility. It is, however, still freely available from its new home at On Demand Software:
http://www.ondemandsoftware.com
For those pesky programs that don't include an MSI package, and don't respond even to an MSI packager, we have the ZAP file . Not to be confused with electrical surge suppression, ZAP files allow the administrator to place non-MSI package files in the Add/Remove Programs control panels of client computers. Keep in mind, however, that ZAP files do not contain the many advantages of MSI files: they do not repair themselves , they cannot auto-install/uninstall, and they require administrator privileges to install and uninstall. Use ZAP files only if you absolutely cannot get an MSI file to work.
Installation Types: Assigned vs. Published
Windows Server 2003 allows for two types of software installation: assigned and published . Recall that MSI packages can either place shortcuts on the client computer's desktop/Start Menu, or they can simply advertise themselves in the Add/Remove Programs control panel. This difference is what distinguishes assigned and published installations. Assigned applications place their shortcuts on the client's computer, and in the case of Windows XP, can be made to auto-install themselves whenever the user logs into the network. Published, on the other hand, simply advertises the application, leaving installation up to the user. If the user needs the application, she may go to the Add/Remove Programs control panel and install it from there. Nothing else is automated, with the exception of application removal if the administrator removes the package from the GPO.
Figure 4-7 explains this further.
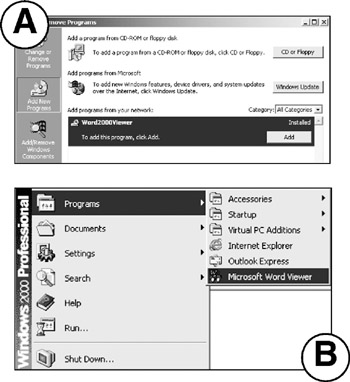
Figure 4-7: Published vs. Assigned Software Installer GPO.
A : Software that is published in the Active Directory becomes available in the Windows Add/Remove Programs control panel under the Add New Programs option. The user may then install it by clicking the Add button. For this example, we see a Word 2000 file viewer.
B : Software that is assigned takes a more active role. When the user logs into the client computer, a shortcut for the Word 2000 viewer is placed on the Start Menu. The instant the user launches the viewer (or double-clicks a Word file), the software is installed to her computer.
User vs. Computer GPO Assignment
As you may have guessed from the subtitle here, software installation GPOs may be applied on a user or computer basis. There are some considerations concerning a user or computer based installation:
-
User based installations may be both published and assigned , while computer based installations may only be assigned .
-
User based installations are installed for every user that logs into the domain in an affected object (most likely an OU). This means that if three people use the same computer and all three belong to the same OU that falls under the software installation's GPO, then all three of those users will install the software, even on the same computer. This can be a burden on users, as some installations can take several minutes to complete.
-
Software that affects each computer independent of the users logging in (e.g., security patches or antivirus software) should be installed at the computer level. Otherwise, the software will be reapplied every time a new user logs into an affected computer in the domain.
Tutorial: Creating an MSI File Using WinInstall LE
For this exercise, let's suppose that you need to be able to install Microsoft's free Word 97/2000 viewer software to your Marketing department. You download the viewer, and find that it does not have an MSI package file with it. You're not ready to throw in the towel and try the ZAP installation method, and so you turn to WinInstall LE. As mentioned earlier, WinInstall LE creates MSI packages for GPO software installations. It does this by taking a before "snapshot" of a sample computer (e.g., before the Word 97/2000 viewer is installed) and then takes an after snapshot (e.g., after the Word 97/2000 viewer is installed). Using the differences between these two snapshots, WinInstall LE gathers data of changes in the Registry and other Windows components and creates an MSI package.
-
Download the Microsoft Word 97/2000 viewer for Windows 95/98/NT from Microsoft's Office downloads site:
http://office.microsoft.com/downloads
Do a search for Word version 2000 and choose Converters and Viewers as shown here:
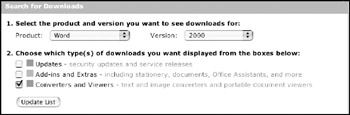
-
On the Windows Server 2003 computer, create a folder inside our public folder named software_installers . This is the folder that will contain our MSI package once it is created.
-
Download WinInstall LE from OnDemand Software's web site:
http://www.ondemandsoftware.com
Get Info When using WinInstall LE, it's best if you install it on a Windows system that is similar, or identical to, your Windows clients that you intend to mass install software. It's also best that your WinInstall LE machine be a "virgin" machine (i.e., a machine onto which little or no other software has been installed). A machine that has had multiple software installs and uninstalls can have a cluttered Registry and hidden files that may contaminate our MSI package creation process.
-
Get a test Windows computer (either Windows XP or 2000) and join it to the guinea.pig domain. Log in as the local administrator ( not a domain administrator), copy both the WinInstall LE and Word viewer installers to this test machine, and install WinInstall LE. You may log in as a local administrator by choosing the this computer option next to the Log on to field, as shown here:
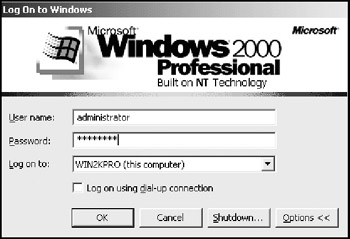
-
Follow the on-screen instructions when installing WinInstall LE. When asked to share WinInstall's folder, leave the field blank and click Next .
-
Launch WinInstall LE by selecting it on the Start Menu under Programs or All Programs . Once the software loads, it displays a multi-paneled window. In the center pane, right-click Windows Installer Packages and choose Packages Directory (Note: you may see two items with this same name . Make sure that you right-click the one with the plus sign next to it ).
-
The default path is a local one, pointing to the local C drive. We must change this to point to our public directory on the Windows Server 2003 machine. In the directory field, type:
\\DC01\public\software_installers
Now, all MSI packages we create from this computer are placed directly on our server.
-
Under the File menu, click Run Discover and click OK . The Welcome screen appears. Click Next .
-
WinInstall asks you to specify both a name and a location for this new package. In the package name field, enter wordviewer . Notice that the the location of this package is automatically filled in to point to our software_installers directory on the server. Click Next .
-
When asked to create a directory, click Yes .
-
WinInstall asks where to keep its temporary files. Use the C drive.
-
The program asks you which drive it should scan. Click the C drive, click Add , and click Next . Click Next on the following two screens, and click Finish .
WinInstall scans your C drive's data and the Windows Registry and makes a database of the data it collects. When it finishes, it informs us that the "before" snapshot is complete. Click OK .
-
WinInstall provides a dialog box to locate the Word viewer installer. Browse to this installer and double-click it. Follow the on-screen instructions and install the Word viewer.
-
Quit WinInstall LE and restart the test computer. When the computer reboots, log back in as the local administrator and run Microsoft Word Viewer , located in Programs on the Start Menu.
Get Info When creating a new MSI package, it's a good idea to restart the computer after installing a new program. It's also a good idea to run the newly installed program, as it still may need to clean up after itself when it is first launched. Remember that we want this installed program to be replicated over our software installer GPO, and that it needs to be in a final installed "state" before we compile it into an MSI package.
-
Quit the Microsoft Word Viewer and launch WinInstall LE. In the center pane, click Windows installer Packages . Under the File menu, click Run Discover and click OK .
-
WinInstall informs us that it is ready to perform the "after" snapshot of the test system. Click Next to proceed.
WinInstall performs a second scan of the system, recording any changes from the first scan. From these changes, it creates our MSI package. Click OK when the scan completes, and quit WinInstall.
Tutorial: Testing the New MSI Package
Now that we have created our MSI installer package, we must test it to ensure that it actually works as expected before we deploy it in the Active Directory.
-
From a different computer connected to the domain, log in as a local administrator.
-
Navigate to the software_installers directory located at:
\\DC01\public\software_installers
-
Double-click the folder labeled wordviewer and locate the MSI installer file, also labeled wordviewer . Most MSI packages have an icon similar to this:

-
Double-click the MSI installer file. Installation of the Word viewer is automatic and requires very little user intervention.
-
Once the installation completes, browse to the Start Menu and verify that Microsoft Word Viewer is present and works.
-
Once you have verified that the Microsoft Word viewer works, remove it via the Add/Remove Programs control panel.
Congratulations! Now that your MSI package works, you're ready to deploy it in the Active Directory.
Tutorial: Deploying the New MSI Package Based on a User GPO Configuration
Recall that there are different circumstances which may help us decide the type of GPO deployment to use (either User based or Computer based). Since a Word viewer does not affect the hardware or operating system (such as with a driver or operating system upgrade), we shall use the User based configuration. We also apply this configuration to our Marketing group in the South Wing OU .
-
On the Windows Server 2003 machine, open Active Directory Users and Computers .
-
In the left pane, right-click the South Wing OU and choose Properties .
-
Click the Group Policy tab and double-click the existing South Wing GPO entry.
-
Once the Group Policy Object Editor appears, expand the Software Settings item under User Configuration in the left column.
-
Right-click the Software Installation icon, point to New , and click Package .
-
A dialog box appears asking for the location of an MSI or ZAP package. Navigate to our Microsoft Word viewer MSI package by clicking My Network Places , and burrowing through Entire Network ˆ’ > Microsoft Windows Network ˆ’ > Guinea ˆ’ > DC01 ˆ’ > public ˆ’ > software_installers ˆ’ > wordviewer ˆ’ > wordviewer.msi . Double-click this MSI package.
-
The computer asks us if we wish to Publish or Assign this package, and presents us with an Advanced option. Since we want this package's attributes to be available upon user logon, choose Assigned and click OK . After a few moments, the wordviewer MSI package appears in the right pane of the GPO Editor.
-
Exit the GPO Editor and click OK on the South Wing OU Properties window. Exit Active Directory Users and Computers .
We now need to make sure that this package installs over the network with users that log in from the Marketing OU.
-
From either a Windows 2000 or XP Professional test computer, log into the guinea.pig domain as a member of the Marketing group. For this example, we log in as Mr. Tye D. Knot (tknot). As the logon process proceeds, you may notice an extra message or two informing you that Windows is applying the software installation settings ( Note: the proper shortcuts are being added to the Start Menu as well as proper Registry information to associate all Microsoft Word files with the new viewer ).
-
Once logged into the domain, go to the Start Menu , point to Programs , and verify that Microsoft Word Viewer is present, and then launch it ( Note: if the viewer is not present, you may need to reboot your test computer ). Instead of the Word viewer program launching, Windows begins installing it automatically. Once the installation completes, the Word viewer launches normally.
To test the resiliency of our MSI package, we shall remove it from the system and observe the system behavior (we're going to try and break something, just as a user on your network might inadvertently do).
-
Quit the Word viewer and remove it from the test system by clicking Remove next to its entry in the Add/Remove Programs control panel.
-
Log out of the test system and then log back in as the same user (tknot for this example).
-
Click the Start Menu and point to Programs . Notice that the Microsoft Word Viewer is back! Launch the Microsoft Word Viewer. Notice that once again the software installs itself and runs! No matter how many times your users try to remove this program, it always comes back. This is the proverbial aspirin for the headache that ails the tired network administrator.
-
Log out of the test computer and log back in as another user in the Marketing group. Go to the Start Menu and launch the Microsoft Word viewer. Notice that it begins its installation all over again. This is because we assigned the software to a User based GPO. Remember that if many different people use this computer, each one must install the software the first time he/she logs into the computer. The Computer based software installation GPO can prevent this.
Tutorial: Deploying the New MSI Package Based on a Computer GPO Configuration
Recall that earlier we mentioned a computer based GPO software installation should be used for software that is to be installed independently of the users logging into the computer. To understand this, we shall use the same Microsoft Word viewer MSI package and apply it to the North Wing OU (Accounting group) based on a computer approach instead of a user approach. When applied, the Word viewer should install upon system boot-up. It does not matter who logs into the computer from that time forward, as the Word viewer is installed at the computer level.
Before we continue, make sure that you have a test computer (either Windows 2000 or XP Professional) that does not have the Microsoft Word viewer installed. Make sure that this test computer is joined to our guinea.pig domain ( Note: see Chapter 4 ). All computers that initially join the domain are kept in a special container called Computers in Active Directory Users and Computers. From there, we may move the computer objects to whatever OU or container we wish, just like any other object in the Active Directory.
-
On the test computer, log into the domain as a member of the Accounting group. For this example, we use Mac N. Tosh. Our test computer's name on the network is winxppro . Shut down the test computer.
-
Back in Windows Server 2003, open Active Directory Users and Computers and expand the North Wing OU.
-
Right-click North Wing , point to New , and choose Organizational Unit . Name this new OU Computers . The new OU appears in the tree of items under North Wing.
-
At the top of the domain tree just below the guinea.pig domain container, click the folder labeled Computers .
-
On the right pane, your test computer in step 1 appears. For this example, the computer's name is winxppro. Drag this test computer to the new Computers OU we just created in step 3, as shown here:
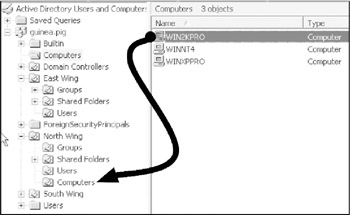
We have just added this computer to our North Wing OU. It now falls under the jurisdiction of the North Wing OU GPO.
-
Edit the North Wing GPO using the Group Policy Object Editor. Expand the Software Settings folder under Computer Configuration instead of User Configuration.
-
Right-click the Software Installation icon, point to New , and click Package . Navigate to the Wordviewer.msi package and double-click it ( Note: Remember to navigate through My Network Places , and not through My Computer ).
-
Since Computer based software installation GPOs cannot be Published, Windows presents only two options: Assigned and Advanced, with the default set to Assigned. Accept the defaults and click OK .
-
Close the Group Policy Object Editor .
-
Start up the test computer. Notice that on the startup window, a new message appears stating that Windows is "installing managed software wordviewer " This tells us that before anyone has even logged into the computer, Windows is already installing our Word viewer software.
-
Log in to the computer as a member of the Accounting group. If all has gone well, the Microsoft Word viewer appears on the Start Menu ˆ’ > Programs (Windows 2000) or Start Menu ˆ’ > All Programs (Windows XP Professional).
-
Log out of the test computer, and then log back in as a different user in the Accounting Group. Notice that Windows does not reinstall the Word viewer a second time for the new user because it was already installed at the computer level.
-
Log out of the test computer and log back in as a user from the Art Group. Notice that the Word viewer is still present, even though this software installation GPO does not apply to the Art Group in the East Wing OU. Again, this is because the software was applied at the computer level and not the user level.
-
Log out and back in as an Administrator of the computer, and not the domain. Remove the Word viewer via Add/Remove Programs and restart the computer. Before you can even log back into the machine, Windows reinstalls the Word viewer.
Tutorial: Removing an MSI Package Through a Software Installation GPO
Let's say that upper management decides to make some changes in the software that our company uses, and that our Word viewer has been given its walking papers. We need to have a way to remove it from all affected computers. As enjoyable as it might sound, we cannot go to each individual computer and remove the software one at a time, as our GPOs will simply reinstall the software when each machine restarts. Thankfully, Windows Server 2003 gives us some simple options to remove software easily from affected clients.
For this tutorial, we remove the Word viewer installed in the previous tutorial. Note that this is a computer based software install and not a user based one, but the process is identical for both types of GPOs.
-
Open the North Wing OU GPO in the Group Policy Object Editor.
-
Click the Software Installation settings under Computer Configuration ˆ’ > Software Settings .
-
On the right pane, the wordviewer MSI package appears. Right-click it, point to All tasks , and choose Remove . Windows gives you two options:
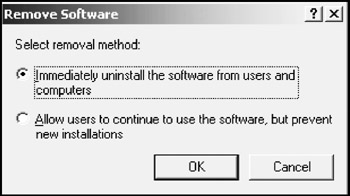
-
Since we wish to completely remove the software from the users' computers, choose the first option and click OK . After a few moments, the wordviewer MSI package disappears from the list.
-
Shut down and restart the test computer from the previous tutorial. The startup status messages state that Windows is "removing managed software wordviewer "
-
Log into the test computer as a member of the Accounting group and ensure that the Word viewer is gone. There should be no trace of it on the Start Menu ˆ’ > Programs (Windows 2000) or Start Menu ˆ’ > All Programs (Windows XP).
To reiterate, the steps for removing software via user based software installation GPOs are the same as what we have done here.
Tutorial: Installing Software Using a ZAP File
So here we are at the last resort of the network administrator trying to install new software on client Windows computers. Our software vendor refuses to package its software using the MSI standard, and try as we might, we just can't get our software to work using WinInstall LE. But we still want to have a central place in which to install software from the network. This is where the ZAP file comes into play.
The ZAP file allows an administrator to publish any standard setup.exe-type file into the Add/Remove Programs Control Panel. This is done by placing an application's setup information in a shared directory on the network and writing a small script describing the location of the setup file. This text file is given the three character extension of .ZAP. The administrator then creates a software installation GPO that points to the ZAP file, which then appears in the client computer's Add/Remove Programs control panel.
Recall, however, that the ZAP file must be installed by an Administrator, or a user with administrative privileges. There are a couple of ways to accomplish this. One way is to delegate some control by adding a user from each department to an administrative group, such as the domain administrators . This gives a user the proper credentials to install software on client computers. However, if you do not wish to delegate that much control, you might want to try applying a GPO to the entire domain containing the ZAP files you wish to install. You may then go from computer to computer and install these items over the network, one at a time by logging in as a domain administrator ( again, if you have a large number of clients, it might be wise to delegate some authority by adding certain users to the domain admins group ).
A ZAP file installation strategy is outlined in figure 4-8 on the following page.
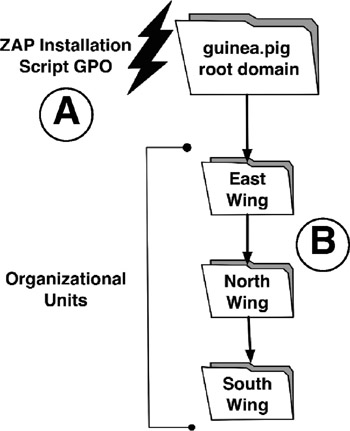
Figure 4-7: A ZAP installation GPO
A : A GPO containing the proper ZAP software installation settings is applied to the root of the domain guinea.pig.
B : The GPO applied in step A propagates throughout the domain, as shown in step B. All users can see the ZAP installers in their Add/Remove Programs control panels, but they are unable to install the software. Only a user with administrative rights can do this.
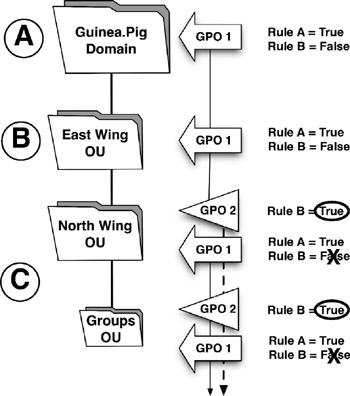
Figure 4-8: GPO Conflict Resolution
A : GPO 1 is applied to the Guinea.pig domain with two rules (A and B) set to True and False, respectively.
B : The East Wing OU is a child object of the parent domain guinea.pig. Therefore, it inherits the settings of GPO 1.
C : GPO 2 is applied to the North Wing OU. Rule B is set to True on this new GPO, conflicting with GPO 1's rule B. The North Wing and its children still inherit GPO 1's settings, but since GPO 2 is closer to the bottom of the domain tree, its conflicting rule B gets priority over GPO 1's rule B. Since rule A has no conflict, North Wing and its children inherit its settings from GPO 1.
-
Before we create the ZAP file, we need to find a software installation package that does not contain an MSI package. Of course, we could use the Microsoft Word viewer in the previous exercises, but for the sake of variety and completeness, let's take a different program. One of the most useful software packages out there is Adobe Acrobat Reader (sometimes called Adobe Reader ), which allows the viewing of cross-platform Portable Document Format (PDF) files. This software is available free of charge from Adobe's web site:
http://www.adobe.com/support/downloads
Be sure to download the version for either Windows XP or 2000. At the time of this writing, the most recent version of the viewer is version 6.0.
-
On the Windows Server 2003 machine, create a folder inside our public\software_installers folder and name it zap_files .
-
Create a folder inside of the zap_files folder and name it reader . Copy the Adobe Reader installer into this folder.
-
We must now create the ZAP text file. The syntax is quite simple, and goes something like this:
[Application] FriendlyName=<appears in Add/Remove Programs> setupcommand=""<network path to setup file>""
Make sure that the network path to the setup file is contained in two sets of quotes. So our ZAP file should look something like this ( Note: the last two lines of the example below should all be on the same line on your system ):
[Application] FriendlyName=Adobe Acrobat Reader setupcommand=""\dc01\public\software_installers\ zap_files\reader\AdbeRdr60_enu_full.exe""
Note that the name of the Reader installer may be different from that shown here, as Adobe releases updates to the software.
Open Notepad located on Start ˆ’ > All Programs ˆ’ > Accessories . Type the information needed for the ZAP file.
-
Save the file with the name reader6.zap into the reader folder we created back in step 3.
-
Open Active Directory Users and Computers and right-click the guinea.pig domain icon in the left pane and choose Properties .
-
Click the Group Policy tab and create a new GPO by clicking New . Name the new GPO ZAP installation GPO .
-
We must add this GPO using a User Configuration instead of a Computer Configuration, as ZAP files are only supported on the User Configuration level. Expand the Software Settings folder under User Configuration, right-click Software Installation , point to New , and click Package .
-
Navigate to the reader folder using My Network Places. When you reach the correct folder, the dialog box appears empty. This is because Windows is looking for MSI files. We must tell it to look for ZAP files. At the bottom of the dialog box is a field labeled Files of Type . Click the down arrow to the right of this field, and choose the option marked ZAW Down-level application packages (*.zap) . The reader6.zap file appears in the dialog box. Double-click it.
-
The Deploy Software dialog box appears. Since ZAP files cannot be assigned, accept the default of Published and click OK . Close the Group Policy Object Editor and OK any dialog boxes.
The ZAP file installer is now available in the Add/Remove Programs control panel of any user in the domain. We must now test the installer on client computers to make sure that it behaves as expected.
-
Log into the domain as Administrator from a client computer. Open Add/Remove Programs and click Add New Programs on the left side of the window.
-
Our Adobe Acrobat Reader installer appears on the right side of the window under Add programs from your network . Click the Add button and proceed with the installation. Remember that only a domain administrator may perform this installation.
EAN: 2147483647
Pages: 88