Connecting Typed DataSets to Live Data
Connecting Typed DataSets to Live DataDataSets on their own are a pretty powerful tool, but a DataSet doesn't do anyone any good without any data. This section shows you the basics of using a DataAdapter to populate a typed DataSet as well as how to use some of the new features of ADO.NET 2.0, such as the TableAdapter component. Filling a DataSet Manually Using a DataAdapterIf you are familiar with working with standard DataSets and DataAdapters, the material in this section should be very familiar to you. A typed DataSet is really just a class that derives from System.Data.DataSet in order to provide a developer with a DataSet that is specific to one schema. As a result of this, any existing code that works on standard DataSets will also work on a typed DataSet, including the DataAdapter. The code in Listing 20.2 shows that you can use a DataAdapter to populate a typed DataSet the same way you would have used one to populate a basic DataSet. Listing 20.2. Populating a Typed DataSet using a Standard DataAdapter
Filling Typed DataSets Using TableAdaptersA TableAdapter can be thought of as a strongly typed DataAdapter that specializes in synchronizing one table between a typed DataSet and the relational back-end database. With previous versions of ADO.NET, Microsoft realized that one of the most common tasks that people performed on DataSets was exchanging data between the DataSet and the database. Using a DataAdapter such as SqlDataAdapter can accomplish this, but the regular DataAdapters are not designed to work with specific types. When you create a TableAdapter using the DataSet designer, that TableAdapter is designed according to your rules for how data should be loaded into the indicated table. To create a TableAdapter, drag one from the Toolbox onto a blank area of the design surface. Though you might initially think so, you can't drag a TableAdapter onto an existing table within your DataSet designer. The reason for this is that the act of dragging a TableAdapter onto the design surface brings up a wizard that prompts you for information on how the adapter can connect to the database, whether it should use stored procedures or SQL statements, and a host of other options. This also will read the schema information from the database and use that to generate the actual table in the DataSet. After being created by the wizard, each TableAdapter starts off with two very important methods:
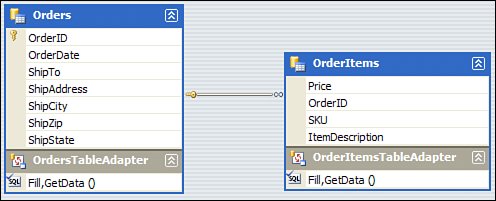
Figure 20.2 shows the design surface after creating two TableAdapters (and, as a result, two strongly typed DataTables) by indicating to the configuration wizard the location of the tables in the database and the queries that should be run by the adapter. Figure 20.2. Connected TableAdapters and their corresponding tables. TableAdapters, despite their direct association with a single strongly typed table, do not appear as nested classes within a typed DataSet. Instead, they show up in their own unique namespace related to the DataSet itself. For example, the DataSet in Figure 20.2 is called ConnectedOrderDataSet. All of the table adapter classes created for that DataSet will appear in a namespace called ConnectedOrderDataSetTableAdapters. The code in Listing 20.3 shows how to use the Fill() methods on TableAdapters to populate a typed DataSet with data retrieved directly from the database. Listing 20.3. Populating a Typed DataSet with TableAdapters
One thing that may seem to be missing from the preceding code is the use of a connection string or a connection at all. This is because when you configured the TableAdapter using the wizard, you specified the connection to use and you also specified the query to use when retrieving data from the table. Other options you can choose during the wizard include giving the TableAdapter the ability to directly send INSERT, UPDATE, and DELETE statements to the database. At the end of the wizard creation, you will see a summary of the actions taken. This typically includes the creation of INSERT, UPDATE, DELETE, and SELECT statements to be used in synchronizing data between the table and the database. This allows you to do things like change a row, call Update() on the TableAdapter, and have the change automatically propagated to the database: orderData.Orders[0].ShipTo = "Modified User"; orderTa.Update(orderData.Orders); Unfortunately, some of the queries that the wizard generates on your behalf aren't the most efficient. You can easily remedy this by supplying your own manually written query to provide the most optimal update experience possible. Take a look at the screenshot of the Query Builder that is integrated directly into Visual Studio in Figure 20.3. As you can see, the query used for the TableAdapter's UpdateCommand property is pretty inefficient. Figure 20.3. The QueryBuilder editing a TableAdapter's UpdateCommand.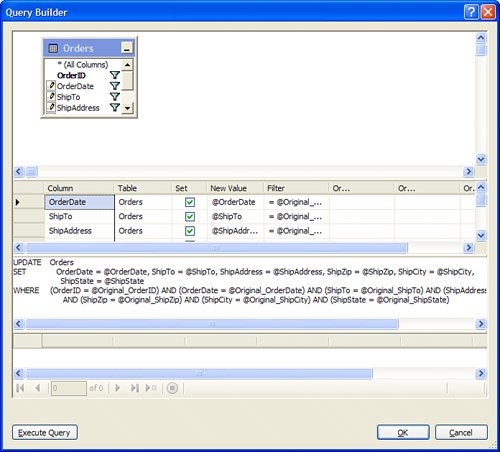 The power at your fingertips with the combination of typed DataSets, the TableAdapter, and the integrated Query Builder is pretty impressive. You can visually design and edit all of the SQL statements (or stored procedures) that will be used when updating and querying the underlying data source. You can combine all of this with the new ability of data adapters to update in batches to create some extremely powerful data access mechanisms with just a few lines of C#. Adding Additional Queries to a Typed DataSetOne of the limitations of the DataAdapter is that it only has room for four commands: INSERT, UPDATE, SELECT, and DELETE. The new TableAdapter recognizes the fact that there may be five or six different ways in which you want to retrieve data with the same schema. For example, at one point in your application you might want only the orders that belong to a specific user, and at another point in the application you might want just the orders placed on a specific date. At the same time, you want to be able to maintain the parent/child relationship between orders and order items. You can do this by creating additional queries and placing them inside the TableAdapter. To add an additional query to an existing TableAdapter, just right-click the TableAdapter on the design surface and choose Add Query. This brings up the query configuration wizard, which first asks if you want to create a new SQL statement, a new stored procedure, or attach your query to an existing stored procedure. You don't have to re-enter any connection information because that is already stored as part of the TableAdapter itself. You will see a dialog prompting you to enter a SQL statement that will be used to populate the data table. You can click the Query Builder button to get a more interactive dialog. You can create a parameterized query here, which will, in turn, create a method on the table that accepts that parameter. In this example, the following query was entered into the dialog: SELECT OrderID, OrderDate, ShipTo, ShipAddress, ShipZip, ShipCity, ShipState FROM Orders WHERE (ShipCity = @City) This query will be used in order to selectively fill the table with orders that were shipped to a specific city. When prompted for the method names for the fill and getdata operations, select something that describes the nature of the operation. In this case, FillByCity and GetdataByCity are descriptive and appropriate. After you add the query to your TableAdapter, you can call that method the same way you would call any other method and pass the filter parameter: orderTa.ClearBeforeFill = true; orderTa.FillByCity(orderData.Orders, "Somewhere"); Console.WriteLine("Orders filtered by city: Somewhere"); foreach (ConnectedOrderDataSet.OrdersRow order in orderData.Orders) { Console.WriteLine("Order {0} Purchased by {1} on {2} with {3} order items.", order.OrderID, order.ShipTo, order.OrderDate.ToShortDateString(), order.GetOrderItemsRows().Length); } The power of being able to create additional parameterized queries exposed as methods on a TableAdapter is something that just hasn't been available to developers until ADO.NET 2.0. The preceding code also demonstrates that the parent-child relationships remain intact when the parent table has been filtered using a custom query. |
EAN: 2147483647
Pages: 298