| Not all of the layer styles can be adjusted. But using a series of sliders, a wheel, check boxes, and radio buttons you can make adjustments to drop shadows, inner and outer glows, and bevels styles. Here then is a quick tour of the Style Settings dialog box controls. (The distance and size slider values are all based on units of pixels.) The Shadow Distance slider quite simply controls the distance that a drop shadow is placed from an object. The larger the number, the more shadow is exposed from behind an object. If the distance is set to 0, the shadow is centered directly under the object and isn't visible. The Outer Glow Size slider lets you increase or decrease the amount of glow radiating out from the edges of an object. The Inner Glow Size slider lets you increase or decrease the amount of glow radiating in from the edges of an object. The Bevel Size slider controls the amount of beveled edge on your object. An inside bevel of 3 will be almost imperceptible, whereas larger values create an increasingly more pronounced bevel effect. The Lighting Angle wheel controls the direction of the light source when a bevel or shadow style is applied. Changing the light angle will change which beveled surfaces are in highlight and which are in shadow, and will also control where a drop shadow falls behind an object (Figure 5.66). Figure 5.66. The Lighting Angle wheel sets a light source for any bevel or drop shadow styles you apply to a layer, and can be set to light any object from any angle. 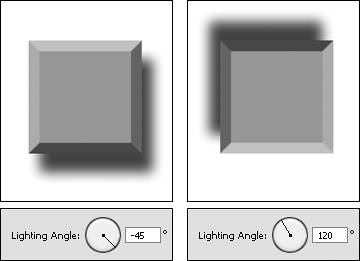
The Use Global Light check box works only if you have bevel or shadow styles applied to more than one layer. If the check box is selected, all the layers will share the same light source; if the light source is changed on one layer (with the Lighting Angle wheel), the light source on all the layers changes at the same time. If the check box is left unselected, a light source can be set independently for each layer (Figure 5.67). Figure 5.67. When the Global Light check box is selected, layer styles on multiple layers will all share the same light source (left). When the check box is deselected, a different light source can be set for each individual layer (right). 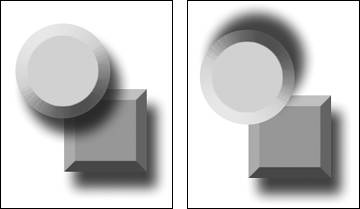
The Bevel Direction radio buttons control the appearance of a bevel style. If the Up button is selected, the bevel will appear to extrude or come forward; if the Down button is selected, the bevel will appear to recede (Figure 5.68). Figure 5.68. When the bevel direction is set to Up, the object bevel appears to come forward (left). When the bevel direction is set to Down, the object bevel appears to recede into the distance (right). 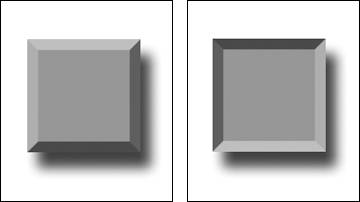
Once you've applied a layer style, you can return to it at any time to modify it, but you also have the option of merging the layer style with its layer by simplifying. In effect, simplifying is like flattening an individual layer. Simplifying a layer permanently applies a layer style to its layer and can help to reduce the complexity and file size of your project. To simplify a layer 1. | On the Layers palette, click to select the layer you want to simplify.
| 2. | From the palette menu on the Layers palette, choose Simplify Layer (Figure 5.69).
Figure 5.69. Once a style is set the way you like it, you can permanently apply it to a layer object by simplifying the layer. 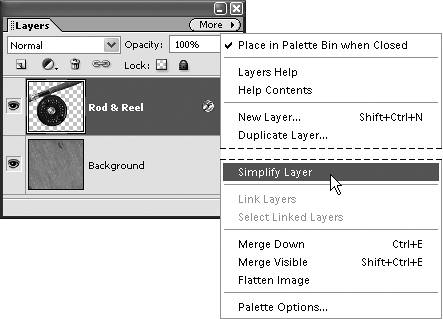
The layer style is merged with the layer, and the Layer Style icon disappears from the layer on the Layers palette.
|
|