Exercise 11-2: The Accelerator for Recruiting
Exercise 11-2: The Accelerator for Recruiting
The Microsoft Office Solution Accelerator for Recruiting deploys a solution to manage both resumes and interviews. The Resume Builder provides a set of tools for managing resumes, and the Interview Manager creates a central location for managing the interview process. The Resume Builder and Interview Manager both come with setup and customization documentation, but for this exercise, you will use your own version, which has been adapted to your particular environment.
Prerequisites
Before beginning this exercise, you should download the installation files for the accelerator from www.microsoft.com/office/solutions/accelerators/default.mspx . Both the Resume Builder and the Interview Manager ship as part of a single installation package. The installation files should be copied to a directory and extracted. All of the installation steps in this exercise assume you have extracted the files. Once the packages are unpacked, you will find the following key items:
-
Microsoft.Solutions.InformationWorker.Recruiting.msi: The accelerator installation package.
-
InterviewManager_DeploymentGuide.doc: A document with installation and customization instructions for the Interview Manager solution.
-
InterviewManager_PlanningGuide.doc: A document to assist in the design and deployment planning of the Interview Manager solution.
-
ResumeBuilder_BuildandTestGuide.doc: A document with installation and customization instructions for the Resume Builder solution.
-
ResumeBuilder_PlanningGuide.doc: A document to assist in the design and deployment planning of the Resume Builder solution.
Installing the Accelerator
The recruiting accelerator ships with a set of generalized instructions designed to work under a variety of conditions. Quite often the instructions require some interpretation for a particular environment. In this exercise, the instructions have been modified to work with your configuration.
The Basic Installation
Both the Interview Manager and the Resume Builder solution are part of the same installation package. This single installation package must be run on the server where SharePoint Services is installed. Although this process is fairly simple, it represents just the beginning of the effort required to successfully install the accelerator.
To perform the basic installation, take these steps:
-
Log in to SPSPortal as a local administrator.
-
Select Start Run.
-
In the Run dialog, click Browse.
-
Select the Microsoft.Solutions.InformationWorker.Recruiting.msi file and click Open .
-
In the Run dialog, click OK.
-
In the Microsoft Office Solution Accelerator for Recruiting wizard, click Next.
-
In the License Agreement step, accept the license agreement and click Next.
-
In the Select Installation Folder step, accept the default settings and click Next.
-
Click Install to begin installation.
-
Open Windows Explorer and navigate to the folder C:\Program Files\Microsoft Solutions\Information Worker\Recruiting\Shared Components .
-
Drag the following assemblies into the Global Assembly Cache (GAC) located at C:\Windows\Assembly :
-
Microsoft.ApplicationBlocks.ExceptionManagement.dll
-
Microsoft.ApplicationBlocks.ExceptionManagement.Interfaces.dll
-
Microsoft.Solutions.InformationWorker.Security.dll
-
Microsoft.Solutions.InformationWorker.Common.dll
-
Microsoft.Solutions.InformationWorker.SoapExceptions.dll
-
RecruitingCommon.dll
-
Installing the Interview Manager Database
The Interview Manager uses a SQL Server database to keep track of open job positions , candidates, and interview assignments. The accelerator ships with a set of sample data that you can use in your exercise; however, you will need to modify this data because the employee data is specific to a Microsoft demonstration. You should take care when working with this data because many different errors can be caused by bad data not properly associated with portal users.
Here are the steps to follow to build the Recruiting database:
-
Log in to SPSPortal as a local administrator.
-
Select Start Run.
-
In the Run dialog, click Browse.
-
Locate the file C:\Program Files\Microsoft Solutions\Information Worker\Recruiting\Interview Management\Database Components\Sample Database\BuildandFillDB.cmd and click Open.
-
In the Run dialog, click OK.
-
When the batch program has finished running, select Start All Programs SharePoint Portal Server SharePoint Central Administration.
-
On the SharePoint Portal Server Central Administration page, select Server Configuration Configure Server Farm Account Settings.
-
On the "Configure server farm account settings" page, note the account listed in the Portal Site Application Pool Identity text box.
Note If you have configured your environment as described in this book, the above account should already have SQL Server access. The following steps assume a log-in for SQL Server exists for the above account. If the account does not have a SQL Server log-in, you must create one.
-
Select Start All Programs Microsoft SQL Server Enterprise Manager.
-
In the SQL Server Enterprise Manager, select Console Root Microsoft SQL Servers SQL Server Group (local)(Windows NT) Security Logins.
-
Locate the account you identified earlier as the "Portal site application pool identity" from SharePoint Portal Server Central Administration.
-
Right-click the account and select Properties from the pop-up menu.
-
On the Database Access tab, locate the Recruiting database.
-
Ensure that the account has access to the Recruiting database with at least the Public role checked.
-
On the General tab, set the default database to Recruiting.
-
Click OK.
-
In the SQL Server Enterprise Manager, select Console Root Microsoft SQL Servers SQL Server Group (local)(Windows NT) Databases Recruiting Users.
-
Locate the account you identified earlier as the "Portal site application pool identity" from SharePoint Portal Server Central Administration.
-
Right-click the account and select Properties from the pop-up menu.
-
In the Database User Properties dialog, click Permissions.
-
On the Permissions tab, ensure that Exec permission is enabled for the following objects:
-
add_CompetencyToJobDescription
-
add_HiringManagerFavoriteInterviewer
-
add_NewCompetency
-
admin_AddCompetency
-
admin_AddCompetencyScale
-
admin_AddJobAssociationDetail
-
admin_AddJobCategory
-
admin_AddJobDescription
-
delete_Competency
-
find_Employee
-
get_Competencies
-
get_Competency
-
get_CompetencyWeight
-
get_CompetencyWeightTypes
-
get_EmployeeIDFromEmail
-
get_EmployeePositions
-
get_EntityOwners
-
get_FeedbackDetail
-
get_FeedbackHeader
-
get_HiringManagerFavoriteInterviewers
-
get_InstanceID
-
get_InterviewFeedback
-
get_InterviewHeader
-
get_InterviewInstanceCompetencies
-
get_Interviewers
-
get_InterviewersSummary
-
get_JobCompetencies
-
get_Jobs
-
get_PositionCandidates
-
remove_CompetencyFromJobDescription
-
remove_CompetencySelectionFromJobDescription
-
remove_HiringManagerFavoriteInterviewers
-
update_Competency
-
update_FeedbackDetail
-
update_FeedbackHeader
-
update_Interview
-
update_InterviewInstanceCompetencySelection
-
update_InterviewInstanceStatus
-
update_InterviewStatus
-
update_InterviewerInstance
-
update_InterviewInstanceComplete
-
update_JobCompetencySelection
-
Setting Up the User Information
Because the data contained in the Interview Manager database is particular to a Microsoft demonstration, you will have to edit it by hand to make it work in your environment. Be careful when editing to maintain database integrity. Do not add or remove rows from the database. Instead, just make changes to the existing records as described in the following procedure:
-
Select Start All Programs Microsoft SQL Server Enterprise Manager.
-
In the SQL Server Enterprise Manager, select Console Root Microsoft SQL Servers SQL Server Group (local)(Windows NT) Database Recruiting Tables.
-
Right-click the Employee table and select Open Table Return All Rows.
-
In the Employee table, modify the AccountName and Email fields to match accounts already defined on your system.
-
Right-click the PersonName table and select Open Table Return All Rows.
-
In the PersonName table, modify the names to match the records previously defined in the Employee table. Figure 11-8 shows an example configuration for both tables.
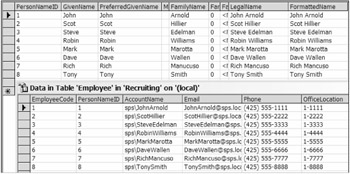
Figure 11-8: The Employee and PersonName tablesNote The PersonNameID field joins the Employee table to the PersonName table. Ensure your modified entries maintain the database integrity.
Installing the Resume Database
The Resume database provides a central store where all submitted resumes reside. Resumes are stored in XML format in a single field. Job candidates will use an InfoPath form to submit resumes to the database.
Here are the steps for creating the Resume database:
-
In the SQL Server Enterprise Manager, select Console Root Microsoft SQL Servers SQL Server Group (local)(Windows NT) Databases.
-
Right-click the Databases folder and select New Database from the pop-up menu.
-
In the Database Properties dialog, name the new database Resume and click OK.
-
Select Tools SQL Query Analyzer from the menu.
-
In the SQL Query Analyzer, select File Open.
-
In the Open Query File dialog, navigate to C:\Program Files\Microsoft Solutions\Information Worker\Recruiting\Resume Builder\Database Components\Sample Database\resume.sql .
-
Click Open.
-
Select Query Execute from the menu.
Configuring Web Services
Both the Interview Manager and the Resume Builder rely on web services to perform correctly. The Interview Manager uses web services extensively to manage the interview competencies, scheduling, and feedback. The Resume Builder uses a web service to facility the submittal of resumes. The following sections configure web services for both solutions.
Configuring the Interview Manager Web Services
Configuring the web services for the Interview Manager is not trivial. To successfully configure these services, you must create several new web sites and modify several configuration files. You should take extra care when performing these steps.
Creating a New Application Pool
The web services associated with the Interview Manager need access to the SQL Database for managing positions, candidates, and interviewers. Therefore, you need to create a new application pool for the web services running under an account that has database access permissions. In this exercise, you will base the new pool on the existing one running your SharePoint Services installation.
Here are the steps to follow to create the new application pool:
-
Log in to SPSPortal as a local administrator.
-
Select Start Administrative Tools Internet Information Server (IIS) Manager.
-
In the IIS Manager dialog, expand the SPSPortal node.
-
Right-click the Application Pools folder and select New Application Pool from the pop-up menu.
-
In the Add New Application Pool dialog, type RecruitingPool .
-
Select to base the new pool on the existing MSSharePointPortalAppPool pool.
-
Click OK.
Creating a New Web Site
The web services associated with the Interview Manager will all run from a new web site. In most cases, services like these will run separately from the SharePoint Services installation. Therefore, you must create a new site running under an unused port number.
-
Log in to SPSPortal as a local administrator.
-
Select Start Administrative Tools Internet Information Server (IIS) Manager.
-
In the IIS Manager dialog, expand the SPSPortal node.
-
Right-click the Web Sites folder and select New Web Site from the pop-up menu.
-
In the Web Site Creation wizard, click Next.
-
In the Web Site Description step, type Recruiting and click Next.
-
In the IP Address and Port Settings step, change the "TCP port this Web site should use" field to 81.
-
Click Next.
-
In the Web Site Home Directory step, click Browse.
-
In the Browse for Folder dialog, navigate to the directory C:\Program Files\Microsoft Solutions\Information Worker\Recruiting\Interview Management\Server Components\Web Services .
-
Click OK.
-
In the Web Site Home Directory step, uncheck the Allow Anonymous Access box.
-
Click Next.
-
In the Web Site Access Permissions step, accept the default values and click Next.
-
Click Finish to complete the operation.
-
In the IIS Manager dialog, right-click the new Recruiting web site node and select Properties from the pop-up menu.
-
On the Home Directory tab, select RecruitingPool from the Application Pool drop-down list.
Creating the Web Applications
The web services associated with the Interview Manager need to have some specific web site configurations in place to work correctly. Each of the services must first function as a separate application. Each of these separate applications must run in the pool you created earlier.
-
In the IIS Manager dialog, right-click the Competencies folder under the Recruiting web site and select Properties from the pop-up menu.
-
On the Directory tab, click Create.
-
Select RecruitingPool from the Application Pool drop-down list.
-
Click OK.
-
Repeat steps 1 through 4 for the following folders:
-
Interview_Data
-
Interview_Exchange
-
Interview_LoopData
-
Configuring the Interview_Data Application
The Interview_Data web application allows access to the primary user interface for managing interview information. This application requires some specific customizations to function correctly.
-
In the IIS Manager dialog, right-click the Interview_Data folder under the Recruiting web site and select Properties from the pop-up menu.
-
On the Directory tab, click Configuration.
-
In the Application Extensions list, select .aspx and click Edit.
-
In the Add/Edit Application Extension Mapping dialog, select the All Verbs option.
-
Click OK.
-
In the Application Configuration dialog, click OK.
-
In the Properties dialog, click the HTTP Headers tab.
-
In the Custom HTTP Headers section, click Add.
-
In the Add/Edit Custom HTTP Header dialog, type MS-Author-Via into the Custom Header Name field.
-
Type DAV into the Custom Header Value field. Figure 11-9 shows the completed dialog.
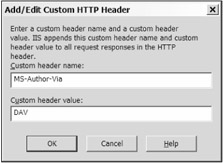
Figure 11-9: The Add/Edit Custom HTTP Header dialog -
Click OK.
-
In the Custom HTTP Headers section, click Add.
-
In the Add/Edit Custom HTTP Header dialog, type DAV into the Custom Header Name field.
-
Type 1,2 into the Custom Header Value field.
-
Click OK.
-
In the Properties dialog, click OK.
-
In the IIS Manager dialog, open the Web Service Extensions folder.
-
Right-click the WebDAV Web service extension and select Prohibit from the pop-up menu.
Modifying the Configuration Files
All of the web services and applications associated with the Interview Manager solution have configuration files that must be modified. In most cases, it is simply a matter of replacing the default web server name with your particular web server. Make these changes carefully to ensure the solution functions correctly.
To modify the configuration files, follow these steps:
-
Select Start All Programs Microsoft Visual Studio .NET 2003 Microsoft Visual Studio .NET 2003.
-
In Visual Studio, select File Open File.
-
In the Open File dialog, navigate to the file C:\Program Files\Microsoft Solutions\Information Worker\Recruiting\Interview Management\Server Components\Web Services\Interview_Data\Web.config .
-
Click Open.
-
When the file opens, select Edit Find and Replace Replace from the menu.
-
In the Replace dialog, enter localhost into the Find What field.
-
Enter SPSPortal:81 into the Replace With field.
-
Click Replace All.
-
When the replacements have been made, click Close.
-
Save and close the file.
-
In Visual Studio, select File Open File.
-
In the Open File dialog, navigate to the file C:\Program Files\Microsoft Solutions\Information Worker\Recruiting\Interview Management\Server Components\Web Services\Interview_Exchange\Web.config .
-
Click Open.
-
When the file opens, select Edit Find and Replace Replace from the menu.
-
In the Replace dialog, enter Exchange_server_name into the Find What field.
-
Enter SPSController into the Replace With field.
-
Click Replace All.
-
In the Replace dialog, enter Domain_name_in_use into the Find What field.
-
Enter sps into the Replace With field.
-
Click Replace All.
-
In the Replace dialog, enter [ExchangeResourcesDirectory] into the Find What field.
-
Enter C:\Program Files\Microsoft Solutions\Information Worker\Recruiting\Interview Management\Server Components\Web Services\Interview_Exchange into the Replace With field.
-
Click Replace All.
-
When the replacements have been made, click Close.
-
Save and close the file.
-
In Visual Studio, select File Open File.
-
In the Open File dialog, navigate to the file C:\Windows\Microsoft.NET\Framework\v1.1.4322\CONFIG\machine.config .
-
Click Open.
-
Locate the following code in the file:
<!- use this section to add application specific configuration example: <appSettings> <add key="XML File Name" value="myXmlFileName.xml" /> </appSettings> ->
-
Modify this code section to appear as follows :
<appSettings> <add key="Microsoft.Solutions.InformationWorker.Recruiting.Exchange.UserID" value="sps\Exchange_account_name"/> <add key="Microsoft.Solutions.InformationWorker.Recruiting.Exchange.Password" value="Exchange_account_password"/> </appSettings>
-
Replace Exchange_account_name and Exchange_account_password with a user name and password that will act as the master meeting organizer for the system.
Note You can use any existing account to coordinate the meetings. In an actual deployment, you would create an account specifically for this task.
-
Save and close the file.
-
Restart IIS.
Creating the Resume Builder Web Service
The recruiting accelerator ships with a web service specifically for the Resume Builder component, but the service is unsupported. Furthermore, the service uses customizations that were intended for a Microsoft demonstration. It is exceedingly difficult to get the service to work. Therefore, you will create your own simple service in this exercise.
Creating a New Web Site
Your web service will be a simple one to populate the Resume database. It will use a new site separate from the other components. Therefore, you must create a new site for the service.
-
In the IIS Manager dialog, right-click the Web Sites folder and select New Web Site from the pop-up menu.
-
In the Web Site Creation wizard, click Next.
-
In the Web Site Description step, type Resume and click Next.
-
In the IP Address and Port Settings step, change the "TCP port this Web site should use" field to 88.
-
Click Next.
-
In the Web Site Home Directory step, click Browse.
-
In the Browse for Folder dialog, navigate to the directory C:\ .
-
Click Make a new Folder.
-
Name the new folder ResumeService .
-
Click OK.
-
In the Web Site Home Directory step, click Next.
-
In the Web Site Access Permissions step, click Next.
-
Click Finish to complete the operation.
Creating the Web Service
Your custom web service will use a single method to accept XML and save it out to the Resume database. The database has some required fields and a dependency between the two tables that it contains. Your web service will consist mainly of an insert operation necessary to upload the resume and maintain the database integrity.
To create the custom web service, follow this procedure:
-
Select Start All Programs Microsoft Visual Studio .NET 2003 Microsoft Visual Studio .NET 2003.
-
In Visual Studio, select File New Project.
-
In the Add New Project dialog, click the Visual Basic Projects folder.
-
Select ASP.NET Web Service from the Templates list.
-
In the Location text box, type http://SPSPortal:88/ResumeWebService .
-
Click OK.
-
When the new project is created, rename the file Service1.asmx as Submit.asmx .
-
Open Submit.asmx in Visual Studio for editing.
-
Rename the web class Submit .
-
Create a single web method in your web service to submit the resume. Listing 11-3 shows how your final web service code should appear.
Listing 11-3: Web Service for Resume Submittal

Imports System.Web.Services <System.Web.Services.WebService (Namespace:="http://tempuri.org/ResumeWebService/Service1")> _ Public Class Submit Inherits System.Web.Services.WebService <WebMethod()> _ Public Function SubmitResume(ByVal strXML As String) As String Try Dim UserName As String = "sa" Dim Password As String = "" 'Set up connection string from custom properties Dim strConnection As String strConnection += "Password=" & Password strConnection += ";Persist Security Info=True;User ID=" strConnection += UserName + ";Initial Catalog=Resume" strConnection += ";Data Source=(local)" 'Create the insert statement Dim ResumeName As String = "Admin" + Now.ToString Dim strSQL As String = _ "INSERT INTO tblUser (username,password) " + _ "VALUES('" + ResumeName + "','password')" 'Insert user name Dim objCommand As New System.Data.SqlClient.SqlCommand With objCommand .Connection = New _ System.Data.SqlClient.SqlConnection(strConnection) .Connection.Open() .CommandText = strSQL Dim intRows = .ExecuteNonQuery() .Connection.Close() End With strSQL = _ "INSERT INTO tblResume " + _ " (owner,name,description,lastChanged,DocData) VALUES('" + _ ResumeName + "','" + _ ResumeName + "','test resume','" + Now + "','" + strXML + "')" 'Insert resume With objCommand .Connection.Open() .CommandText = strSQL Dim intRows = .ExecuteNonQuery() .Connection.Close() End With Return "" Catch x As Exception Return x.Message End Try End Function End Class -
Build the web service.
-
Close Visual Studio.
Configuring InfoPath Forms
All of the InfoPath forms associated with the recruiting accelerator need to be customized to work properly. In some cases, all you have to do is substitute some particular values for placeholders in the configuration. In other cases, you have to make significant changes.
Configuring the Interview Manager InfoPath Forms
The Interview Manager uses InfoPath forms extensively to manage the competencies, scheduling, and feedback of interview information. In order for members of the interview team to have access to the forms, they must be part of the web site. After that, some specific changes must be made to each form so that they will function in your environment.
Creating the InfoPath Web
The site for the Interview Manager InfoPath forms is created as a virtual directory on the Recruiting web site. The key to providing access to these forms is to ensure that the physical directory has the proper access permissions. In this exercise, you must give all users read and write access to the virtual directory.
To create the InfoPath web, follow these steps:
-
In the IIS Manager dialog, right-click the new Recruiting web site node and select New Virtual Directory from the pop-up menu.
-
In the Virtual Directory Creation wizard, click Next.
-
In the Virtual Directory Alias step, type Solutions and click Next.
-
In the Web Site Content Directory step, click Browse.
-
In the Browse for Folder dialog, navigate to the directory C:\Program Files\Microsoft Solutions\Information Worker\Recruiting\Interview Management\Client Components\InfoPath Forms .
-
Click OK.
-
In the Web Site Content Directory step, click Next.
-
In the Virtual Directory Access Permissions step, accept the default values and click Next.
-
Click Finish to complete the operation.
-
Open Windows Explorer and navigate to the directory C:\Program Files\Microsoft Solutions\Information Worker\Recruiting\Interview Management\Server Components\Web Services\Interview_Data .
-
Right-click the Interview_Data folder and select Properties from the pop-up menu.
-
In the Properties dialog, click the Security tab.
-
On the Security tab, click Add.
-
In the Select Users, Computers, or Groups dialog, type Everyone .
-
Click OK.
-
In the Permissions for Everyone list, check the following permissions:
-
Read & Execute
-
List Folder Contents
-
Read
-
Write
-
-
Click OK.
Configuring the InfoPath Forms
The Interview Manager InfoPath forms are all configured for a generic localhost server. In order for them to work properly, you must modify them to work with your particular server. This requires you to edit a resource file for the forms by hand.
Here is what you need to do to configure the InfoPath forms:
-
Open Windows Explorer and navigate to the directory C:\Program Files\Microsoft Solutions\Information Worker\Recruiting\Interview Management\Client Components\InfoPath Forms .
-
Right-click the file CompetencySolution.xsn and select Design from the pop-up menu.
-
On the Microsoft InfoPath menu, select Tools Resource Manager.
-
In the Resource Manager dialog, select the file resource.xml and click Export.
-
In the Export dialog, navigate to My Documents and click Save.
-
In the Resource Manager dialog, click OK.
-
Select Start All Programs Microsoft Visual Studio .NET 2003 Microsoft Visual Studio .NET 2003.
-
In Visual Studio, select File Open File.
-
In the Open File dialog, navigate to the resource.xml file and click Open.
-
When the file opens, select Edit Find and Replace Replace from the menu.
-
In the Replace dialog, enter localhost into the Find What field.
-
Enter SPSPortal:81 into the Replace With field.
-
Click Replace All.
-
Save and close the file.
-
On the Microsoft InfoPath menu, select Tools Resource Manager.
-
In the Resource Manager dialog, click Add.
-
In the Add File dialog, navigate to the resource.xml file and click OK.
-
When prompted, select to replace the existing file.
-
Save and close the file.
-
Repeat steps 2 through 19 for the files Interview_FeedbackSolution.xsn and Interview_ManagerSolution.xsn .
Configuring the Resume Builder InfoPath Form
The Resume Builder provides an InfoPath form that candidates can use to submit resumes online. For this exercise, you will need to edit the resource file to make it work with your configuration. Then you will copy it to the Recruiting web site.
-
Open Windows Explorer and navigate to the directory C:\Program Files\Microsoft Solutions\Information Worker\Recruiting\Resume Builder\Templates\InfoPath Form .
-
Right-click the file Resume_InfoPath.xsn and select Design from the pop-up menu.
-
From the InfoPath menu, select Tools Submitting Forms.
-
In the Submitting Forms dialog, click the option Enable Submit.
-
Click Select a Web Service.
-
In the Submit to Web Services wizard, type http://spsportal:88/ResumeWebService/Submit.asmx?WSDL .
-
Click Next.
-
Select the SubmitResume operation and click Next.
-
Click Modify.
-
In the Select a Field or Group dialog, open the StructuredXMLResume folder and select the ExecutiveSummary node.
-
Click OK.
-
Click Next.
-
Click Finish to complete the operation.
-
In the Submitting Forms dialog, click OK.
-
Save and close the file.
-
Copy the Resume_InfoPath.xsn file to the directory C:\Program Files\Microsoft Solutions\Information Worker\Recruiting\Interview Management\Client Components\InfoPath Forms .
Installing Web Parts
The Recruiting site relies heavily on three different web parts to present open job positions, candidate information, and interview feedback. These web parts must be installed and marked as safe before you can use them in the site. This process should be familiar by now, as it is similar to work you have done throughout the book.
-
Log in to SPSPortal as a local administrator.
-
Open Windows Explorer and navigate to the directory C:\Program Files\Microsoft Solutions\Information Worker\Recruiting\Interview Management\Server Components\webparts\assemblies .
-
Drag the two assemblies located in this folder to the GAC located in C:\Windows\assembly .
-
Create a new folder for the web part resources at C:\Program Files\Common Files\Microsoft Shared\web server extensions\wpresources\InterviewWebParts\1.0.0.0__31bf3856ad364e35 .
-
Copy the GIF files located in C:\Program Files\Microsoft Solutions\Information Worker\Recruiting\Interview Management\Server Components\webparts\InterviewWebParts\resources to the resource folder you just created.
-
Select Start All Programs Microsoft Visual Studio .NET 2003 Microsoft Visual Studio .NET 2003.
-
In Visual Studio, select File Open File.
-
In the Open dialog navigate to the file C:\inetpub\ wwwroot \web.config and click Open.
-
In the <SafeControls> section, add the following entry to allow the web parts to run:
<SafeControl Assembly="InterviewWebParts, Version=1.0.0.0, Culture=neutral, PublicKeyToken=31bf3856ad364e35" Namespace="Microsoft.Solutions.InformationWorker.Recruiting" TypeName="*" Safe="True" />
-
Save and close the file.
-
In Visual Studio, select File Open File.
-
In the Open dialog, navigate to the file C:\Program Files\Microsoft Solutions\Information Worker\Recruiting\Interview Management\Server Components\webparts\InterviewWebParts\dwp\Candidates.dwp and click Open.
-
When the file opens, select Edit Find and Replace Replace from the menu.
-
In the Replace dialog, enter localhost into the Find What field.
-
Enter SPSPortal:81 into the Replace With field.
-
Click Replace All.
-
In the Replace dialog, enter c:\inetpub\wwwroot\webparts\InterviewWebParts\resources into the Find What field.
-
Enter C:\Program Files\Microsoft Solutions\Information Worker\Recruiting\Interview Management\Server Components\webparts\InterviewWebParts\resources into the Replace With field.
-
Click Replace All.
-
Save and close the file.
-
Repeat steps 13 through 20 for the files InterviewFeedback.dwp and Positions.dwp .
-
Restart IIS.
Creating the Recruiting Site
Once all the components of the accelerator are installed and configured, you can create the Recruiting site. The site consists of three web parts to display the key information and links to access the InfoPath forms. All aspects of the recruiting process begin by accessing the site.
To create the Recruiting site, take these steps:
-
Log in to SPSPortal as a member of the Administrator site group.
-
Open the portal home page in Internet Explorer.
-
On the portal home page, click the Sites link.
-
From the Site Directory, click the Create Site link under the Actions list.
-
On the New SharePoint Site page, give your new site the title Recruiting and designate a URL.
-
Click Create.
-
On the Add Link to Site page, fill in any options you want and click OK.
-
On the Template Selection page, select Team Site and click OK.
-
On the Recruiting site home page, select Modify Shared Page Add Web Parts Import.
-
In the Add Web Parts pane, click Browse.
-
In the Choose File dialog, navigate to the file C:\Program Files\Microsoft Solutions\Information Worker\Recruiting\Interview Management\Server Components\webparts\InterviewWebParts\dwp\Positions.dwp .
-
Click Open.
-
In the Add Web Parts pane, click Upload.
-
Drag the web part into a pane on the page.
-
Repeat steps 10 through 14 for the files Candidates.dwp and InterviewFeedback.dwp .
-
On the Candidates web part, select Modify Shared Web Part from the drop-down menu.
-
When the Candidates web part enters design mode, select Connections Candidate Consumer Positions from the drop-down menu.
-
On the Interview Feedback web part, select Connections Interview Feedback Consumer Candidates from the drop-down menu.
-
Close the Web Part pane.
-
Using the Links web part, add a link to the online resume at http://spsportal:81/Solutions/Resume_InfoPath.xsn .
-
On the Recruiting home page, click the Site Settings link.
-
On the Site Settings page, select Administration Manage users.
-
On the Manage Users page, click the link Add Users.
-
On the Add Users page, enter the user names for the accounts to access the Recruiting site.
-
Check the Contributor site group.
-
Click Next.
-
On the Add Users page, click Finish.
Using the Recruiting Site
Once the site is created, you are ready to initiate a mock interview process. The site you have created can be used to submit resumes and manage the interview process. Here is a simple series of steps to get started with the process:
-
Log in to SPSPortal as the local administrator.
-
Select Start All Programs Microsoft SQL Server Enterprise Manager.
-
In the SQL Server Enterprise Manager, select Console Root Microsoft SQL Servers SQL Server Group (local)(Windows NT) Databases Recruiting Tables.
-
Right-click the Employee table and select Open Return All Rows from the pop-up menu.
-
In the Employee table, identify the account that is associated with the PositionID of 6. This is the hiring manager for the exercise.
-
Log in to SPSClient as the hiring manager.
-
Open the portal in Internet Explorer and navigate to the Recruiting site.
-
On the Recruiting home page, click Customer Service Representative.
Note If you do not see the Customer Service Representative position, then you are not logged in as the hiring manager.
-
In the Candidates web part, click the Open link in the Plan Interview column. Figure 11-10 shows the Candidates web part.
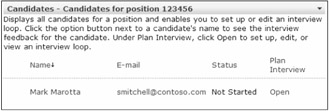
Figure 11-10: The Candidates web part -
In the "Select interviewers for this interview loop" section of the InfoPath form, click Select All.
-
In the task pane, click the link "Save or send interview notices."
-
In the Save or Send Interview Notices dialog, select the option to Save the Form Only.
-
Uncheck the Close Interview Manager box and click OK.
-
In the task pane, select the Schedule Interviewers link.
-
Create an interview schedule using the scheduling tools.
-
In the task pane, click the link "Save or send interview notices."
-
In the Save or Send Interview Notices dialog, select the option to "Save the form and send interview notices."
-
Uncheck the Close Interview Manager box and click OK.
-
In the task pane, click the link Select Competencies.
-
Check all of the competencies on the form.
-
In the task pane, click the link "Save or send interview notices."
-
In the "Save or send interview notices" dialog, select the option to Save the Form Only.
-
Click OK.
-
Return to the hiring portal and refresh the page. Verify that the interviewers are set up in the page.
-
Log in to SPSClient using one of the accounts that you scheduled for as an interviewer.
-
Open Microsoft Outlook and accept the interview meeting.
-
In the meeting request form, click the link to provide interview feedback.
-
From the Recruiting site, click the link for the online resume.
-
When the online resume appears, fill out the form.
-
When you have filled out the form, select File Submit.
EAN: N/A
Pages: 92