Customizing with Microsoft FrontPage
Because SPS is built on top of SharePoint Services, most of the items in SPS are accessible in some way from Microsoft Office 2003. Later in the book, I will go into detail about exactly how the standard products like Word, Excel, and Outlook integrate with SharePoint Services. But for now, I will focus primarily on the content-creation capabilities that Microsoft FrontPage 2003 brings to your portal solution.
| Caution | If you must support browsers other than Internet Explorer, you should work closely with those browsers to ensure that pages appear correctly when created with FrontPage. |
Although SPS offers several ways to create and manage content, if you are a web developer, you will likely find them too limiting. In my experience, companies want their intranets to look and feel much like their existing corporate site on the Internet. This means that we need more control over the content and the layout of pages. This is the real reason to use Microsoft FrontPage in conjunction with SPS.
You can open the portal site directly from a URL by selecting File Open Site. When you open the URL, FrontPage displays a folder list view that shows all of the areas, sites, libraries, and lists defined in the portal. Figure 4-14 shows a typical folder list for a portal.
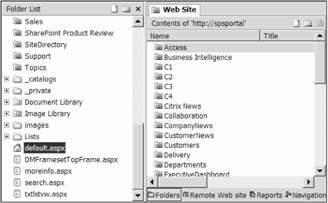
Figure 4-14: Viewing the portal structure
Opening the portal home page within FrontPage will give you an idea of the structure and elements available for editing. From the folder list, you can right-click a file and select Open from the pop-up menu. If you do this, you will see the same portal home page you are used to, but all of the elements are exposed for editing. You'll see, for example, that you could easily type directly into the page to edit content. You'll also notice that the landscape is complicated. Before you start making significant changes, you'll need to understand several aspects of page design; however, my goal is to provide only a brief overview of the major design tools you will need to work with pages in the portal.
Designing a New Page
Adding a page to an existing web site is a simple matter of selecting File New from the menu. When you make this selection, FrontPage opens a task pane with a list of new items you can create. This introduces one of the most important new metaphors in FrontPage. Many of the tasks in FrontPage are accomplished through task panes. Task panes are similar in functionality to a dialog box, but they remain visible even after you finish the immediate operation. Multiple task panes stack up in a queue like web pages in a browser. You can navigate the task panes by using the back, forward, and home buttons within the pane or the drop-down menu at the top of the pane.
Once the new page is added, you may start designing it. Before you start creating sites that integrate directly with SharePoint Services, you'll review some of the basic page-creation tools in FrontPage. These tools will be useful later when you are working with more complicated pages.
When starting a new page, many web designers will create a prototype page using a graphics program such as Adobe Photoshop. Then they cut the image apart to create the graphics for the new page. This is especially helpful if you have an existing web site and are trying to make the new page match that look and feel. As I mentioned earlier, this is often the case with intranets ”they must match the look and feel of the corporate Internet site. You can get help with this effort by making use of a tracing image in FrontPage.
Tracing images allow you to take a JPEG, GIF, PNG, or BMP file and use it like tracing paper to help with the layout and design of a page. In order to set a tracing image, you must have the page in design view, which is controlled by a set of buttons underneath the page, as shown in Figure 4-15. Once in design view, the tracing image is set by selecting View Tracing Image Configure from the FrontPage menu. When you configure the tracing image, you select the file to act as the image, its position on the page, and its opacity.

Figure 4-15: Setting a tracing image
Once you have a tracing image in place, you will want to construct the layout of the page to define the areas where content will be placed. Microsoft FrontPage allows you to set up multiple complex regions for content using layout tables. Layout tables are similar to any HTML table, but they are specifically intended to help layout content regions on the page. Inserting a layout table into a page is done by using a task pane. The layout table task pane can be opened by selecting Table Layout Tables and Cells .
Within the task pane, you can choose to create your own layout tables or use the predefined layouts in the pane. Generally , the predefined layouts are sufficient because several different kinds are available. Even if these are not exactly what you want, you can modify the layouts once they are applied to the page.
To utilize Layout Tables and Cells, take these steps:
-
Select Start All Programs Microsoft Office Microsoft Office FrontPage 2003 to open Microsoft FrontPage.
-
From the main menu, select File Open Site.
-
In the Open Site dialog, type http://spsportal and click Open.
-
When the site opens, make sure the folder list is visible by selecting View Folder List from the main menu.
-
Using the folder list, examine the sites, lists, and libraries defined in the site.
-
Open the New task pane by selecting File New from the main menu.
-
In the New task pane, click Blank Page to add a new page to the site.
-
Open the Layout Tables and Cells task pane by selecting Table Layout Tables and Cells.
-
In the Layout Tables and Cells task pane, click a new layout from the Table Layout section with a top title row that spans the entire page and a navigation column that spans the left side of the page.
-
Click your mouse inside the top row.
-
In the task pane, select New Tables and Cells Insert Layout Cell .
-
In the Insert Layout Cell dialog, accept the default values and click OK to insert the new cell.
-
When the new cell appears, click Cell Formatting.
-
In the task pane, click Cell Properties and Borders.
-
In the task pane, change the BgColor drop-down list to blue.
-
Click the sizing handle and make the cell fill the entire available area within the layout table.
-
In the task pane, click Cell Corners and Shadows.
-
Select to round the upper-right corners of the cell.
-
Place cells in the layout so that the page has a blue title area and blue navigation area. Figure 4-16 shows my final page.
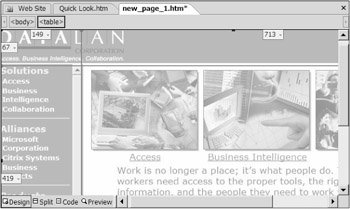
Figure 4-16: Table and cell layout
Once the initial layout is complete, adding text is a simple matter of typing directly into the cells. You can format the font style directly from the editor using the same approach as you would in Microsoft Word. For images, you may either place the image directly in a cell, or make use of layers to position images. Layers are floating frames that can be positioned anywhere on the page. You can add a new layer from the Insert menu. Once added, you can drag the layer around the page and position it exactly where you want it. Using the layouts and layers, you can rapidly put a page together over a tracing image.
Working with Data Sources
Once you have an idea of how to use the basic layout tools, you will want to be able to add more interesting content than just text and graphics. Microsoft FrontPage in conjunction with SharePoint Services supports the ability to create XML data sources that you can use in your web pages. This capability allows you to connect directly with SQL databases, XML sheets, SharePoint lists, and other sources to display dynamic data sets. Using FrontPage, you can display the data without ever writing code.
The key to using dynamic data sets in your web pages is to make use of the Data Source Catalog and the Data View web part. The Data Source Catalog acts as an agent for mapping access to any number of data sources that can provide XML data sets. The Data View web part is the component that displays those data sets on the page.
When the Data View web part is displaying an XML data set, it has the ability to format the data set based on the eXtensible Stylesheet Language Transform (XSLT). This means that you can use the FrontPage what you see is what you get (WYSIWYG) editor to format columns , colors, and styles for a data set. You can also use conditional format to change the style of a data cell when it reaches certain parameters. In this way, you can call attention to outlying data in the set.
Using XML data sets begins with the Data Source Catalog. You can access the Data Source Catalog by selecting Data Insert Data View from the main menu in Microsoft FrontPage. The catalog lists all of the available XML data sources. If you have an existing SharePoint Service site open in FrontPage, you'll notice that all of the lists and libraries in the site are available for use as data sources. In addition to these sources, you'll also see support for database connections, XML files, server-side scripts, and web services. Figure 4-17 shows a typical Data Source Catalog.
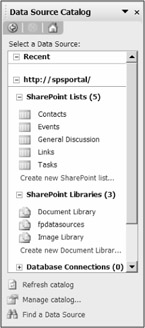
Figure 4-17: The Data Source Catalog
When using the Data Source Catalog, you are not limited to the lists and libraries associated with the site that is currently open. You can either create new lists and libraries directly or utilize list and libraries from other sites within the portal structure. If you click either the Create New SharePoint List or the Create New Document Library link, you will open a dialog that allows you to add a new list, library, or survey to the Data Source Catalog. If you instead want to add an element from another site, you can click the Manage Catalog link to add a new source. From this link, you can add a reference to another SharePoint site, which will import all of the data sources defined for that site.
If the data source you want to use is not a SharePoint element already, you will have to spend some time setting up the source before it can be used. Most of the data sources are set up in a similar fashion that begins by clicking the Add to Catalog link, which appears just below the data source type you want to use.
To add a database connection, follow these steps:
-
From the FrontPage main menu, select Data Insert Data View to open the Data Source Catalog pane.
-
In the Data Source Catalog, expand the Database Connections node.
-
Click the link Add to Catalog just beneath the node to open the Data Source Properties dialog.
-
On the General tab, name the connection pub authors .
-
On the Source tab, click the Configure Database Connection button.
-
In the Configure Database Connection dialog, enter spsportal in the Server Name text box.
-
In the Authentication section, enter a valid user name and password to access the SQL Server installation.
-
Click Next .
-
On the next step, select the Pubs database from the drop-down list and select the Authors table from the list.
-
Click Finish.
-
On the Source tab, click Fields.
-
In the Displayed Fields dialog, remove the field au_id from the set of displayed fields and click OK.
-
On the Source tab, click Sort .
-
In the Sort dialog, select to sort the fields by au_lname and click OK.
-
In the Data Source Properties dialog, click OK to complete the definition of the new data source.
When using a database connection as a data source, it is generally not a good idea to save the credentials directly in the database connection. Instead you can use Windows authentication to verify access credentials at the time the data is accessed in the web site. However, if you go down this path , you will have to set up credentials in the database for each user. A better mechanism for authentication is to use the Microsoft Single Sign-On (SSO) service. This service allows you to set up a master set of credentials just for accessing such data sources. Later in the book, I'll cover the setup and usage of SSO when I discuss creating custom web parts .
Once the data source is defined, adding it to the page is a simple matter of dragging the source from the catalog to the page. Once you drop the data source onto the page, FrontPage adds the server-side code necessary to access the data source and display the data. Because the page now contains server-side code, you may be prompted to rename the page to contain an ASPX extension. The ASPX extension is required for the page to be recognized as containing serverside code.
Working with Data Views
Once the data set is visible on the page, you can make changes to the presentation directly in the page. Changing font styles, font sizes, and column header names can be done using the same techniques as in a word processor. A drop-down menu also becomes available in the upper-left corner of the table. This drop-down menu gives you the ability to sort and filter the data as well as change the presentation style. From this menu, you can also apply conditional formatting to call out values in the data set that need attention.
Selecting Style from the drop-down menu opens the View Styles dialog. In this dialog, you may choose to apply one of several predefined styles that arrange the tabular data in various reporting formats. You can also change the paging, add headers and footers, as well as add a sort/filter toolbar to the header of the table. This gives your data view some flexibility to support the reporting needs of the intended users.
Selecting Sort and Group from the drop-down menu opens the Sort and Group dialog. In this dialog, you can select the fields to sort the tabular data. You can pick multiple fields for the sort and apply a grouping to the sorted data.
Selecting Filter from the drop-down menu opens the Filter Criteria dialog. In this dialog, you can specify the filter to apply when the page is viewed . Using this dialog, you may apply several different criteria nested together. As you might expect, this is essentially a SQL query tool that applies to the data view.
Using conditional formatting, you can highlight a cell when it has values that meet certain criteria. To get started, you have to select the table, column, or cell where you want to apply the formatting. After selecting the values, you can pick Conditional Formatting from the drop-down menu. This in turn opens the Conditional Formatting pane. In the pane, you click Create to build the conditions.
Building conditional formatting rules is very similar to building filter rules. You can specify the fields and conditions that trigger the formatting. Once the rules are defined, FrontPage opens a style dialog that you can use to change the font, size , and color of the data to call it out in the table.
Not only can you apply sorts, filters, groups, and formatting in the data view, but you can apply them to the data source as well. In the Data Source Catalog, you can use the drop-down list associated with a data source and select Show Data. This action opens the data in the task pane and presents the same options as you find in the drop-down menu on a page.
Although data views can stand alone on a page like a report, they also have the ability to interact with other data sources. For example, you can have one data view that displays names and another data view that displays contact information. Selecting a name from the first data view causes the contact information to show in the second data view. This is the same concept of connecting web parts that you saw when you modified pages directly in SPS. The biggest difference between connecting web parts in FrontPage versus SPS is that FrontPage can connect web parts from two different web pages. SPS can only connect web parts that are on the same page.
You can connect two data views by selecting Web Part Connections from the drop-down menu associated with either of the views. Microsoft FrontPage responds by running a wizard that helps you make the connection. The wizard walks you through the process of selecting the fields to connect and the behavior for each part. The wizard also allows you to select a connection with a web part that is on a different page.
One of the major challenges of portal development is the integration of systems within the portal. I have found that data views are the easiest way to take data from disparate systems and present them together in a meaningful way. Furthermore, because they do not require any programming, they are pretty simple to get up and running. This capability is the single biggest reason to use FrontPage in your portal development.
Here is what you need to do to work with data views:
-
In Microsoft FrontPage, select File New.
-
In the New pane, click Blank Page.
-
Open the Data Source Catalog by selecting Data Insert Data View.
-
From the Data Source Catalog, drag the Pub Authors data source onto the new page and drop it.
-
Select the table on the page and locate the drop-down menu.
-
From the drop-down menu, select Style to open the View Styles dialog.
-
On the Options tab, check the box Show Toolbar Options For:.
-
Click OK.
-
From the table's drop-down menu, select Filter to open the Filter Criteria dialog.
-
In the Filter Criteria dialog, click the link "Click here to add a new clause."
-
In the Field Name list, select au_lname .
-
In the Comparison list, select Begins With.
-
In the Value list, select [Input Parameter].
-
Click OK.
-
Select File Save and save the new page.
-
Select File Preview in browser to see the new page.
Creating and Consuming a Web Service in FrontPage
Earlier in this chapter, I noted that web services were one of the data sources that could be used by Microsoft FrontPage. It turns out that web services are useful in many other aspects of portal development. Later, you will find that they can be integrated with InfoPath to create mechanisms to input form data into multiple systems. Although complete coverage of web services is beyond the scope of this book, I will cover the basics of web service development and show you how to use it as a data source in FrontPage.
The easiest way to think of web services is as a component accessible over a network using standard Hypertext Transfer Protocol (HTTP). In this way, a web service is not unlike its predecessor, the Distributed Component Object Model (DCOM). DCOM was designed to allow components on different machines to communicate across a network. The fundamental problem with DCOM is that it was proprietary and was easily blocked by corporate firewalls. The driving force behind web services is essentially to create an open protocol for distributed components that won't be blocked by firewalls.
Although creating a web service in Visual Studio is simple, creating one on the same virtual server where SharePoint Services is installed is difficult. This is because SharePoint Services essentially takes over the virtual server where it is installed, making it difficult to run any other kind of web application, including Active Server Pages (ASP) and web services. The simplest way around this dilemma is to create a new virtual server on a different port. Once the new virtual server is created, you can easily build web services on it. The exercise at the end of this chapter shows in detail how to create a new virtual server.
When you create a new web service project in Visual Studio, the project template provides most of what you need immediately. The key file you need to examine is Service1.asmx , which contains the code for the web service. The code in a web service is not much different from any Visual Studio project you create. The biggest area of concern lies in the decorations used in the code.
Like all Visual Studio projects, web services are based on class definitions; however, the classes in a web service are decorated with a Namespace attribute that references a unique URL instead of just a simple name. The structure of the URL itself is not critical, but it does provide a way to organize the web services you create and make them discoverable by external components. In this case, you do not need to go through discovery because you already know about the web service. The following code shows a typical class definition for a web service.
<System.Web.Services.WebService _ (Namespace:="http://www.datalan.com/pubs/authors")> _ Public Class Authors Inherits System.Web.Services.WebService End Class
Inside the class definition, you may define functions that accept input parameters and return values. The only difference between any normal function you create and a web service is once again found in the attributes. Every function must have a <WebMethod()> decoration. The following code shows a typical definition for a web service method.
<WebMethod()> _ Public Function GetData() As String End Function
A web service can accept and return any kind of data type; however, Microsoft FrontPage deals best with DataSet objects returned directly from the web service. If you return a DataSet object, you will be able to use the sorts and filters more easily. Listing 4-1 shows a complete example of a web service returning a list of author last names as XML from the Pubs database.
| |
Imports System.Web.Services Imports System.Data Imports System.Data.SqlClient <System.Web.Services.WebService _ (Namespace:="http://www.datalan.com/pubs/authors")> _ Public Class Authors Inherits System.Web.Services.WebService <WebMethod()> _ Public Function GetData() As DataSet 'Dataset for query Dim objDataSet As DataSet 'Set up connection string from custom properties Dim strConnection As String = _ "Password=;Persist Security Info=True;User ID=sa;" _ + "Initial Catalog=pubs;Data Source=(local)" 'Query database for phone numbers" Dim strSQL As String = "select au_lname from authors" 'Try to run the query Try With New SqlDataAdapter objDataSet = New DataSet("root") .SelectCommand = New _ SqlCommand(strSQL, New SqlConnection(strConnection)) .Fill(objDataSet, "Contacts") End With Return objDataSet Catch ex As Exception Return Nothing Exit Function End Try End Function End Class | |
Once the web service is written, it can be added to the Data Source Catalog in Microsoft FrontPage. From the Data Source Catalog, you would click the Add to Catalog link below the XML Web Services node to open the Data Source Properties dialog. In this dialog, you must provide the URL that points to the web service description. The web service description is the definition of the methods , parameters, and return values provided by the web service. You access the web service description using the URL of the web service followed by ?WSDL . For this example, the following URL points to the web service description:
-
http://spsportal:8080/pubs/service1.asmx?WSDL
Once the web service description URL is defined, you can connect to the web service. Connecting to the web service will make the returned data available in the Data Source Catalog, where you can drag it onto a page. Once on the page, it functions like any other data view.
Using Web Components
Another useful component for creating portal content is the FrontPage web component. FrontPage web components are essentially web parts that do not have knowledge of the web part infrastructure. FrontPage web components have properties and can display data, but they cannot connect to other web components. In fact, it is easy to see that web components controls are really the predecessor to web parts.
If web components are just light versions of web parts, then why would you use them? The answer is that there are many web components available that were created before web parts. Therefore, you might find some useful functionality that is not immediately available in a web part. A prime example of this is the spreadsheet and chart control. Web components also exist for Java applets, ActiveX controls, and Flash movies. All of the web components are accessible from the menu by selecting Insert Web Component.
EAN: N/A
Pages: 92
- Challenging the Unpredictable: Changeable Order Management Systems
- The Second Wave ERP Market: An Australian Viewpoint
- Enterprise Application Integration: New Solutions for a Solved Problem or a Challenging Research Field?
- The Effects of an Enterprise Resource Planning System (ERP) Implementation on Job Characteristics – A Study using the Hackman and Oldham Job Characteristics Model
- A Hybrid Clustering Technique to Improve Patient Data Quality