Transactions
|
Relationships
Relationships between tables are created when a column in one table is populated with values from another table. In our example, you created a relationship between the login and groups table by adding to login a column called currGroup that contains one of the primary key values from the groups table.
So, if you perform a query against login for the login johnd, you get a result like the following:
mysql> select login, role, currGroup, opendate from login where login='johnd'; +-------+-------+-----------+---------------------+ | login | role | currGroup | opendate | +-------+-------+-----------+---------------------+ | johnd | owner | 1 | 2002-10-10 00:00:00 | +-------+-------+-----------+---------------------+ 1 row in set (0.00 sec)
Now if you want to see the group associated with group 1, you run the query
mysql> select * from groups where group_id = 1; +----------+--------+----------------+ | group_id | groups | ts | +----------+--------+----------------+ | 1 | aab | 20030109092527 | +----------+--------+----------------+ 1 row in set (0.00 sec)
Using a SQL Join, you can return the values from both tables in a convenient single result:
mysql> select login, role, opendate, groups.groups from login left join groups on login.currGroup=groups.group_id where login='johnd'; +-------+-------+---------------------+--------+ | login | role | opendate | groups | +-------+-------+---------------------+--------+ | johnd | owner | 2002-10-10 00:00:00 | aab | +-------+-------+---------------------+--------+ 1 row in set (0.00 sec)
Now you have all of your relationship information in a single result set. The question now is, How do you handle this in EJB and Resin? You handle the relationship primarily in the deployment descriptor, but before we get there let's consider some of the different situations that can occur in relationships.
Relationship Types
In our example, you created a one-to-one relationship between the login and groups table. The relationship is considered to be unidirectional because you are interested in the group with which a specific login is associated but you are not interested in which logins are associated with that group. You can create unidirectional relationships in the direction most appropriate for the application. If the business logic requires relationships in both directions between two tables, you create a bidirectional relationship.
In addition to one-to-one relationships, the following types are supported by Resin and EJB:
-
One-to-one
-
One-to-many
-
Many-to-one
-
Many-to-many
As you might expect, when a many relationship is involved, the code won't receive a single row from the database but several rows (or a Collection in the case of EJB).
Building a Relationship between login and groups
Now, let's see how you can change your beans to support the relationship between the login and groups tables. There are three basic steps to building an EJB relationship:
-
Add container-managed relation (CMR) fields to the appropriate bean definition.
-
Add <relationships> tag and subtags to the deployment descriptor.
-
Change the business code.
In the first step, you are changing the bean that is interested in the relationship to include a CMR field. In other words, the login table includes a field called currGroup that is a link to the groups table. You must define this field as a CMR field instead of just a CMP field. Consider the following local interface for the Login bean:
package entitlements; import javax.ejb.*; import java.sql.Timestamp; import java.util.*; public interface Login extends EJBLocalObject { String getLogin(); String getTs(); String getRole(); String getDescription(); String getOpendate(); String getClosedate(); int getCurrGroup(); void setTs(String t); void setRole(String s); void setDescription(String s); void setOpendate(String d); void setCurrGroup(int g); void changeClosedate(String d); Collection pullLogins(); Group getCurrGroup(); void setCurrGroup(Group e); } The CMR field for the currGroup column is shown in bold. When you add the field to the database table using the ALTER TABLE SQL command, you normally add the column to the local interface and bean implementation files immediately in the form of getter/setter methods. Looking back at the table definition, you see that the column type is int, so you use the following code:
int getCurrGroup(); void setCurrGroup(int group);
This code creates a CMP field for the bean. However, since the field is used in a relationship you need to add appropriate methods to handle getting and setting the field based on the relationship. When you execute the method getCurrGroup() against a Login object, you get a Group object in return. The Group object includes the row from the groups table in which the currGroup value is equal to the primary key. The same holds for setting the object. Now consider the LoginBean class, shown in Listing 6.5.
Listing 6.5: The LoginBean class.
package entitlements; import javax.ejb.*; import java.sql.Timestamp; import java.util.*; public abstract class LoginBean extends com.caucho.ejb.AbstractEntityBean { public abstract String getLogin(); public abstract String getTs(); public abstract String getRole(); public abstract String getDescription(); public abstract String getOpendate(); public abstract String getClosedate(); public abstract int getCurrGroup(); public abstract void setLogin(String 1); public abstract void setTs(String t); public abstract void setRole(String s); public abstract void setDescription(String s); public abstract void setOpendate(String d); public abstract void setClosedate(String d); public abstract void setCurrGroup(int g); public void changeClosedate(String d) { setClosedate(d); } public abstract Group getCurrGroup(); public abstract void setCurrGroup(Group e); public abstract Collection ejbSelectJustLogins() throws FinderException; public Collection pullLogins() { Collection c = null; try { c = ejbSelectJustLogins(); } catch(FinderException e) {}; return c; } public String ejbCreate(String login, String ts, String role, String description, String opendate, String closedate ) throws CreateException { setLogin(login); setTs(ts); setRole(role); setDescription(description); setOpendate(opendate); setClosedate(closedate); return login; } public void ejbPostCreate(String login, String ts, String role, String description, String opendate, String closedate) { } } Again the added code is shown in bold. We listed the code in its entirety to show that no additional code is needed for the relationships. The container will be generating all of the code for you. However, you do need to give it some help—in the form of the deployment descriptor.
In the second step, you set up the relationship between the two beans by using a <relationship> tag. Here's the new descriptor:
<ejb-jar> <enterprise-beans> entity beans </enterprise-beans> <relationships> <ejb-relation> <ejb-relation-name>LoginGroup</ejb-relation-name> <ejb-relationship-role> <ejb-relationship-role-name>LoginGroup</ejb-relationship-role- name> <multiplicity>One</multiplicity> <relationship-role-source> <ejb-name>Login</ejb-name> </relationship-role-source> <cmr-field> <cmr-field-name>currGroup</cmr-field-name> </cmr-field> </ejb-relationship-role> <ejb-relationship-role> <ejb-relationship-role-name>LoginGroupPart </ejb-relationship-role-name> <multiplicity>One</multiplicity> <relationship-role-source> <ejb-name>Group</ejb-name> </relationship-role-source> </ejb-relationship-role> </ejb-relation> </relationships> </ejb-jar>
The <relationships> element includes quite a few new tags:
-
<ejb-relation>— A container element that encapsulates a single bean-to-bean relationship.
-
<ejb-relation-name>— The name of this specific bean-to-bean relationship.
-
<ejb-relationship-role>— The container element for one end of the relationship. The descriptor needs two of these for all relationships.
-
<ejb-relationship-role-name>— The name of this part of the relationship.
-
<multiplicity>— The type of relationship for this end of the relationship or bean.
-
<relationship-role-source>— The bean for this end of the relationship.
-
<ejb-name>— The name of the bean.
-
<cmr-field>— The relationship field for the bean.
-
<cmr-field-name>— The name of the relationship field.
When you create a relationship in the deployment descriptor, you must define two roles for each of the beans. Of particular importance is the <cmr-field-name> element. This element defines the CMR field relating to the setter/getter methods added to the local interface and bean implementation. You must define this field in the database table represented by the defined bean. If the relationship is unidirectional, there will be only one <cmr-field> for the entire <ejb-relation>. Obviously in a bidirectional relationship, a <cmr-field> appears in both <ejb-relationship-role> definitions.
In the third step, you'll make use of the CMR field entry added to the Login bean. For example, the LoginMaintenanceServlet allows you to GET the current values for a login. Let's make a quick change to the code that handles a GET as well as the JSP template that displays the information. (The update and insert will be left as an exercise.) The new code for the GET code is:
if (submit.equals("get")) { try { Login e = (Login)home.findByPrimaryKey(req.getParameter("login")); Group g = e.getCurrGroup(); ServletContext app = getServletContext(); app.setAttribute("login", e); app.setAttribute("group", g); RequestDispatcher dispatch = app.getRequestDispatcher("/changeLogin.jsp"); dispatch.forward(req, res); } catch (FinderException e) { throw new ServletException(e); } } At the beginning of the code, you obtain the Login object for the login provided by the user. Once it's found, the getCurrGroup() method is called on the object to obtain the Group object created from the relationship defined in the deployment descriptor. Essentially, the container executed the two SQL queries shown at the beginning of this section, but without you having to write the SQL. Both of the objects are added to the Application object.
The JSP for the output is dispatched. In the JSP, include support for the additional object:
<%@ page language='java' import='entitlements.*' %> <% ServletContext app = getServletContext(); Login e = (Login)app.getAttribute("login"); Group g - (Group)app.getAttribute("group"); %> <head> <body> <form action="http://localhost:8080/entitlements/entitlements .LoginMaintenanceServlet" method="post"> Username: <input name="login" value = " <%= e.getLogin() %>"><BR> Timestamp: <input name="timestamp" value = " <%= e.getTs() %>"><BR> Role: <input name="role" value = "<%= e.getRole() %>"><BR> Description: <input name="description" value = " <%= e.getDescription() %>"><BR> Opendate: <input name="opendate" value = " <%= e.getOpendate() %>"><BR> Closedate: <input name="closedate" value = " <%= e.getClosedate() %>"><BR> Group: <input name="group" value= "<%= g.getGroups() %>"><BR> <input type="submit" name="submit" value="update"> <input type="submit" name="submit" value="add"> </form> </body> </head> Compare the previous code for the JSP template, and you can see that we changed the import directive to include all of the entitlements classes and added code to pull the Group object from the Application object. Finally, we used the Group object to pull the group description with the getGroups() methods previously defined for the Group bean.
With all of the code in place, you can test your relationship by browsing to http://localhost:8080/login.html. After entering the login johnd, you see the output shown in Figure 6.12. As you can see, the description aab is displayed for the group John Doe belongs to.
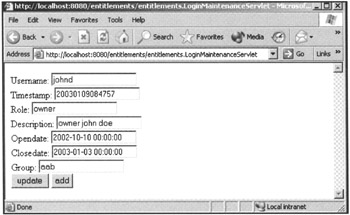
Figure 6.12: Group Output for Login.
|
EAN: 2147483647
Pages: 180