Chapter 6: J2EE Application Assembly and Deployment
|
![]() Download CD Content
Download CD Content
At this point, we have completed the development of the presentation and business-logic components of the Plants-By-WebSphere application, using WebSphere Studio. We have seen how the presentation logic is contained in Web Application modules, and the business and data-access logic is contained in Enterprise JavaBean modules. In this chapter, we will focus on assembling these components into a completed Enterprise Application, and deploying that application into a unit test environment, and then a production WebSphere server.
WebSphere 5.0 includes a standalone application assembly tool, and we will provide a brief overview of that tool in this chapter. However, IBM's strategic direction for tools is to use web applications where appropriate, and to host all other tools on the Eclipse platform (as WebSphere Studio is). It is intended that future versions of WebSphere will provide an application assembly tool that is much more consistent with today's WebSphere Studio, and the current application assembly tool will be deprecated. In addition, when creating an application in WebSphere Studio (as we have with Plants-By-WebSphere in the preceding chapters), it is much more consistent and logical to complete the assembly process in the same environment, than it is to export the application to a separate tool for assembly. Therefore this chapter will focus primarily on the application assembly process in WebSphere Studio, instead of the standalone application assembly tool. WebSphere Studio Application Developer edition contains the EJB and J2EE tools, so the examples in this chapter assume that is the edition of Studio being used.
Assembling a J2EE Application
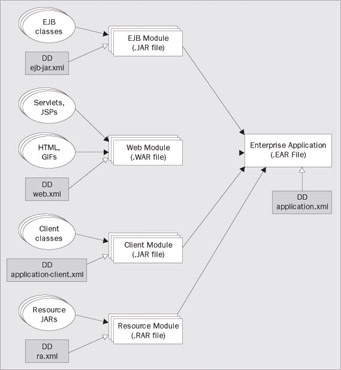
The J2EE specification naturally encourages the adoption of a multi-tier architecture and a strict separation between business logic and the presentation layer. The main component types are web applications, which are saved in a Web archive (or WAR) file, and Enterprise JavaBean archives, which are saved in a JAR file. The application may also contain other module types, including an application client JAR file, and a Resource archive (RAR file).
Each of these archives contains a static deployment descriptor file, defining the content of the archive, and providing a mechanism to pass information from the Component Provider to the Deployer. Reconciling all the individual components, resolving references between the components, and assembling them into a single application is known as, not surprisingly, Application Assembly. The resulting archive is saved in an Enterprise Archive (EAR) file and contains a deployment descriptor of its own, which is used to pass information about the application to the deployment tools and the server runtime:
The creation of a J2EE specification-compliant enterprise application can be accomplished using a variety of tools, both command-line and UI-based. The J2EE specification defines the core of what's required in an application, but there are a number of additional pieces of data that are not included in the spec, such as the specification of binding information like JNDI names. The best way to complete the settings is by using one of the WebSphere-specific tools.
There are two such tools:
-
WebSphere Studio can be used for all phases of an application's development, including both its initial creation and the subsequent application assembly.
-
WebSphere Application Assembly Tool (AAT) can be used after development to import other archives and assemble them into a new application. We won't be covering the use of this tool in this chapter because it will likely be deprecated soon, as explained earlier.
We are creating the Plants-By-WebSphere application using WebSphere Studio, so we will focus on the application assembly tasks in that environment. There are two J2EE modules in Plants-By-WebSphere; the presentation logic is contained in PlantsByWebSphere.war, and the business logic is contained in PlantsByWebSphereEJB.jar.
| Note | Note that the J2EE specification does not restrict you to a single instance of each module type in an application; that just happens to be the structure used in this case. |
Application Assembly Using WebSphere Studio
WebSphere Studio attempts to create applications in the correct structure from the beginning, to avoid the need to manipulate archive files during the export and assembly steps. There is one important difference between the project structure in Studio, and the archive structure of the eventual application; the assembled application (EAR) file will contain the two modules listed above, but the Studio design keeps the two modules as peers of the application module.
The reason for this difference is that the constituent modules are actually reusable components; multiple applications can quite easily use different groupings of the same (and other) modules. If the modules were created in Studio as children of a single application module, it would be almost impossible to re-use them in another application. Instead, all modules are created as root projects; the assembly of an enterprise application within Studio is managed logically, and the containment is shown in the Studio J2EE Perspective. The physical containment of the other modules will occur automatically when an enterprise archive is exported from Studio to an EAR file.
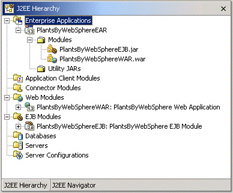
The following screenshot shows the state of the workbench after the application has been imported. Note that the WAR and EJB JAR modules are shown as children of the EAR project in this view, even though all three projects are actually peers in the underlying file system, and resources view:
This discussion highlights another important point about application assembly; a portable EAR file must include all required classes and resources, and cannot have Java references to classes defined in other files. In general, the only reference that one application can make to the contents of another application is via a resource reference – even if all you need is to interact with another EJB (for example) as a client, you must have a copy of the client bindings contained within your EAR. The concept of ensuring an application is complete is an important way of scoping the content of the application; you do not need to worry about additional dependencies when installing a J2EE application, because by definition the EAR will contain everything that is required.
As one of its basic design tenets, Studio attempts to direct you down a path that will assemble the application as you create it. Therefore, there is very little composition left to do for the Plants-By-WebSphere application we are creating. The very first project we created in Chapter 4 was the web (or "WAR") project – but as a side effect of that creation, an enterprise (or "EAR") project was created at the same time. Since then, every new addition has added to the enterprise project, meaning the assembly process is already mostly complete.
It is also possible to edit the logical contents of an application module after the initial project creation has been completed. The J2EE Perspective can be used to list all application projects, and double-clicking on the project will open the Application editor. The same editor can also be opened by double-clicking on the EAR deployment descriptor for the enterprise project – the ![]() application.xml file that is located in the META-INF directory. Once in the editor, select the module tab, shown in the bottom of the editor view. This will allow you to list, add to, and remove modules from the application:
application.xml file that is located in the META-INF directory. Once in the editor, select the module tab, shown in the bottom of the editor view. This will allow you to list, add to, and remove modules from the application:
The operation is fast, because you are only manipulating references at this point; for the same reason, it is possible to add a single module to multiple applications.
Having completed the composition of the application, we now need to reconcile the J2EE module deployment descriptors.
The Assembly Process
Application assembly consists of more than just application composition, which is all that's been accomplished in the preceding chapters. In order to generate a consistent application, we need to reconcile the J2EE module deployment descriptors, and complete the WebSphere extensions for those descriptors. The first part of this consists of a number of steps – the J2EE specification requires that the Application Assembler:
-
Make sure that each component in the application properly describes any dependencies it may have on other components in the application
-
Assign a context root for each web module included in the J2EE application
-
Synchronize security role-names across the application
-
Link the internally satisfied dependencies of all components in every module contained in the application
We will now walk through each of these steps, to complete the Plants-By-WebSphere application.
Resolving Module Dependencies
WebSphere Studio maintains the correct module dependencies for you during development, as long as you have used the JAR dependency editor to define cross-project dependencies. Since each J2EE project module is also a Java project, you may be tempted to just use the Java classpath page in the project preferences to add additional libraries to the classpath. This would only update the classpath used within Studio, however, and would not result in the correct module dependencies being generated into the JAR for use at run time.
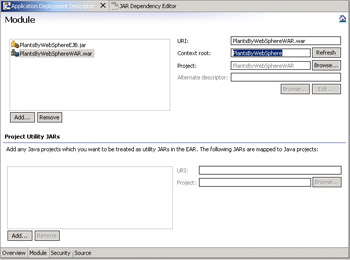
The JAR dependency editor (shown below) is an alternative editor for all EJB and web projects. In the J2EE Hierarchy view, select the project you wish to modify, right-click to bring up the context menu, and select Open With ( Jar Dependency Editor:
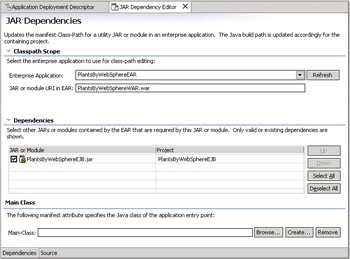
The editor will allow you to select from all modules that exist within the EAR. This will ensure the Java classpath is correct within Studio, and also modify the manifest classpath within the JAR. It is the manifest classpath that allows WebSphere to set the correct classloader dependency chain at runtime. If a module you wish to add a dependency does not appear in the dependent JAR list on this page, it means the JAR is not contained within the EAR; correct that first from the EAR deployment descriptor editor, and then you'll be able to select the dependency for the module.
We need to ensure the PlantsByWebSphereWAR project depends on the PlantsByWebSphereEJB project. Therefore open the JAR dependency editor on the PlantsByWebSphereWAR project, and verify that the EJB project is selected as shown above.
Assign a Context Root
The next requirement during module reconciliation is to assign a context root for each contained web module. The context root is a relative name in the web namespace for the application, and is already defined by this stage when creating the projects in Studio – it is required data (a default is provided) when you create a new web project. The context root we use for Plants-By-WebSphere is /PlantsByWebSphere.
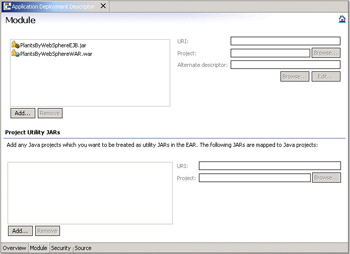
If you wish to modify an existing context root, you can locate the setting in the Module page of the Application Deployment Descriptor editor:
The context root is saved in the deployment descriptor of the enterprise application (the ![]() application.xml file). Each web module must be given a distinct and non-overlapping name for its context root; Studio validates this, and an error is shown in the task list if duplicate context roots exist in the same EAR module.
application.xml file). Each web module must be given a distinct and non-overlapping name for its context root; Studio validates this, and an error is shown in the task list if duplicate context roots exist in the same EAR module.
Synchronize Security Role Names
The security role names next need to be synchronized across the application. The security roles are initially defined in each of the module deployment descriptors. A security role is a defined with a name and description, and is used to define method permissions for the bean. For each security role defined in the module, you can associate multiple beans, and methods from each bean. Once associated, the execution of those methods is only possible when the caller has permission to run as that role. This abstraction allows the Application Assembler to define method-level permissions, while the Application Deployer only needs to worry about the much smaller list of security roles. We are not going to enable security in the Plants-By-WebSphere application, but we'll provide a brief description now of how to resolve the security roles.
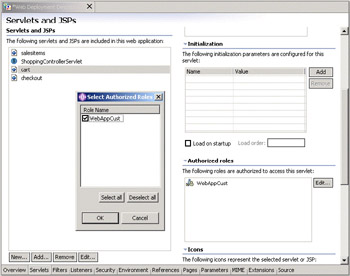
For web applications, the security roles are defined on the Security page of the Deployment Descriptor editor; click the Add button, and then click the new entry in the list to rename it. You next need to associate the security role with the servlets or JSP pages you wish to control. Simply select the desired servlet from the list on the in the Servlets page, and scroll down to the Authorized Roles section. Click the Edit button, and select the role you wish to associate it with the servlet. Here we have defined a WebAppCust role, and associated with the cart JSP page:
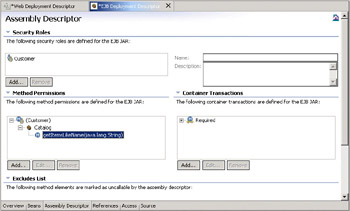
For EJBs, these settings are found in the Assembly Descriptor page of the EJB Deployment Descriptor editor. The first action is to define the security roles you desire. You then move to the Method Permissions section of the page, and click Add. This will bring up a wizard that allows you to associate a specific role with first beans, and then methods. The result of this wizard is shown in the following view; here the Customer role has been defined, and associated with the Catalog.getItemsLkeName(java.lang.String) method:
The security roles and method permissions are defined in the individual modules, but these modules are components that may be reused in multiple applications. Therefore you need to reconcile the roles defined in the modules at the application level, in the Enterprise Application deployment descriptor.
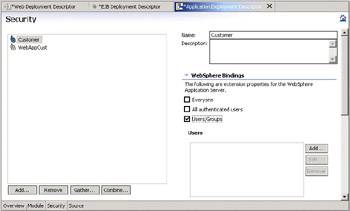
The primary task here is to rename role names that are defined in different modules; role names with the same name but different meanings, or different names with the same meanings all need to be reconciled. This can be done in the EAR Deployment Descriptor editor from the Security tab. The Gather button will collect and list all the role names that have been defined in all modules in the application. The Combine button will bring up a wizard listing all the roles, and allowing one role to be substituted with another. These changes will update the original deployment descriptors.
In the example shown below, there are two similar roles, Customer and WebAppCust. These could be reconciled into a single role name if desired. One the reconciliation is complete you can select the remaining roles shown in the list, and add Users and Groups who will then run in the role listed:
Link the Dependencies
The final stage of reconciling the application is to link the internally satisfied dependencies of all components in every module contained in the application; in other words, to resolve the various references within each module in the application. The fact that inter-component dependencies are resolved via references is what allows the modules to be truly reusable components. Without references, you would end up building an application that was tightly coupled to all other components, and would be correspondingly brittle. With references, it is possible for the module providers to declare a dependency on a certain object or resource, and still defer the definition of those references until application assembly time. References can be defined for EJBs, resources, security roles, and resource environments.
In all module types, the references are defined in the deployment descriptor, and thus exposed in Studio via the associated Deployment Descriptor editor. In a web application, references are defined on the References page of the editor. There are multiple types of references that can be defined, and these are selected from the tabs at the top of the page. Note that the references are defined for the entire web application, and not by servlet. The following example shows the local EJB references for the Plants-By-WebSphere web application:
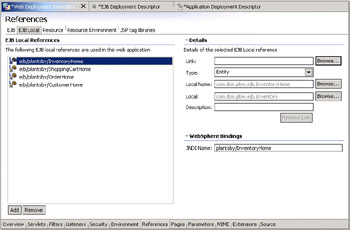
The selected reference is the InventoryHome bean. The actual name defined for it, in the list on the left, is "ejb/plantsby/InventoryHome". There is no requirement that EJB reference names start with an ejb prefix, but it is a common convention. The reference is used in the InventoryModel Java class, looking up the Inventory bean. The code looks up the reference via an InitialContext object, using the EJB reference name prefixed by "java:comp/env/" – in other words, indicating that a computed environment reference should be used.
The local EJB references that need to be defined in the PlantsByWebSphereWAR module are:
-
ejb/plantsby/ShoppingCartHome
-
ejb/plantsby/CustomerHome
-
ejb/plantsby/InventoryHome
-
ejb/plantsby/OrderHome
You need to verify that each of these references is completely defined. Open the Web Application editor, and go to the References page, and the EJB local tab. Ensure that all of the above references are listed correctly. Select each one in turn; if the reference is defined but not resolved, then the Link field will be empty. In this case, use the Browse button to select the correct EJB to resolve the reference. For example, select the ejb/plantsby/ShoppingCartHome entry, and from the browse dialog select the ShoppingCart bean.
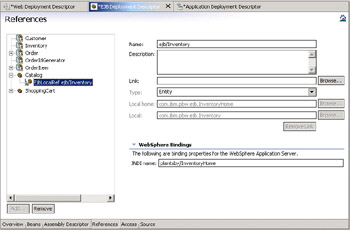
References within an EJB JAR are defined slightly differently; each reference is defined within the scope of the bean that is using the reference and not the complete module (as was the case for the web application). As a result, the reference support in the EJB editor is slightly more complicated, listing each reference in a tree view by bean. The beans containing the references are those beans using, not providing the reference. For example, the Catalog bean uses, and therefore defines a reference to, the Inventory bean. The EJB reference support is available via the References page in the EJB Deployment Descriptor editor:
There are several reference types that can be defined:
-
An EJB reference is used to access an EJB's remote home and remote interface.
-
An EJB local reference is used to access an EJB's local home local interface.
-
An EJB resource reference is used to access an external resource, such as a data source, or a mail session. The Type field is used to determine the exact type referenced.
-
A Security role reference is used to access a security role.
-
A resource environment reference is used to access an administered object, such as a JMS destination.
The references are often defined by the Component Provider but it is the job of the Application Assembler to confirm the references are all correct. The reference name must match the String used in the lookup method in the code. In the Plants-By-WebSphere application, we need the following references. Note that for each component dependency, there must only be one corresponding component in the scope of the application that fulfils the dependency.
| EJB | Reference type | Referenced object | Reference name |
|---|---|---|---|
| Order | EJB Local Reference | OrderIdGenerator | ejb/OrderIdGeneratorHome |
| EJB Local Reference | OrderItem | ejb/OrderItemHome | |
| Catalog | EJB Local Reference | Inventory | ejb/InventoryHome |
| OrderItem | EJB Local Reference | Order | ejb/OrderHome |
The definition of these references consists of little more than following the above table. For example, to define the reference that Catalog requires to access the Inventory bean, you follow these steps:
-
Open the EJB Deployment Descriptor editor
-
Select the References tab
-
Select the Catalog bean
-
Select the Add button to open then Add Reference wizard
-
Select the EJB local reference option, and then the Next button
-
Enter the name you wish to use; in this case it will be ejb/InventoryHome
-
Click the Browse button next to the link field, and select Inventory from the list of beans defined in this project
-
Hit Finish
The EJB references that are resolved by other EJBs within the application are linked at application assembly time by the ejb-link attribute in the deployment descriptor; for each such link there must be only one matching ejb-name in the scope of the entire application. The links are defined for you by Studio in the deployment descriptor editor.
If the reference has been defined but not resolved, then it will appear in the tree view in this editor. However, when selected the Link field will be blank. In this case, use the Browse button to select the correct EJB to resolve the reference. For example in the Catalog bean, select the ejb/InventoryHome entry, and from the browse dialog select the Inventory bean.
You do not need to define data source links for CMP beans; they access the data source via a CMP connection factory that we will configure later in this chapter.
|
EAN: N/A
Pages: 135