Blocking Access
|
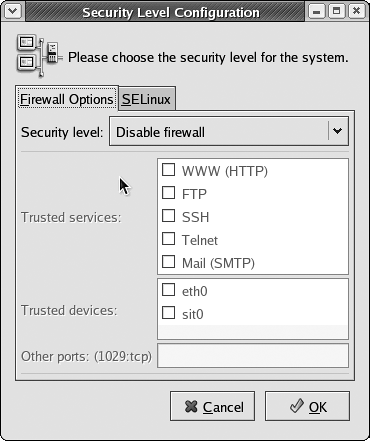
| Even home users can afford a packet-inspecting firewall that's stateful (meaning that it keeps track of a connection's state, instead of just inspecting the port and IP addresses); in fact, it's probably built into your cable or DSL router for free! But if you're unwilling (or unable) to invest in a hardware firewall, the "real" Unix operating systems all have built-in software firewalls. Why did I say "real" Unix systems? Cygwin doesn't have a firewall, but Windows XP does, as of Service Pack 2. Check your Windows XP documentation for details. Users of older Windows systems can look into other software firewalls, such as Zone Alarm. Fedora Core 3's firewall is iptables. FreeBSD and Mac OS X both include the very powerful, and potentially complex, IP Firewall (ipfw). To enable the firewall (Fedora Core)Fedora Core provides a GUI for controlling the basic firewall functions.
To enable the firewall (FreeBSD)Enabling ipfw on FreeBSD is fairly straightforward.
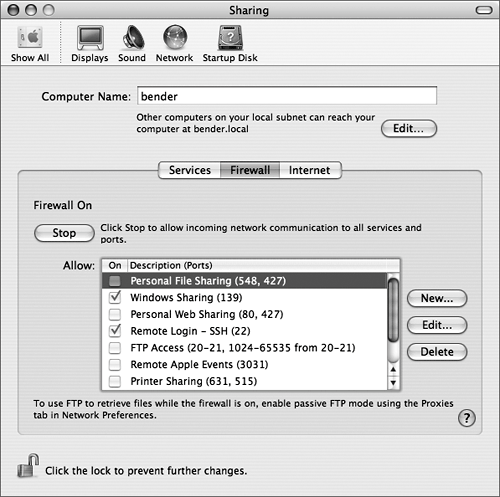
Code listing 12.7. A good ipfw rules file blocks everything, then allows specific services to have access.# ipfw rules file # # Based on the ipfw rules file in the # FreeBSD Handbook # ( www.freebsd.org/doc/). # Delete the existing rules. ipfw -q -f flush # Shorthand. cmd="ipfw -q add" # CHANGE THIS: # # The interface you're applying these # rules to, facing the public Internet. pif="interface" # Loopback has no restrictions. $cmd 00010 allow all from any to any via lo0 # Allow packets through if they've been # added to the dynamic rules table by an # allow keep-state statement. $cmd 00015 check-state # OUTBOUND CONNECTIONS # CHANGE THIS: # # Allow out access to your ISP's domain # name server. # x.x.x.x must be changed to the IP # address of your ISP's DNS. # Copy these lines if your ISP has more # than one DNS server. # You can get the IP addresses from the # /etc/resolv.conf file. $cmd 00110 allow tcp from any to x.x.x.x 53 out via $pif setup keep-state $cmd 00111 allow udp from any to x.x.x.x 53 out via $pif keep-state # CHANGE THIS: # # Allow out access to my ISP's DHCP # server for cable/DSL configurations. # # Use the following rule and check the # log for the server's IP address, # then put the server's IP address in the # commented out rule and delete # first rule. $cmd 00120 allow log udp from any to any 67 out via $pif keep-state #$cmd 00120 allow udp from any to x.x.x.x 67 out via $pif keep-state # Allow out non-secure standard WWW HTTP # and secure HTTPS connections. $cmd 00200 allow tcp from any to any 80 out via $pif setup keep-state $cmd 00220 allow tcp from any to any 443 out via $pif setup keep-state # Allow out send and get email functions # (SMTP and POP3). $cmd 00230 allow tcp from any to any 25 out via $pif setup keep-state $cmd 00231 allow tcp from any to any 110 out via $pif setup keep-state # Allow out FreeBSD (make install and # CVSUP) functions. # Note that this basically gives the root # user "GOD" privileges. $cmd 00240 allow tcp from me to any out via $pif setup keep-state uid root # Allow out ping, Time, NNTP news, SSH, # and whois connections. $cmd 00250 allow icmp from any to any out via $pif keep-state $cmd 00260 allow tcp from any to any 37 out via $pif setup keep-state $cmd 00270 allow tcp from any to any 119 out via $pif setup keep-state $cmd 00280 allow tcp from any to any 22 out via $pif setup keep-state $cmd 00290 allow tcp from any to any 43 out via $pif setup keep-state # Deny and log everything else trying to # get out. # This rule enforces the "deny everything # by default" logic. $cmd 00299 deny log all from any to any out via $pif # INCOMING CONNECTIONS # CHANGE THIS: # # Deny all inbound traffic from non- # routable reserved address spaces. # # You'll want to comment out the line # that corresponds to your LAN if # this system isn't directly connected to # the Internet. $cmd 00300 deny all from 192.168.0.0/16 to any in via $pif #RFC 1918 private IP $cmd 00301 deny all from 172.16.0.0/12 to any in via $pif #RFC 1918 private IP $cmd 00302 deny all from 10.0.0.0/8 to any in via $pif #RFC 1918 private IP $cmd 00303 deny all from 127.0.0.0/8 to any in via $pif #loopback $cmd 00304 deny all from 0.0.0.0/8 to any in via $pif #loopback $cmd 00305 deny all from 169.254.0.0/16 to any in via $pif #DHCP auto-config $cmd 00306 deny all from 192.0.2.0/24 to any in via $pif #reserved for docs $cmd 00307 deny all from 204.152.64.0/23 to any in via $pif #Sun cluster interconnect $cmd 00308 deny all from 224.0.0.0/3 to any in via $pif #Class D & E multicast # Deny public pings and ident requests. $cmd 00310 deny icmp from any to any in via $pif $cmd 00315 deny tcp from any to any 113 in via $pif # CHANGE THIS: # # Deny all NetBIOS service. 137=name, 138=datagram, 139=session # NetBIOS is MS/Windows sharing services. # Block MS/Windows hosts2 name server # requests 81 # # You'll want to comment these out if # you're serving directories with Samba. $cmd 00320 deny tcp from any to any 137 in via $pif $cmd 00321 deny tcp from any to any 138 in via $pif $cmd 00322 deny tcp from any to any 139 in via $pif $cmd 00323 deny tcp from any to any 81 in via $pif # Deny any late arriving packets $cmd 00330 deny all from any to any frag in via $pif # Deny ACK packets that did not match the # dynamic rule table $cmd 00332 deny tcp from any to any established in via $pif # CHANGE THIS: # # Allow traffic in from ISP's DHCP # server. This rule must contain # the IP address of your ISP.s DHCP # server as it's the only # authorized source to send this packet # type. # Only necessary for cable or DSL # configurations. # This rule is not needed for .user ppp. # type connection to # the public Internet. This is the same # IP address you captured # and used in the OUTBOUND CONNECTIONS # section. #$cmd 00360 allow udp from any to x.x.x.x 67 in via $pif keep-state # CHANGE THIS: # # Uncomment this if you're running a web # server. #$cmd 00400 allow tcp from any to me 80 in via $pif setup limit src-addr 2 # CHANGE THIS: # # Uncomment this if you're running # OpenSSH. $cmd 00410 allow tcp from any to me 22 in via $pif setup limit src-addr 2 # Reject & Log all incoming connections # from the outside $cmd 00499 deny log all from any to any in via $pif # Everything else is denied by default # Deny and log all packets that fell # through to see what they are. $cmd 00999 deny log all from any to any # End of ipfw rules. To enable the firewall (Mac OS X)Naturally, Mac OS X comes with a nice graphical user interface for configuring the firewall.
|
|
EAN: 2147483647
Pages: 116