| Ken Burns has some limitations. One is that you can't "hold" on a certain frame. You might want to have a 10-second clip in which the photo zooms for the first eight seconds and then remains static for the last two. Or maybe you want to zoom in part way, freeze for a couple of seconds, and then continue zooming. Ken can't do that. Another limitation is that you can't combine multiple moves in a single clip. For example, you might want to pan across a photo and then zoom in on part of it. Ken can't do that, either. At least not without a little finessing. It's actually possible to accomplish both of these tasks in iMovie HD. Here's how. Holding on a Frame To hold on a frame, save a frame from a Ken Burns generated clip, then add it to the timeline. Step 1. | Set up the Ken Burns effect as desired and then apply it, as described on page 237.
| Step 2. | Select the clip that iMovie HD has rendered, then move the playhead to its last frame.
| Step 3. | Choose Create Still Frame from the Edit menu (Shift-  -S). -S).
| Step 4. | Locate the still frame in the Clips pane, drag it to the timeline and, if necessary, trim it to the desired length.
Tip You can also adjust the still frame's duration by double-clicking the clip, then entering a new duration in the Clip Info dialog box. |
Variations You can also start by holding on a frame, and then panning and zooming. First, apply the Ken Burns effect, then navigate to the first frame of the resulting clip and create a still frame from it. Position the still-frame clip before the Ken Burns clip. Another variation involves inserting a still image in the middle of a Ken Burns move so that panning and zooming stops and then resumes. For this trick, apply the Ken Burns effect and then split the resulting clip where you want to hold on a frame. (To split a clip, position the playhead at the desired split point and choose Split Video Clip at Playhead from the Edit menu.) Next, move the playhead to the last frame of the first half of the clip (or to the first frame of the second half). Create a still frame, and drag the resulting clip between the two halves. Combining Moves Combining two kinds of moves involves importing the same photo twice and applying different Ken Burns settings each time. Step 1. | Set up the first Ken Burns move as desired and then apply it.
| Step 2. | In the photo browser, select a different photo, and then select the same photo that you selected for Step 1.
This tricks iMovie HD into preparing to create a new clip instead of updating the one you just created.
| Step 3. | In the Photo Settings panel, click the Reverse button.
 This reverses the Ken Burns settings that you set up for Step 1: its end point becomes the new start point.
| Step 4. | Specify the End settings for the second Ken Burns move and then apply it.
|
Beyond Ken Burns: Other Pan-Zoom Tools Ken Burns isn't the only game in town. Several companies offer pan-zoom tools that work with iMovie HD. Photo to Movie. Photo to Movie by LQ Graphics (www.lqgraphics.com) makes it very easy to create pan-zoom effects. Create your effect in Photo to Movie, export it as a QuickTime movie, and then bring it into iMovie HD and add it to your project. Photo to Movie's results are superior to those created by the Ken Burns effect. Photo to Movie does a better job of what animators call ease in and ease out: rather than motion abruptly starting and ending, the motion starts and ends gradually. The results have a more professional appearance. 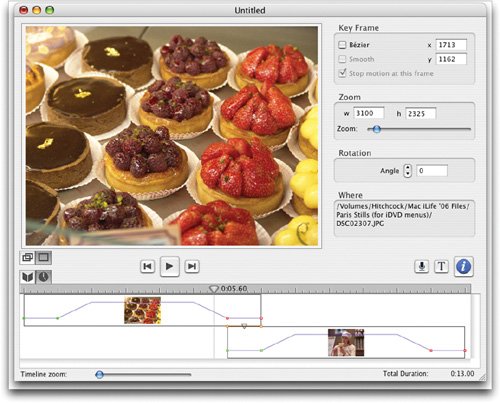 SlickMotion. This simple program is included with GeeThree's Slick Transitions and Effects Volume 4, an extensive library of iMovie effects. SlickMotion also supports ease-in/ease-out, and adds the ability to rotate images. Motion Pictures. This scaled-down version of Photo to Movie is included with Roxio's Toast. |
|