Set Up a Network
|
| < Day Day Up > |
|
When you installed Mac OS X, a full set of networking services was installed and configured using your input (for example, for your Internet connection) and system defaults. These default settings typically provide an operable networking system, enabling you to plug your Mac into an Ethernet network or connect to a wireless network (if your Mac has an AirPort card installed) and start using the network, with a minimum of further configuration.
This section walks you through creating a network using the four means you’re most likely to use: wired Ethernet, wireless using an access point, wireless without an access point, and FireWire. It then shows you how to check that your network configuration is working and how to make key changes to it.
Set Up an Ethernet Network
To create an Ethernet network, you need a Cat 5 or Cat 5e Ethernet cable for each computer that will be connected, and a hub or switch with enough ports for each computer or other device that you will connect. Switches deliver faster network throughput than hubs and cost only a little more, so unless you already have a hub or you’re squeezing every cent, a switch is a better choice.
If you want, you can leave your Mac running while you connect it to an Ethernet network; if you prefer, you can shut your Mac down first. If you’re connecting PCs to the network as well, it’s best to shut them down before connecting them.
-
Plug one end of an Ethernet cable into your hub or switch and the other end into your Mac.
-
Repeat the process for each of the other Macs that will be part of the network.
-
Turn on the power for the hub or switch.
-
If you have shut down your Macs or PCs, turn them on.
Set Up a Wireless Network Using an Access Point
To create a wireless network using an access point, you need a wireless adapter in each Mac and an access point. The wireless adapters and the access point must be compatible with each other:
-
All Wi-Fi–certified 802.11g products if you want 54 Mbps speeds
-
Either a mixture of Wi-Fi–certified 802.11g products and Wi-Fi–certified 802.11b products or all Wi-Fi–certified 802.11b products if 11 Mbps is good enough
| Caution | When you add a device using 802.11b to an otherwise 802.11g network, the whole network drops down to the 802.11b speed. |
Install the Hardware
If the wireless adapters aren’t installed in the Macs, install them first. Then set up your access point by following the instructions that come with it. A typical setup process for an access point involves connecting your computer to it using an Ethernet cable so that you can communicate via a wired network in order to configure the wireless network. Configuration typically also includes:
-
Specifying the name, or service set identifier (SSID), of the wireless network—often simply a descriptive text name (for example, Wireless1).
-
Choosing whether to use encryption. If your access point offers a choice, choose Wi-Fi Protected Access (WPA) over Wired Equivalent Privacy (WEP), an older standard that includes known compromises; but even Wired Equivalent Privacy is better than no encryption at all.
-
Choosing whether to restrict the network to a specified list of wireless adapters (identified by their Media Access Control number, or MAC number) or to leave it open to any wireless adapter within range.
Hardware for a wireless network includes a wireless adapter and a wireless access point.
Select a Wireless Speed
For a new wireless network using Macs, you’ll typically want to choose the 802.11g standard in order to get the fastest data rate available, 54 Mbps. The faster rate is especially important if you’re building a multi-user network, as each computer has to share the capacity with all the other computers on the network at any given time.
If you’ll need only to connect to public Wi-Fi networks, such as those in airports and coffee shops, you can get away with the 802.11b standard and its 11 Mbps data rate. However, given that 802.11g equipment can connect to 802.11b networks, 802.11g is usually a better choice—but see the next section for limitations.
Select a Wireless Adapter
Higher-end PowerBooks come with wireless adapters built in. You can install wireless adapters on all other Macs, from iBooks to Power Macs.
Your first choice for a wireless adapter in a Mac should be an Apple AirPort card. There are two types of AirPort cards: standard AirPort cards, which use 802.11b, and AirPort Extreme cards, which use 802.11g. Each Mac can accept either an AirPort Extreme card (in newer Macs) or an AirPort card (in older Macs): You must get the type that fits into your Mac.
Your other option is to install a third-party wireless adapter: a PCI card (in a desktop Mac), a PC Card (in a ‘Book), or a USB adapter (on any Mac). Because Apple’s AirPort cards have most of the market, the selection of third-party wireless adapters with Mac drivers is relatively thin. (By comparison, the selection of third-party wireless adapters with Windows XP drivers is huge.) Generally, an AirPort card is the best choice, especially if you also choose an AirPort as your access point.
Select a Wireless Access Point
Wireless access points come in simple versions that plug into a wired Ethernet network and in more sophisticated versions, called “wireless broadband routers,” that terminate a DSL or cable Internet connection. When choosing a wireless access point, you can choose between these two types. You can also choose the speed of the access point.
Apple’s AirPort and AirPort Extreme cards work with any wireless access point. (You must use an 802.11g access point to get 54 Mbps with AirPort Extreme cards.) But if you’re selecting a wireless access point for a Mac network, an AirPort or AirPort Extreme access point is likely to be your best choice, as it is designed to work seamlessly with Mac OS X and with AirPort cards.
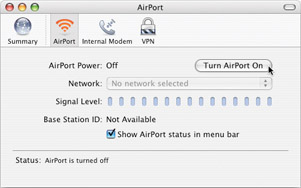
Turn Your AirPort On
If your AirPort is off, you can turn it on in either of two ways:
-
If the AirPort icon is displayed on the menu bar, click it to open the menu, and click Turn AirPort On.
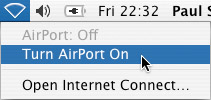
–Or–
-
Open Internet Connect (click the Finder icon on the Dock, click Applications in the Sidebar, and double-click Internet Connect). Click the AirPort tab, and then click Turn AirPort On. Leave Internet Connect open so that you can specify which wireless network to connect to.
Connect to the Wireless Network
When you turn your Mac’s AirPort on, Mac OS X will automatically identify wireless networks that it can connect to. To choose a wireless network:
-
If the AirPort icon is displayed on the menu bar, click it to open the menu, and then click the network on the menu.
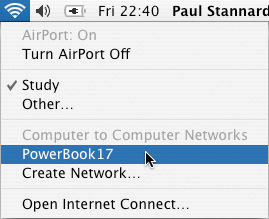
-
Choose the network in the Network drop-down list on the AirPort tab of Internet Connect. Then open Internet Connect and click Quit Internet Connect to close Internet Connect.
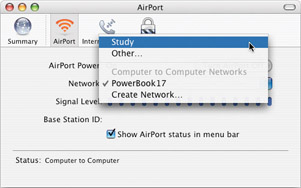
If Mac OS X prompts you to enter the password for the network, enter it in the Password text box. Select the Add To Keychain check box if you want to add the password to your Keychain. Then click OK.
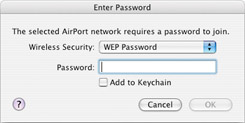
The Keychain is a Mac OS X feature that helps you consolidate all the passwords you need for networks and services when you’re logged in. After you’ve proved your identity to your Mac by logging in, Mac OS X automatically stores the passwords you enter so that it can supply them for you the next time they’re required. In some cases, such as connecting to a network, Mac OS X lets you decide explicitly whether to add the password to your Keychain. You can manage your Keychain by activating the Finder, clicking Go | Utilities, and double-clicking Keychain Access. This utility lets you lock and unlock your Keychain, change your password, delete items from the Keychain, or specify whether Mac OS X should use an item automatically or prompt you to decide.
| Tip | |
Connect to a Closed Network
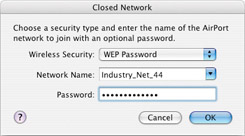
If the wireless network’s access point is configured not to broadcast its SSID (for security), the network won’t appear in the AirPort menu or in the Network drop-down list box in Internet Connect. Such a network is called a closed network. You’ll need to know the network’s name, security type, and password before you can access it.
-
Click Other in the AirPort menu or in the Network drop-down list in Internet Connect. Mac OS X will display the Closed Network dialog box.
-
Choose the type of security (for example, WEP Password) in the Wireless Security drop-down list box.
-
Type the network name and the password. (If you’ve connected to this closed network before, you can select the network in the Network Name drop-down list box. Otherwise, you’ll need to type it.)
-
Click OK.
Networking protocols are sets of standards used to package and transmit data over a network. The protocol determines how the information is divided into packets (units) for transmission, how it is addressed, and what is done to ensure it is transferred reliably.
To transmit data between your Mac and another computer, Mac OS X uses TCP/IP, the networking protocol used on the Internet. TCP/IP is a powerful protocol and very complex. Mac OS X makes TCP/IP configuration as straightforward as possible, masking most of the ugly details from your sight. Yet it helps if you understand a few essentials about TCP/IP.
IP Addresses
TCP/IP identifies the different computers (actually, the different network interfaces—more on this in a moment) on a network by using addresses called IP addresses. An IP address takes the form of four groups of three decimal numbers separated by periods—for example, 192.168.0.1. The first group (here, 192) defines the largest unit; the second group defines the unit within that unit; the third, another unit within the second unit; and the fourth, another unit within the third. In layperson’s terms, each of the numbers can go up to 255. (This is a generalization and ignores some exceptions.)
For identification, each IP address must be unique on the network it’s being used on, so each network interface on a network is assigned a different IP address. Most Macs come with several ways to connect to another computer or network: the network connection, the FireWire port, the internal modem, and maybe an AirPort card.
You can use two or more connections at the same time, so one Mac can have two or more IP addresses at once. These IP addresses can be on the same network, but they’ll typically be on different networks. For example, when your Mac is connected directly to the Internet, it has one IP address on the Internet and another IP address on your local network.
The Internet functions as a single huge TCP/IP network, so each computer on the Internet has to have a unique IP address. When you connect your Mac to the Internet, your ISP assigns it an IP address from the block of IP addresses allocated to the ISP. For a typical dial-up connection, the IP address is dynamic, meaning that it is likely to be different each time you establish the connection: the ISP allocates one of the addresses assigned to its modem pool. For a typical broadband connection, the IP address is static, meaning that you keep the same IP address all the time (your ISP reserves the IP address for you).
Network Address Translation
To reduce the number of computers directly connected to the Internet, many networks use a process called Network Address Translation (NAT). In NAT, one computer (or a special-purpose device, such as a router) is connected to the Internet and has an IP address on the Internet. The NAT computer shares the Internet connection with the other computers on the internal network as required, funneling Internet requests and replies through its IP address. This process is often compared to the mailroom in a building, through which all incoming and outgoing mail is directed.
Getting an IP Address
IP addresses can be allocated either manually or automatically. Manual allocation is handy for some situations, but automatic allocation is the norm for most networks because it is more efficient. Most automatic allocation is performed by a DHCP (Dynamic Host Configuration Protocol) server, either at your ISP (for an Internet connection) or on your local network.
When your Mac detects that no DHCP server is available, it falls back on Automatic Private IP Addressing (APIPA). APIPA assigns an IP address in the address range 169.254.0.0 through 169.254.255.255 and checks that no other computer on the network is using that IP address (and if one is, changes the IP address until it is unique on the network).
Specify a Default Wireless Network
To set your Mac to connect to a particular wireless network by default:
-
Open
 and click System Preferences to open the System Preferences window.
 -
Click Network. The Network sheet will be displayed.
-
Select AirPort in the Show drop-down list box.
-
Click the AirPort tab if it isn’t already displayed (see Figure 9-5).
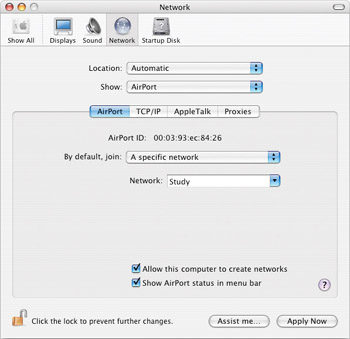
Figure 9-5: You can tell your Mac to connect to a particular wireless network by default. -
In the By Default, Join drop-down list box, select A Specific Network.
-
In the Network drop-down list box, select the network by name.
-
Click System Preferences | Quit System Preferences to close System Preferences.
Near the bottom of the AirPort tab, you can also choose whether to allow this Mac to create networks (see “Set Up an Ad-Hoc Wireless Network,” later in this chapter) and whether to display the AirPort status in the menu bar.
Disconnect from a Wireless Network
To disconnect from a wireless network, turn your Mac’s AirPort off:
-
If the AirPort icon is displayed on the menu bar, click it to open the menu, and click Turn AirPort Off.
–Or–
-
Open Internet Connect (click the Finder icon on the Dock, click Applications in the Sidebar, and double-click Internet Connect). Click the AirPort tab button, and then click Turn AirPort Off. Click Internet Connect | Quit Internet Connect to close Internet Connect.
Set Up an Ad-Hoc Wireless Network
If you don’t have an access point, you can set up an ad-hoc or computer-to-computer wireless network by using a Mac as a “software access point.” This capability means that one Mac starts broadcasting a SSID and other Macs can join the network. Ad-hoc computer networks work well for small numbers of computers, but if you plan to add more than a half-dozen computers to your wireless network, an access point will give you better results.
To set up an ad-hoc wireless network:
-
Turn on your Mac’s AirPort (as described in the previous section).
-
Select the Allow This Computer To Create Networks check box on the AirPort tab of the Network sheet in System Preferences (as shown in Figure 9-5).
-
Display the Computer To Computer dialog box or sheet:
-
If the AirPort icon is displayed on the menu bar, click it to open the menu, and then click Create Network. Mac OS X displays the Computer To Computer dialog box, which is shown in Figure 9-6 with all its options displayed.

Figure 9-6: Create an ad-hoc wireless network in the Computer To Computer dialog box. -
Otherwise, open Internet Connect, click the AirPort tab, and choose Create Network in the Network drop-down list box. Internet Connect displays the Computer To Computer dialog box.
-
-
Type the name for the network in the Name text box.
-
Choose the wireless network channel in the Channel drop-down list box. In most cases, the best choice is Automatic (11) unless you know you need to use another channel to avoid conflicts with an existing wireless network.
-
If you want to use encryption (which is usually a good idea), click Show Options to display the lower part of the Computer To Computer dialog box.
-
In the WEP Key drop-down list, choose the length of password to use for the WEP key. Choose 128-Bit over 40-Bit (More Compatible) unless a wireless adapter that you’ll use on another computer on the network is limited to 40-bit WEP.
-
In the Password and Confirm text boxes, type a password of the length specified by the readout at the bottom of the dialog box: 13 ASCII (regular text) characters for 128-bit WEP, 5 ASCII characters for 40-bit WEP.
-
Click OK. Mac OS X creates the AirPort network. If the AirPort icon is displayed in the menu bar, you will see the symbol for an ad-hoc network, as shown here:

You can now join other Macs to the network as described in “Connect to the Network,” earlier in this chapter. To tear down your ad-hoc network, click Turn AirPort Off on either the AirPort menu or the AirPort tab of Internet Connect on the Mac that created the network.
| Note | Mac OS X can’t use WPA on an ad-hoc wireless network at this writing, so 128-bit WEP is the best choice for security. |
| Note | You can also enter the password in hexadecimal notation (HEX) if you want to do so. ASCII is easier. |
Set Up a FireWire Network
As explained earlier in this chapter, FireWire offers you the option of setting up a small but very fast network among Macs. Because each FireWire cable is limited to 4.5 meters (15 feet), the computers must be physically close to each other, even if you use a FireWire hub to connect two cables and so double the cable length.
| Note | Six pins is the standard number for FireWire cables, but some devices use four-pin FireWire jacks, so some FireWire cables have six pins at one end and four pins at the other. You can’t use such a cable for networking Macs. |
If you need to connect only two Macs, all you need is a six-pin to six-pin FireWire cable. To connect three or more Macs, you need a FireWire hub with enough ports and a cable to connect each Mac to the FireWire hub.
| Note | You can join Windows computers to the FireWire network as well. If the Windows computer doesn’t automatically use APIPA to assign itself an IP address in the range 169.254.0.0 through 169.254.255.255, you may need to assign an IP address in this range manually. |
Create the FireWire Network
With the Macs running, connect them to each other using FireWire cables. Use a FireWire hub if necessary. If the hub requires power (rather than drawing it from one of the Macs), connect its power adapter.
Then perform the following steps on each Mac in turn:
-
Open
and click System Preferences. The System Preferences window will be displayed. -
Click Network. The Network sheet will be displayed.
-
Choose Network Port Configurations in the Show drop-down list box. Mac OS X will display a list like that shown in Figure 9-7.
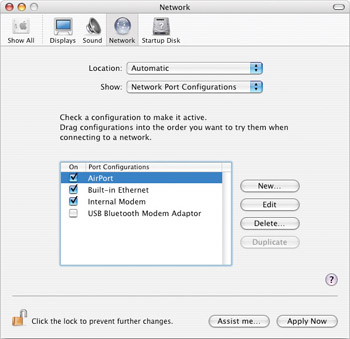
Figure 9-7: From the Network Port Configurations list on the Network sheet in System Preferences, you can create a new networking connection using FireWire. -
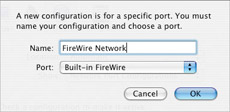
Click New. Mac OS X will display a sheet for creating a new connection.
Tip The IP address 127.0.0.1 is a special address set aside to refer to the computer on which it is entered. This address is called the loopback address. By pinging the loopback, you can check that your network connection is working.
-
In the Name text box, type the name you want to use for the network—for example, FireWire Network. In the Port drop-down list box, select Built-in FireWire.
-
Click OK. Mac OS X will add the new network item to the bottom of the list in the list box.
-
Drag the new network item to the top of the list.
-
Click Apply Now. Mac OS X applies the changes to your network configuration.
-
Click System Preferences | Quit System Preferences to close System Preferences.
Change Your Network Configuration
The Network sheet of System Preferences lets you change your network configuration. The previous sections have shown you specific examples of the changes you’ll typically need to make in order to implement a particular network (for example, a FireWire network). This section shows you how to get an overview of your network connections, change the order of your network connections, and how to specify which method Mac OS X should use to get an IP address.
Start by displaying the Network sheet of System Preferences:
-
Open
and click System Preferences. The System Preferences window will be displayed. -
Click Network. The Network sheet will be displayed.
Get an Overview of Your Mac’s Network Connections
To get an overview of your Mac’s network connections, open the Show drop-down list on the Network sheet and click Network Status. Figure 9-8 shows the Network Status screen.
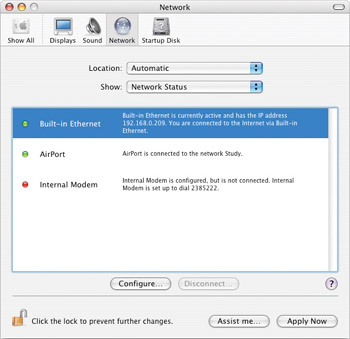
Figure 9-8: The Network Status screen on the Network sheet in System Preferences gives you a quick overview of your Mac’s network connections.
From here, you can:
-
Configure one of the connections by either double-clicking it in the list box or by clicking it and then clicking Configure
-
Disconnect a connection by clicking it and clicking Disconnect
-
Access a different area of the Network sheet by using the Show drop-down list box
Note AirPort appears in the Show drop-down list only if your Mac has an AirPort card. FireWire appears only if you’ve created a configuration for FireWire networking, as described in “Set Up a FireWire Network,” earlier in this chapter.
Change the Order of Network Connections
If your Mac has established multiple network connections via different network interfaces, you must tell Mac OS X the order in which to use the interfaces.
-
On the Network sheet of System Preferences, click the Show drop-down list, and then click Network Port Configurations. The Network Port Configurations sheet is displayed. (See Figure 9-7, earlier in this chapter, for an example of this sheet.)
-
Select the check box for each interface you want to make active. Clear the check box for each interface you don’t want to use.
-
Drag the items in the list box into the order you want to use them for connecting to a network.
-
Click Apply Now to apply your changes.
Specify How Mac OS X Should Get an IP Address
To specify how Mac OS X should get an IP address:
-
On the Network sheet of System Preferences, click the Show drop-down list, and then click Built-In Ethernet, AirPort, or FireWire as appropriate. This example uses Built-In Ethernet.
-
Click the TCP/IP tab button (see Figure 9-9) to display the TCP/IP tab.
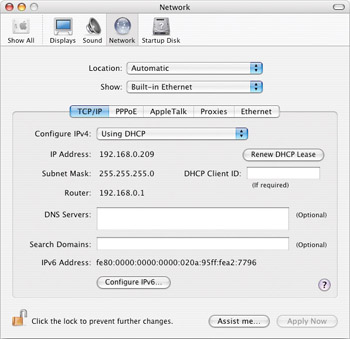
Figure 9-9: Use the Configure IPv4 dropdown list to specify how Mac OS X should get an IP address. -
Click the Configure IPv4 drop-down list and click the appropriate item:
-
Click Using DHCP to have Mac OS X request an IP address automatically from a DHCP server (possibly your DSL router).
-
Click Manually to specify an IP address manually. Type the IP address, the subnet mask, and the router details in the text boxes that Mac OS X displays.

-
-
Click Apply Now.
After you’ve finished working on the Network sheet, click System Preferences | Quit System Preferences to close System Preferences.
| Caution | Remember that private ranges of IP addresses work only with computers on their own subnets and with IP addresses from the same range. You can tell what the subnet is from the subnet mask. For example, with a subnet mask of 255.255.255.0, all computers in the network must have IP addresses with the same first three numbers, varying only in the last number. For example, computers with the IP addresses 192.168.104.001 and 192.168.104.002 are on the same subnet. |
Check Network Interface Status
and Connections
To check the status of a network interface or find out if a network connection is working, launch Network Utility.
-
Activate the Finder.
-
Open Go and click Utilities. The Utilities folder will be displayed.
-
Double-click Network Utility. Network Utility will open.
You can then use Network Utility as discussed in the following sections.
Check the Status of a Network Interface
To check the status of a network interface:
-
Click the Info tab button in Network Utility to display the Info tab (see Figure 9-10).
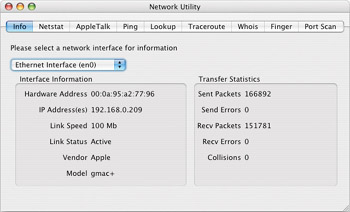
Figure 9-10: The Info tab of Network Utility lets you check the IP address, link speed, and status for a network interface. -
Select the network interface in the Please Select A Network Interface For Information drop-down list box:
-
Ethernet Interface (en0) is the Ethernet adapter.
-
Ethernet Interface (en1) is the AirPort card (and will only appear if your Mac has an AirPort card).
-
Ethernet Interface (fw0) is your Mac’s FireWire connection.
Note Computers start counting with 0 rather than with 1, so your Mac considers en0 its “first” Ethernet network interface and en1 its “second.”
-
-
The Interface Information area displays the following information:
-
The Hardware Address (also called the MAC, or Media Access Control, address) is an address encoded into the physical network adapter—for example, 00:0a:95:a2:77:96. This address doesn’t change.
-
The IP Address is the IP address currently assigned to the network interface—for example, 192.168.0.209.
-
The Link Speed is the speed of the network connection in megabits (Mb) per second: 400 Mb for FireWire, 100 Mb for Fast Ethernet, 54 Mb for 802.11g, 11 Mb for 802.11b, and 10 Mb for regular Ethernet (10BaseT).
Note The link speed shown in Network Utility is the maximum speed of the link. The actual speed you get for data transfer will often be lower.
-
Check a Connection to Another Computer
To check a connection to another computer:
-
Find out the computer’s IP address. (If the computer is a Mac, you can use the technique described in the previous section).
-
Click the Ping tab button in Network Utility to display the Ping tab (see Figure 9-11).
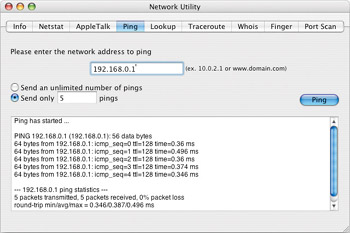
Figure 9-11: Use the Ping tab of Network Utility to test the TCP/IP connection to another computer. -
Type the other computer’s IP address in the Please Enter The Network Address To Ping text box.
-
Select the Send Only NN Pings option button and type a low number (such as 3 or 5) in the text box.
-
Click Ping. The Ping utility sends data packets to the specified address and displays its results. The example in Figure 9-11 shows responses from the address that was pinged, with the Statistics section showing that 5 packets were sent and 5 packets received, indicating that the connection is working. If Ping gets no response and the Statistics section indicates a “100% packet loss,” you know the connection isn’t working.
After you’ve finished using Network Utility, click Network Utility | Quit Network Utility to close it.
The block of IP addresses you use with the Internet Protocol depends on whether the computers to be assigned the addresses will be private or public.
Get Private IP Addresses
If the computers will be operating only on an internal network, they are private and need be unique only on the internal network. Four blocks of IP addresses have been set aside and can be used by any organization for its private, internal needs:
-
10.0.0.0 through 10.255.255.255 (typically used for large networks)
-
169.254.0.0 through 169.254.255.255 (used for the Automatic Private IP Addressing protocol, or APIPA)
-
172.16.0.0 through 172.31.255.255 (typically used for medium-sized networks)
-
192.168.0.0 through 192.168.255.255 (widely used for small networks)
Get Public IP Addresses
Computers that are connected directly to the Internet are public and thus need a globally unique IP number. Your ISP will probably provide the IP addresses you need. For a larger block, you may have to go to one of the three Internet registries:
-
American Registry for Internet Numbers (ARIN), at www.arin.net/, which covers North and South America, the Caribbean, and sub-Saharan Africa
-
R seaux IP Europ ens (RIPE), at www.ripe.net/, which covers Europe, the Middle East, and northern Africa
-
Asia Pacific Network Information Center (APNIC), at www.apnic.net/, which covers Asia and the Pacific
-
|
| < Day Day Up > |
|
EAN: 2147483647
Pages: 68