Print Documents and Pictures
|
| < Day Day Up > |
|
Before you can transfer your digital documents and pictures to paper, you must install and configure a printer.
| Tip | You can also connect an Ethernet laser printer directly to your Mac by using a crossover cable, a special cable that reverses the wires in the cable from their standard arrangement. |
Install a Printer
To install either a local printer or a network printer in Mac OS X, you use the Printer Setup Utility. This section explains the process of installing a local printer separately from the process of installing a network printer, as there are several differences between the two processes.
Before installing a local printer, work through the following checklist.
| Note | Some printers connect to your Mac via a wireless connection. This arrangement is typically used for PowerBooks and iBooks, for which it offers the most benefits, but it can be used with desktop Macs as well. In this case, “plugging the printer into your Mac” means that you should establish the appropriate wireless connection. |
Checklist Before Installing a Printer
A local printer is one that is attached to your Mac with a cable or a wireless connection. Make sure your printer meets the following conditions before you begin to install it in Mac OS X:
-
It is plugged into the correct port on your Mac. Most inkjet printers and personal laser printers connect to your Mac directly via a USB cable. Most laser printers designed for multiple users connect via an Ethernet connection: both the printer and your Mac connect to the network’s hub or switch via standard Ethernet cables or a wireless AirPort, and they communicate through the hub or switch.
-
It is plugged into an electrical outlet.
-
Fresh ink, toner, or ribbon is correctly installed.
-
It is loaded with paper.
Install a Local Printer
Installing a local printer is usually pretty straightforward:
-
With the printer turned off, connect it to your Mac. Then make sure the other points in the above checklist are satisfied.
-
Turn on the printer.
-
Activate the Finder.
-
Open Go and click Utilities. The contents of the Utilities folder will be displayed.
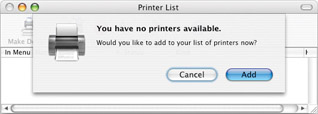
-
Double-click Printer Setup Utility. Printer Setup Utility will open and will display the Printer List window. If you haven’t set up a printer on this Mac before, Printer Setup Utility displays a message inviting you to add a printer.
Note If Printer Setup Utility doesn’t select a suitable model in the Printer Model drop-down list box, open the drop-down list, select the category, and then use the resulting list box to specify the model.
-
Click Add. (If Printer Setup Utility doesn’t display this message, click the Add button in the toolbar.) Printer Setup Utility displays a dialog box for selecting the printer.

-
In the top drop-down list box, select USB for a USB-connected printer or AppleTalk for an Ethernet-connected printer.
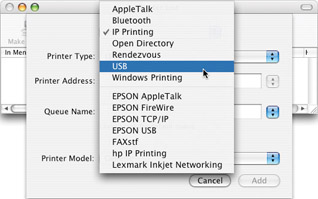
-
Printer Setup Utility searches for connected printers and displays the names of any it finds.
-
Click the printer name. Printer Setup Utility automatically selects the appropriate printer model in the Printer Model drop-down list box.
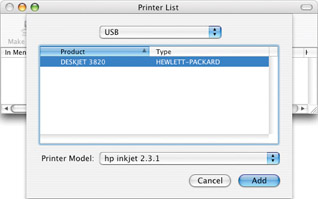
-
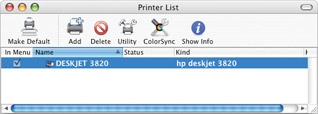
Click Add. Printer Setup Utility adds the printer to the Printer List window. If this is the first printer you’ve added, Printer Setup Utility automatically makes the printer the default printer.
-
Open the Printer Setup Utility menu and click Quit Printer Setup Utility to close Printer Setup Utility.
Note To share your Mac’s printer with other computers on your network, see “Share Your Printers” in Chapter 10.
You’re ready to test your printer. Go to “Test the Printer,” later in this chapter.
Install a Network Printer
Network printers are not directly connected to your Mac but are available to you by being shared through the network to which your Mac is connected. There are three types of network printers:
-
Printers connected to someone else’s computer and shared by that computer
-
Printers connected to a dedicated print server (a special-purpose computer whose function is to share and manage printers on a network)
-
Printers directly connected to a network (these printers have a built-in print server)
Note If you don’t know the details of the network printer you’re connecting to, consult your network administrator.
To connect to a network printer:
-
Connect your Mac to the network if it’s not already connected.
-
Activate the Finder, open Go and click Utilities, and then double-click Printer Setup Utility.
-
Click Add either in the message box that suggests you add a printer or on the toolbar in Printer Setup Utility.
-
Specify the details of the printer:
-
To connect to a line printer (typically on a corporate or college network), select IP Printing in the top drop-down list box (see Figure 6-9). Enter the IP (Internet Protocol) address of the printer in the Printer Address text box, enter the queue name in the Queue Name text box (or leave it blank to use the default queue), and use the Printer Model drop-down list box and the list under it to specify the printer mode. Click Add.
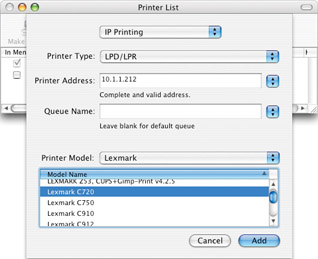
Figure 6-9: Use the IP Printing choice to connect to a line printer. -
To connect to a network printer shared using Apple’s AppleTalk protocol, select AppleTalk in the top drop-down list box. In the second list box, select the AppleTalk zone—for example, Local AppleTalk Zone. Select the printer by name in the list box. Printer Setup Utility should select the printer model automatically in the Printer Model drop-down list box; if not, select it manually. Then click Add.
-
To connect to a printer shared by a Windows computer, select Windows Printing in the top list box. In the second list box, select the name of the Windows workgroup if Printer Setup Utility hasn’t selected it automatically. The list box displays the computers available on the network. Double-click the computer that’s sharing the printer. (Enter a user name and password if requested and click OK.) Printer Setup Utility will display the list of printers (see Figure 6-10). Select the printer in the middle list box, specify the manufacturer in the Printer Model drop-down list box, and then specify the model in the lower list box. (If your printer isn’t listed, consult the manufacturer.) Click Add.
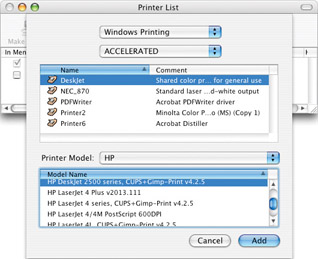
Figure 6-10: Open the entry for the Windows computer that’s sharing the printer (here, ACCELERATED) so that you can select the printer and specify which model it is.
-
-
Printer Setup Utility adds the printer to the Printer List window. If this is the first printer you’ve added, Printer Setup Utility automatically makes the printer the default printer.
-
Open the Printer Setup Utility menu and click Quit Printer Setup Utility to close Printer Setup Utility.
Test the printer as described next.
Test the Printer
After adding your printer, test it by printing a document. For example:
-
Click the iPhoto icon on the Dock. iPhoto will open.
-
Select a picture you want to print.
-
Click Print on the toolbar at the bottom of the window. The Print dialog box will open (see Figure 6-11).
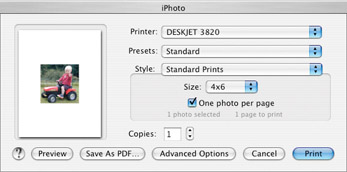
Figure 6-11: Print a document (such as a picture from iPhoto) to check that your printer is working correctly. -
Ensure the correct printer is selected in the Printer drop-down list.
-
In the Style drop-down list, select Standard Prints.
-
In the options area below the Style drop-down list, select the One Photo Per Page check box.
-
Click Print. iPhoto sends the page to the printer, which prints it.
Most printing is done from within an application. Here’s an example using Microsoft Word, whose Print dialog box is shown in Figure 6-12.
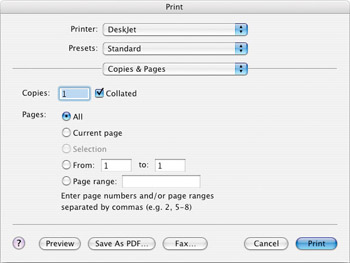
Figure 6-12: The Print dialog box in Microsoft Word is similar to those in many other applications.
Print Documents
To print:
-
Open File and choose Print to display the Print dialog box.
-
Click Print to print using the default settings.
Choose a Printer
To choose which printer you want to use:
-
Open File and choose Print to display the Print dialog box.
-
Open the Printer drop-down list box and choose the printer you want.
Specify Which Pages to Print
In the Pages area of the Print dialog box you can:
-
Select the All option button to print all pages in the document. (This is the default setting.)
-
Select the Current Page option button to print only the current page.
-
Select the From option button, specify the starting page in the From text box, and specify the ending page in the To text box.
-
Print a series of individual pages, and/or one or more ranges of pages, by specifying the individual pages separated by commas, and specifying each range with a hyphen. For example, entering 4,6,8-10,12 will print pages 4, 6, 8, 9, 10, and 12.
Identify a Default Printer
If you add two or more printers, you need to tell Mac OS X which is the default. To do so:
-
Activate the Finder, open Go and click Utilities, and then double-click Printer Setup Utility.
-
Select the printer in the list box.
-
Click Make Default.

-
Open the Printer Setup Utility menu and click Quit Printer Setup Utility to close Printer Setup Utility.
Print to a PDF File
Instead of printing a document on a piece of paper, you can print it to a file in Adobe’s Portable Document Format (PDF) format. There are two primary reasons for printing to a PDF:
-
To create a file that you can take to a remote printer. For example, you might create a PDF file so that you could have it printed on a specialist item, such as a T-shirt, at a service bureau.
-
To create a file that you can send to someone who is using a different computer platform (for example, Windows or Linux) and be confident that they will be able not only to open the document but also see it exactly as you laid it out.
Caution The PDF format is widely used for sending high-resolution print jobs to professional printers. The PDF files that Mac OS X creates aren’t suitable for this purpose: they’re optimized to look great on screen and to provide impressively high quality in a relatively compact file size, but they don’t provide the super-high resolution that professional applications, such as Adobe Acrobat, deliver.
Because Adobe has promoted the PDF format vigorously and has produced and distributed free versions of its Acrobat Reader software for all significant computer operating systems, almost anybody with an Internet connection should be able to open a PDF and view it as its creator intended.
| Note | On most operating systems, to create a PDF file, you need a custom application such as Adobe’s Acrobat application—which, unlike Acrobat Reader, Adobe doesn’t distribute for free. Apple, however, has built native support for PDF into Mac OS X, so you can create PDFs automatically from any application that supports printing. |
To create a PDF file:
-
Open the file from which you want to create the PDF file in the appropriate application. For example, open iPhoto and select a picture.
-
Open File and choose Print to display the Print dialog box.
-
Choose printing options.
-
Click Save As PDF. The application displays the Save To File dialog box (see Figure 6-13).

Figure 6-13: The Save To File dialog box lets you create a PDF file of a document in the folder you choose. -
Enter the file name and choose the folder in which to save it.
-
Click Save.
-
Open the application’s application menu and click the Quit command to close the application. For example, open iPhoto and click Quit iPhoto to close iPhoto.
Print Web Pages
Printing web pages works the same way as printing from any other application:
-
Click the Safari icon on the Dock. Safari will open.
-
Browse to the page you want to print.
-
Open File, click Print, and select the printer and other options in the Print dialog box.
-
Click Print to print the page.
-
Open Safari and click Quit Safari to close Safari.
Control Printing
When a document is printed, the print job (the information required to print the document) is sent to the printer, where it is stored temporarily in a holding area called the print queue. When the printer is ready, it starts to print the document. If further documents are sent to the printer while the printer is busy printing, they wait their turn in the print queue. You can control the print process by manipulating jobs in the print queue. For example, you might need to place a lower-priority print job on hold in order to get an urgent print job printed.
| Note | You cannot change the order in which print jobs are being printed by putting on hold the document that is currently being printed. You must either complete printing the current document or cancel it. You can, however, use hold to get around intermediate documents that are not currently printing. For example, suppose you want to print the third document in the queue immediately, but the first document is currently printing. You must either let the first document finish printing or cancel it. You can then pause the second document before it starts printing, and the third document will begin printing when the first document is out of the way. |
To control printing:
-
Open Go and click Utilities. The contents of the Utilities folder will be displayed.
-
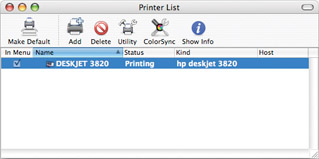
Double-click Printer Setup Utility. Printer Setup Utility will be displayed, showing the status of the printer:
-
Printing indicates that the printer is currently printing.
-
Stopped indicates that the printer has been stopped (for example, by an administrator).
-
A blank indicates that the printer is functional but waiting for print jobs to be sent to it.
-
-
In the list box, select the printer you want to control.
-
To quickly stop all print jobs on the printer, open the Printers menu and click Stop Jobs. (You might want to do this if you notice a problem with the printer.) You can then restart the jobs by opening the Printers menu and clicking Start Jobs.
-
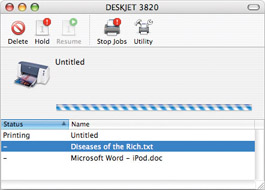
For greater control, open Printers and click Show Jobs. A window for the printer will be displayed:
-
Control the jobs as necessary:
-
To delete a job, select it and click Delete.
-
To put a job on hold so that other jobs can print, select the job and click Hold.
-
To resume a job you’ve put on hold, select it and click Resume.
-
To stop all jobs (for example, so that you can change the printer’s cartridge), click Stop Jobs.
-
To restart all jobs after stopping them, click Start Jobs.
-
-
Close the printer utility by opening its application menu and clicking the Quit command.
-
Open the Printer Setup Utility menu, and click Quit Printer Setup Utility to close Printer Setup Utility.
A font is a set of characters with the same design, size, weight, and style. A font is a member of a typeface family, all with the same design. The font 12-point Arial bold italic is a member of the Arial typeface family with a 12-point size, bold weight, and italic style. Mac OS X comes with a good variety of fonts, which you can manipulate by using the Font Book application (see Figure 6-14):
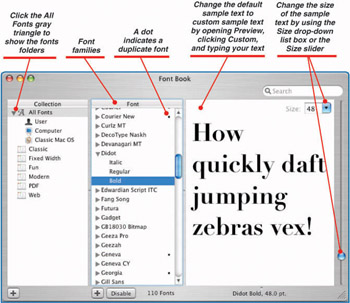
Figure 6-14: Font Book lets you examine fonts, add them, and delete them.
-
Activate the Finder.
-
Click Applications in the Sidebar.
-
Double-click Font Book.
Add Fonts
-
Activate the Finder.
-
Open the folder that contains the font file.
-
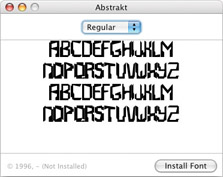
Double-click the font file. Font Book will display a window showing the font.
-
Click Install Font. Font Book installs the font to your User font folder and displays its main window.
-
If you want the font to be available to all users of your Mac rather than just to you, drag the font to the Computer item under the All Fonts collection.
Disable Fonts
If you want to reduce temporarily the number of fonts you have available without deleting the fonts, you can disable the fonts:
-
Open Font Book and click the font in the Font list.
-
Click the Disable button at the bottom of the Font list. Font Book will display a confirmation dialog box.
-
Click Disable. Font Book will disable the font and will display Off next to it in the Font list.
To enable a font you’ve disabled, click the font in the Font list and click the Enable button at the bottom of the Font list.
Delete Fonts
To delete a font:
-
Open Font Book and click the font in the Font list.
-
Press delete. Font Book will display a confirmation dialog box.
-
Click Remove. Font Book will delete the font file.
Use Fonts
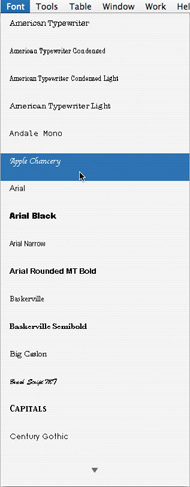
Fonts are used or specified from within an application. In Microsoft Word, for example, you can select one or more characters and then open the Font menu (as shown here) or the Font dialog box (open Format and click Font) to apply the font you want. Other applications use similar features to let you choose fonts. One nice feature in recent versions of Word is that the list shows what the fonts look like instead of simply showing their names in a standard system font.
|
| < Day Day Up > |
|
EAN: 2147483647
Pages: 68