The Deployment Descriptor
|
| < Free Open Study > |
|
So far we have briefly described the deployment descriptor as a configuration file for the web application. It is perhaps the single most important item of your web application (after its content of course). In this section we are going to take a closer look at it.
In a nutshell, the deployment descriptor conveys the elements and configuration information of a web application between developers, assemblers and deployers. All manner of information is defined in the deployment descriptor, from information about the web application itself, to information about its constituent parts, and most importantly, how those parts are assembled into a complete web application. This section will discuss the elements of the deployment descriptor that are important for most web applications. The way in which a deployment descriptor is written is often the key to how well a web application fits its purpose. It is very simple to write the components of a web application, but considering how it should be assembled is a very difficult and often neglected task.
The areas of the deployment descriptor that we are going to focus in on are:
-
Servlet definitions and mappings
-
Servlet context initialization parameters
-
Error pages
-
Welcome pages
-
Simple file-based security
To illustrate the parts of the deployment descriptor, we will show a simple example descriptor file and then proceed to explain its constituent parts. First, however, you should note the following important rules about the deployment descriptor, which should be adhered to in order that the deployment descriptor is valid for web applications using the Servlets 2.3 specification:
-
The deployment descriptor must reside at the top level of the WEB-INF directory of your web application
-
It must be a well-formed XML file named web.xml
-
This XML file must conform to Sun's web application DTD, which is defined at http://java.sun.com/dtd/web-app_2_3.dtd.
Let's now take a look at an example web.xml file.
An Example Deployment Descriptor
The example deployment descriptor is listed below. Once we have seen the relevant parts of the deployment descriptor we will then validate it against the DTD.
<?xml version="1.0" encoding="ISO-8859-1"?> <!DOCTYPE web-app PUBLIC "-//Sun Microsystems, Inc.//DTD Web Application 2.3//EN" "http://java.sun.com/dtd/web-app_2_3.dtd"> <web-app>
At the start of the descriptor we need to declare the location of the DTD for the file, using the <!DOCTYPE> tag. This is followed by the starting <web-app> tag, inside of which all the deployment information for the web app can be found. Then we encounter several tags that give information about the entire web application:
<display-name>Test Web Application</display-name> <description>A test web application</description>
The <display-name> tag allows us to specify a short name for the overall web application. This tag is designed to allow the name of the web application to be displayed by tools including the GUI-based deployment utilities supplied with many of the mainstream application servers.
The <description> tag allows us to provide a short textual description of the purpose of this web application. This is a very simple form of documentation for the overall web application.
Next we have the <context-param>, <servlet>, and <servlet-mapping> tags. These contain information about servlet context initialization parameters, the servlets in the application, and the mapping of the servlets to specific URLs, respectively. We'll examine these tags in more detail a little later.
<context-param> <param-name> adminEmail </param-name> <param-value> admin@wrox.com </param-value> </context-param> <servlet> <servlet-name>Servlet1</servlet-name> <servlet-class>example.Servlet1</servlet-class> <init-param> <param-name>version</param-name> <param-value>0.1b</param-value> </init-param> </servlet> <servlet> <servlet-name>Servlet2</servlet-name> <servlet-class>example.Servlet2</servlet-class> </servlet> <servlet-mapping> <servlet-name>Servlet1</servlet-name> <url-pattern>/home.html</url-pattern> </servlet-mapping> <servlet-mapping> <servlet-name>Servlet2</servlet-name> <url-pattern>/AnotherServlet</url-pattern> </servlet-mapping>
Then we encounter <welcome-file-list> and <error-page> tags. In these tags we define the files to use as the welcome and error pages for the application. We'll talk more about these tags later too:
<welcome-file-list> <welcome-file> /index.html </welcome-file> </welcome-file-list> <error-page> <exception-type> java.lang.ArithmeticException </exception-type> <location> /error.html </location> </error-page> <error-page> <error-code> 404 </error-code> <location> /404.html </location> </error-page>
The final set of tags, below, deal with security aspects for the web-application. Again, we'll be looking at these tags more closely later:
<security-constraint> <web-resource-collection> <web-resource-name>SecureResource</web-resource-name> <url-pattern>/admin/*</url-pattern> <http-method>GET</http-method> <http-method>POST</http-method> </web-resource-collection> <auth-constraint> <role-name>admin</role-name> </auth-constraint> </security-constraint> <login-config> <auth-method>BASIC</auth-method> <realm-name>Secure Realm</realm-name> </login-config> </web-app>
Although the deployment descriptor above looks very daunting because of its size and use of different, perhaps unfamiliar tags, we will soon see that it is very simple.
We shall now move on and look at the parts of the example deployment descriptor that relate directly to servlet deployment.
Servlet Definitions and Mappings
Looking at the deployment descriptor we can see that it defines two servlets in the web application. We can see this by looking at the number of unique <servlet> tags. The first of our two servlets is defined below:
<servlet> <servlet-name>Servlet1</servlet-name> <servlet-class>example.Servlet1</servlet-class> <init-param> <param-name>version</param-name> <param-value>0.1b</param-value> </init-param> </servlet>
The <servlet> tag contains several child tags that give information about the declaration of the servlet. This information includes the unique name that the servlet is registered with in this web application, and the full name of the class that implements the servlet's functionality. The <servlet-name> tag gives the servlet a unique name within the web application. In the case of our first servlet we can see that it is called Servlet1.
The <servlet-class> tag gives the fully qualified class name of the class that implements the functionality of this servlet. In the case of our first servlet we can see that Servlet1 is implemented in the class example.Servlet1.
Looking at the <servlet> element for our first servlet we can see that it contains more than just the name and class of the servlet. It also contains an <init-param> tag. This tag allows us to specify initialization parameters for our servlet. These parameters can be used for many purposes, for example setting the language for an application, or defining the location of a configuration file for the application. As we can see our servlet has one parameter set. The <param-name> child tag gives the name that the parameter can be accessed by, and the <param-value> gives the starting value for the parameter.
The parameter can be accessed from our first servlet using the getInitParameter() method on the ServletConfig object. So, in order to get access to the parameter defined for our first servlet we can use the following code within the servlet's class:
String version = getServletConfig().getInitParameter("version"); Note that we don't need to get the ServletConfig object explicitly, as the GenericServlet class implements the ServletConfig interface, so the method is available to us.
Servlet Mappings
Once we have defined our servlet through the <servlet> tag, we need to map it to a particular URL pattern. This is necessary so that the web container knows which requests to send to a particular servlet.
You may think something along the lines of "Why can we not just pass all requests to the servlet with the same name as the end of the URL?" For example, http://localhost:8080/mywebapp/Servlet1, would be routed to the servlet defined with the name Servlet1. This would seem like a very logical approach, and is in fact the most common way of implementing the mappings between servlets and URLs. However, the approach is not very flexible. Imagine if you wanted to map more than one URL to the same servlet, which could, for example, check that a user is logged in? This is where the <servlet-mapping> element illustrates its power. An example of the power of this mapping is to hide the implementation of your application from the user. As far as the user is concerned, they cannot tell if your application is based on servlets, cgi-bin, or any other technology. This can minimize the risk of hacking.
In our example deployment descriptor, our first servlet is invoked every time http://localhost:8080/TestWebApp/home.html (assuming the web application is called TestWebApp) is encountered. The unique servlet name that we defined in the <servlet> (referenced here as <servlet-name>) is mapped to a URL pattern, which is referenced here as <url-pattern>:
<servlet-mapping> <servlet-name>Servlet1</servlet-name> <url-pattern>home.html</url-pattern> </servlet-mapping>
It is worth mentioning at this stage that servlets can be mapped to more than one URL through the use of wildcards in the <url-pattern> child of the <servlet-mapping> tag. For example, the following example maps every URL encountered to the same servlet:
<servlet-mapping> <servlet-name>ValidatorServlet</servlet-name> <url-pattern>/*</url-pattern> </servlet-mapping>
You can also have more than one <servlet-mapping> tag per defined servlet. This allows you to map completely disparate URLs to the same target
Servlet Context Initialization Parameters
The next section of the deployment descriptor that we are going to discuss is the section concerning application (or servlet context) initialization parameters. We have already seen how to define initialization parameters for individual servlets, now we will look at defining parameters for the whole web application.
In order to achieve this we use the ServletContext object. We discussed the ServletContext earlier in the chapter, and said that it is a servlet's view into the web application that contains it. As such, if a parameter is set in the ServletContext, it is accessible from all servlets in the web application.
Through the deployment descriptor we can provide the ServletContext with any number of initialization parameters. We could use such parameters to convey application information such as an administrator's e-mail address. These parameters are available to the servlets in the web application via two abstract methods of the ServletContext. These methods are:
-
getInitParameter(String name)
-
getInitParameterNames()
The first method returns a String containing the value of the parameter, the second returns an Enumeration containing the names of the parameters in the ServletContext.
Since these methods are abstract (like all methods on the ServletContext interface), their implementations must be provided by the web container. In our example, we define one initialization parameter for our web application. This is shown below:
<context-param> <param-name> adminEmail </param-name> <param-value> admin@wrox.com </param-value> </context-param>
This parameter represents the e-mail of the applications administrator. This can be pulled into any servlet in the application, so that the e-mail used is consistent throughout the system and any modifications to it only need to be made in a single place. In order to obtain this parameter in any particular servlet we can use the following code
String adminEmail = getServletContext().getInitParameter("adminEmail");
Error Pages
In the early days of web development, if an error occurred in an application we would see the familiar HTTP Error 500, or worse still a nasty stack trace on the browser. For example if our servlet performed an operation that results in an exception, it is quite common to see the following type of output in the client browser:
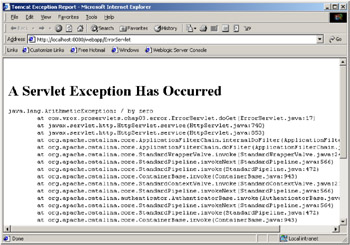
In a production system, the output of a stack trace like this does not inspire much confidence from the end user of the application! However, we can control how exceptions or errors are displayed to the user through the use of error pages. Error pages allow us to specify pages to be shown when particular errors occur; these errors can include Java exceptions, as well as HTTP errors (such as when a page can't be found).
Our sample deployment descriptor defines two error pages. The first error page is shown whenever the server encounters a java.lang.ArithmeticException (as in the above screenshot). The tags to define this are shown below:
<error-page> <exception-type> java.lang.ArithmeticException </exception-type> <location> /error.html </location> </error-page>
As you can see, the <error-page> tag has two children. In this case, these are <exception-type> which defines the exception to catch, and <location> which defines the page/resource to show on encountering the error defined.
If we were to run the same servlet that produced the screen shot above, we would see the resource error.html instead of the nasty Java stack trace that we saw above:
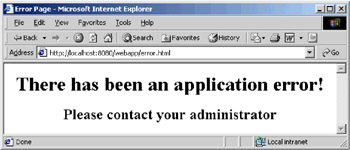
This is obviously a lot more user-friendly and readable, and has the added advantage that the web application developer has control over what happens when an error occurs. However, there are two sides to this coin. Hiding the error information from the user also means hiding it from the people expected to deal with the error. It would be useful, for example, to log the real error to a file, or display it in a collapsible area of the screen. This would isolate the user from a messy stack trace, but still allow the programmers to identify the root of the problem.
Our sample deployment descriptor also contains an error page definition for an HTTP error. This is defined using the tags below:
<error-page> <error-code> 404 </error-code> <location> /404.html </location> </error-page>
This looks very similar to the previous example, but note the use of the <error-code> child tag, instead of the <exception-type> child. This <error-code> child defines the HTTP error under which the error page defined will be shown. In this example, whenever the web container can not find a file requested in the web application, it will show the page 404.html rather than the server's default error page.
Welcome Pages
Those of you that have developed static websites will be familiar with the concept of welcome pages. A welcome page is just a default page for a web application. Just as a website can have a default page (typically index.html or home.html) a web application can have a page or resource that is displayed if no specific page within the application is requested.
In order to define a welcome page for a web application we use the tags below:
<welcome-file-list> <welcome-file> index.html </welcome-file> </welcome-file-list>
Note that the file specified in the <welcome-file> tag may not exist. All this tag does is tells the container which files to look for if a request occurs for a directory, rather than a servlet. In this case the tag instructs the container to look for the file index.html if no other resource is specified. You can have more than one <welcome-file> tag, and the container will look for each resource in order, displaying the first resource found. This is useful, as you can define several common welcome file names (such as index.html, home.html, index.htm, home.htm), freeing the developers from having to name their welcome files the same across the application.
File-Based Security
So far our servlets have existed in a vacuum, where there is no hacking or distrust. Sadly this is not the case in the real world. In reality you must secure your applications from the dubious characters that exist around the Internet. If you can provide security in your applications, then you can do a whole host of things that would be unadvisable otherwise, such as accepting payments, storing credit card information, and so on.
The issue of security splits into four major areas:
-
Authentication - Verification of a user interacting with a system
-
Authorization - Restricting access to resources within an application
-
Confidentiality - Hiding information from all but authorized parties
-
Integrity - Ensuring that communications are received unmodified
In this section we will consider authentication.
HTTP Authentication
Fortunately for us, the HTTP protocol comes with a built-in authentication mechanism. This mechanism is called Basic Authentication. Basic authentication uses a very simple challenge/response system, based on a username and password. The web container maintains a list of usernames and passwords, and authenticates the user's details based on this information. The users details are conveyed to the web container via a username/password box popped up by the web browser.
HTTP based authentication is detailed in RFC 2617 available at http://www.ietf.org/rfc/rfc2617.txt
Basic file-based authentication is very easy to configure. Let's see how to do this for the Tomcat web container.
The first step in setting up file-based basic authentication is to decide which resources in your application you wish to protect. Once you have done this you can set up your deployment descriptor.
The root of the tags defining security is the <security-constraint> tag. Within this you define the resources to secure via the <web-resource-collection> tag:
<web-resource-collection> <web-resource-name>SecureResource</web-resource-name> <url-pattern>/admin/*</url-pattern> <http-method>GET</http-method> <http-method>POST</http-method> </web-resource-collection>
The collection of resources to secure is given a name via the <web-resource-name>. The <url-pattern> tag defines the URL pattern that represents the resources to secure. In the above case everything in the admin directory is secured. The <http-method> tags define the HTTP methods on the secured resources to which the security applies. In this case the security is applied to both the GET and POST methods. If no <http-method> tags are present, then the security constraint applies to all HTTP methods.
Once you have described the resources to secure, you must decide which users or groups of users will be able to see the secured resources. This is done using the <auth-constraint> tag:
<auth-constraint> <role-name>admin</role-name> </auth-constraint>
The <role-name> tag gives the role name (user or group) that is able to access this collection of resources.
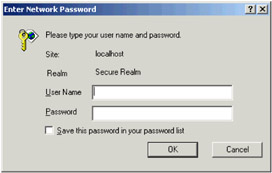
Having defined the resources to secure, and the roles that are able to see the resources, we have to tell our web application that we wish to use basic authentication. This is done using the <login-config> tag:
<login-config> <auth-method>BASIC</auth-method> <realm-name>Secure Realm</realm-name> </login-config>
The <auth-method> tag indicates that we wish to use basic authentication, and the <realm-name> tag gives a textual name to show to the user in the pop-up login box. The setup used here would show a pop-up to the user like that shown in the screenshot below:
Defining Users in Tomcat
In order to use security, we also need to set up some users. For file-based security in Tomcat this is a very simple process. The users and groups that you wish to add can be added to the tomcat-users.xml file in the %CATALINA_HOME%/conf directory. A sample setup of this file would be:
<tomcat-users> <user name="tomcat" password="tomcat" roles="tomcat" /> <user name="role1" password="tomcat" roles="role1" /> <user name="sam" password="dalton" roles="admin" /> </tomcat-users>
This defines three users, one of which has a role called admin, and as such will be able to access the resources defined above.
We'll look at securing web applications in more detail in Chapter 9.
Tag Order
A common problem when writing your deployment descriptor will be with tag order. It is important to remember that the tags in the deployment descriptor are order dependent. For example, the <servlet> tags that define servlets MUST come before the <servlet-mapping> tags that map the defined servlets to a URL pattern. Any errors with the ordering of tags will normally be picked up at deployment time, but it is possible that this will not be the case (for example, if your web container does not use a validating XML parser). In order to make sure that your deployment descriptor is correct in every way, we will discuss a small deployment descriptor validation tool in the next section.
Validating Your Deployment Descriptor
Once you have written your deployment descriptor it is important to know that you have defined the configuration of the web application correctly. You may wonder how we define 'correct' in this context. Basically a web application deployment descriptor is correct if it conforms to the published Document Type Definition (DTD) for web applications. The DTD in question is web-app_2_3.dtd. This DTD is available from the Sun web site at http://java.sun.com/dtd/web-app_2_3.dtd. This DTD is included in the /code directory for this chapter. In order to ensure that your deployment descriptor complies with this DTD, you have three options; these options are presented here in ascending order of desirability:
-
Pick through the deployment descriptor and the DTD by hand, checking that you have all of the correct tags in the correct places
-
Deploy your application to a web container, and see if you get any errors during deployment
-
Use a validating XML parser to validate your XML deployment descriptor against the appropriate DTD
Obviously, the first option is not ideal, as it is very easy to miss items in a very large and involved deployment descriptor. If indeed you do fail to find mistakes, then you will get errors when you come to deploy your web application to a web container.
This is not actually a major problem, since most modern web containers will report the errors, and give you help in finding them. Once you have fixed any errors reported, you can re-deploy your application, and start the process again. It is possible that errors may mask the existence of other errors, so you could have to re-deploy your application quite a few times to isolate and fix all of the potential errors in your descriptor. Although this is not a huge hassle, there may be times when it is not an appropriate method for finding errors. For instance, if you are deploying a very large application, the process of preparing an application for deployment may be very time consuming (imagine trying to JAR up the contents of your company's web site).
So finally, we have the option of using a validating XML parser. Such a validating XML parser is the JAXP 1.1 Reference Implementation from Sun. This is available at http://java.sun.com/xml/download.html.
To make use of the parser to achieve our goal, we must also write a small utility program which uses it to validate our deployment descriptor. Such a program is shown below:
package deployment; import java.io.*; import javax.xml.parsers.*; import org.xml.sax.*; import org.xml.sax.helpers.*; import org.w3c.dom.*; public class DDValidator { private String xmlfile; public DDValidator(String xmlfile) { this.xmlfile = xmlfile; } private boolean isValid() throws SAXException {
In the isValid() method of the DDValidator class, we first create a DocumentBuilderFactory object and configure it to validate the XML as it parses it. Then we create a DocumentBuilder object that satisfies the constraints specified by the DocumentBuilderFactory:
DocumentBuilderFactory dbf = DocumentBuilderFactory.newInstance(); dbf.setValidating(true); DocumentBuilder db = null; try { db = dbf.newDocumentBuilder();
Then we create an inner class to handle any errors encountered when parsing the document:
db.setErrorHandler(new DefaultHandler() { public void error(SAXParseException e) throws SAXException { throw new SAXException ("ERROR : " + e.getMessage()); } public void fatalError(SAXParseException e) throws SAXException { throw new SAXException ("FATAL ERROR : " + e.getMessage()); } } } catch (ParserConfigurationException pce) { System.err.println("Exception with configuration" + pce); System.exit(1); }
Next we parse the document. Any parse errors will cause an exception to be thrown:
Document doc = null; try { doc = db.parse(new File(this.xmlfile)); } catch (IOException ioe) { throw new SAXException("Document Invalid " + ioe.getMessage()); } return true; }
Finally we define the main() method that will use the DDValidator class. We get the name of the XML file as a command line argument, and create a DDValidator object, passing it the name of the XML file to validate. Then we call the isValid() method on this object. If any errors are encountered we display an error message:
public static void main(String args[]) { if (args.length != 1) { System.err.println("Usage: DDValidator xml_file_to_validate"); System.exit(0); } String xmlfile = args[0]; DDValidator validator = new DDValidator(xmlfile); try { System.out.println(validator.isValid()); } catch (SAXException se) { System.err.println(se.getMessage()); } } }
Let's now see how to execute this program against a valid and an invalid deployment descriptor.
Executing the Validator
In order to execute the deployment descriptor validator detailed above, you need to make sure that you have a JAXP compatible XML parser in your CLASSPATH environmental variable. We are using Xalan, in this example, which is available from the Sun site as detailed earlier.
All we need now is a web.xml file:
<?xml version="1.0" encoding="ISO-8859-1"?> <!DOCTYPE web-app PUBLIC "-//Sun Microsystems, Inc.//DTD Web Application 2.3//EN" "http://java.sun.com/dtd/web-app_2_3.dtd"> <web-app> <display-name>Test Web Application</display-name> <description>A test web application</description> <servlet> <servlet-name>Servlet1</servlet-name> <servlet-class>example.Servlet1</servlet-class> <init-param> <param-name>version</param-name> <param-value>0.1b</param-value> </init-param> </servlet> <error-page> <error-code> 404 </error-code> <location> /404.html </location> </error-page> </web-app>
Now execute the validator, passing the path to the deployment descriptor as a command line argument to the program. As this deployment descriptor is valid, there should be no error messages displayed:

Now modify the deployment descriptor so that the <error-page> tag comes before the <servlet> tag:
<?xml version="1.0" encoding="ISO-8859-1"?> <!DOCTYPE web-app PUBLIC "-//Sun Microsystems, Inc.//DTD Web Application 2.3//EN" "http://java.sun.com/dtd/web-app_2_3.dtd"> <web-app> <display-name>Test Web Application</display-name> <description>A test web application</description> <error-page> <error-code> 404 </error-code> <location> /404.html </location> </error-page> <servlet> <servlet-name>Servlet1</servlet-name> <servlet-class>example.Servlet1</servlet-class> <init-param> <param-name>version</param-name> <param-value>0.1b</param-value> </init-param> </servlet> </web-app>
Execute the program as before. As the XML file entered does not conform to the DTD specified, we see an error message displayed:
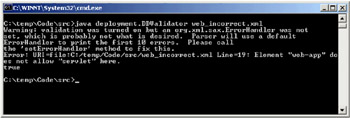
This is indicating that the DTD does not allow the element <servlet> in the place at which we have placed it. The <error-page> element must come after the <servlet> element. As is suggested in the error message, we could set a custom error handler to report errors in validation. We will not show this here, but it would be an interesting exercise for the reader. Another interesting exercise would be to add a Swing/JFC front end to the validator. This could show the exact place that an error occurs in the descriptor.
|
| < Free Open Study > |
|
EAN: 2147483647
Pages: 130