Editing a Concentration Component
|
|
Quiz games are well and good, but now let's look at a game that is more graphic-dependent. One of the classic games of all time is concentration or memory. Concentration is one of those game that everyone knows how to play. While it's not the most exciting game in the world, it has a lot of practical applications because you can place just about any set of images in a concentration game. Let's look at a component for creating concentration games.
| Component | Close the quiz.fla file and open the concentration.fla file from the Chapter 9 folder on the CD. Go to the first frame on the Game scene and notice the instance of the Concentration Game component above the upper-left corner of the stage (see Figure 9.8). |

You should notice the images to the left of the stage. You will be working with them shortly, but first let's look at the parameters in the Concentration Game component. Select the component and open the Component Parameters panel. Click on the Next Page button to go to the second page (see Figure 9.9).
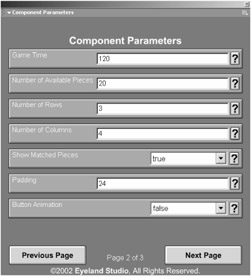
Figure 9.9: The Component Parameters panel for the Concentration Game component
Here is a list of the component's parameters:
Game Time The Game Time parameter specifies how much time the player has to make all the matches. It is otherwise the same as the Game Time parameter described earlier in the section "Editing a Quiz Component."
Number Of Available Pieces The Number Of Available Pieces parameter specifies the potential number of pairs the game has to draw from. This parameter is a little difficult to understand, so let's use an example. Let's say you have specified 4 rows and 5 columns. This means that there will be 10 matching pairs because 5 times 4 equals 20, and 20 divided by 2 equals 10. However, let's say you've created 15 object pairs. This means that you have up to 15 object pairs from which the game could randomly choose 10.
In the example above, you would want to enter 30 (15 times 2) for the Number Of Available Pieces parameter. The concentration game engine would then know that there are up to 15 possible objects that it can use for the 10 available matches for the game. Thus this parameter allows you to create a slightly more variable and interesting game because the game will not always use the exact same objects each time.
Number Of Rows, Number Of Columns These establish the number of rows and columns for the objects and buttons. The number of rows times the number of columns must equal an even number. For example, 3 rows and 3 columns will not work because the nature of the game is that the player must match two objects, and, of course, 3 time 3 equals 9. This means there would be one extra piece, making it impossible for a player to win.
Show Matched Pieces The Show Matched Pieces parameter establishes whether or not the objects will disappear when they are matched. There are only two options: True or False. True leaves the pieces visible when the player matches them, and False makes them invisible when the player matches them.
Padding The Padding parameter establishes the distance between each of the objects. For example, a value of 10 spaces each of the objects and their corresponding buttons approximately 10 pixels apart. A value of 0 forces the objects and their corresponding objects and buttons to abut one another.
If you want to hide an image below the objects/buttons like in the classic Concentration game, use a Padding value of 0 and set the Show Matched Pieces parameter to False. This forces the objects and buttons to cover any image you have in the background. When the player makes a match, the objects will disappear and reveal the background image through the vacant spaces.
Button Animation The Button Animation parameter establishes whether or not the button will play some animation when revealing the objects underneath. There are only two options: True or False. True displays any animation in the Button movie clip when you click it. You will need to set the Button movie clip with an animation after the first frame. The animation must end with nothing showing so that the object can be seen. A value of False causes the object to be displayed immediately after you click on the button.
Object Base Name The Object Base Name parameter refers to the instance names used on the objects. You should assign each object an instance name. For example, the 10 objects that come with this game are named: "object1," "object2," and so on. The basis for these instance names is "object" with a number appended at the end. If, for any reason, you want to change the instance names to something else, you'll need to change the reference in the Object Base Name parameter. For example, if you want to change the name of your objects or game pieces to "image1," "image2," and so on, then you need to enter the word image in the Object Base Name parameter. See the "Replacing the Images" section later in this chapter for more information on working with the object.
Button Base Name The Button Base Name parameter refers to the instance name used on the button. The button is the image that covers each of the objects. The button artwork is contained within a button that is, in turn, contained within a movie clip. That movie clip should have an instance name assigned to it. The default name for this movie clip is Button. If, for any reason, you want to change the instance name to something else, you'll need to change the reference in the Button Base Name parameter. For example, if you want to change the instance name of your button to Cardback, you'll need to enter Cardback in the Button Base Name parameter.
X Placement, Y Placement These parameters establish the x- and y- coordinates (respectively) for the upper-left corner of the grid of the objects. If both are both set to 0, the grid will start at the upper-left corner of the stage. For the X Placement parameter, negative numbers move the starting point to the left, and positive numbers move it to the right. Usually, you will want to use a number that is greater than or equal to 0, because negative numbers will result in all or part of some of the objects being off the stage or visible area. For the Y Placement parameter, negative numbers move the starting point up, and positive numbers move it down. Usually, you will want to use a number that's greater than or equal to 0, because negative numbers will result in all or part of some of the objects being off the stage or visible area.
Object Sound Base Name The Object Sound Base Name parameter refers to the identifier set in the Linkage Properties dialog box. This parameter allows you to set a base name for the identifiers so that you can set a sound for each of the pieces in the game. The default for the Object Sound Base Name parameter is "sound." In the library, you'll find an Audio library containing many sound files with identifier names such as "sound1," "sound2," and so on. The audio file that has the linkage name "sound1" corresponds to "object1a" and "object1b." The audio file that has the linkage name "sound2" corresponds to "objet2a" and "object2b" and so on. You can leave this parameter blank if you do not want matching sounds for the game pieces.
CorrectSound, WrongSound These parameters specify the "identifier" for the audio effect that you enter in the Symbol Linkage Properties dialog box. You should not enter the actual filename here. For example, if you want to use an audio file called correctsound.wav for the sound effect that plays when the player makes a correct match, you do not enter correctsound.wav in the CorrectSound parameter. Instead, you assign an identifier to the correctsound.wav file from the Symbol Linkage Properties dialog box. This identifier is what you enter in the CorrectSound parameter. Leave the CorrectSound and/or WrongSound parameters blank if you do not want an audio file to play when the player makes a match.
Now let's modify a few parameters and start to customize the game a little. Follow these steps:
-
Set the Game Time parameter to 0.
-
Change the Number Of Rows parameter to 4 and the Number Of Columns to 5.
-
Set the Show Matched Pieces parameter to False.
-
Set the Padding parameter to 0. Figure 9.10 shows these parameter settings.
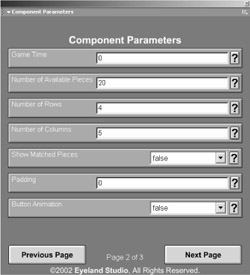
Figure 9.10: Editing the parameters for the Concentration Game component -
Click on the Next Page button to go to the third page of the custom UI for the Concentration Game component's parameters.
-
Change the value for the X Placement and Y Placement parameters to 0 (see Figure 9.11).
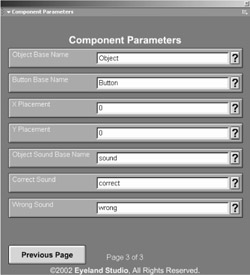
Figure 9.11: Editing the X Placement and Y Placement parameters -
Close the Component Parameters panel.
|
|
EAN: 2147483647
Pages: 111
- Chapter III Two Models of Online Patronage: Why Do Consumers Shop on the Internet?
- Chapter VI Web Site Quality and Usability in E-Commerce
- Chapter IX Extrinsic Plus Intrinsic Human Factors Influencing the Web Usage
- Chapter XIII Shopping Agent Web Sites: A Comparative Shopping Environment
- Chapter XIV Product Catalog and Shopping Cart Effective Design