Tracking Document Changes
You can have Word track and mark all changes you make to a document, so that you or another author or editor can later review these changes and either accept or reverse them. For each change that is tracked, Word stores the exact modification that was made, as well as the name of the author, the date, and the time of the change; and it displays all this information when you review the revisions. (The name used to indicate the author of a change is the name that was contained in the Name box on the User Information tab of the Options dialog box at the time the revision was made.)
To start tracking changes to a document, point to Track Changes on the Tools menu, and choose Highlight Changes from the submenu that pops up. Then select Track Changes While Editing in the Highlight Changes dialog box, and click OK. Alternatively, you can simply press Ctrl+Shift+E, or double-click the TRK indicator on the Word status bar:
![]()
You can also start tracking changes by clicking the Track Changes button on the Reviewing toolbar, which is shown in Figure 12-3. (To display this toolbar, choose Toolbars from the View menu, and choose the Reviewing option from the submenu that pops up.)
NOTE
When change tracking is enabled, the TRK indicator on the Word status bar is displayed in dark type.
To stop tracking changes, just repeat any of these procedures (each procedure toggles change tracking on or off). When you turn off change tracking, Word retains a record of all revisions that have already been tracked, but it doesn't track changes that you subsequently make.
Figure 12-3. The buttons on the Reviewing toolbar used for tracking changes.
When change tracking is enabled, Word stores information on each modification you make to the document, so that any change can later be reviewed, accepted, or reversed. You can also have Word display visible revision marks indicating each change that has been tracked. If visible revision marks aren't already enabled, you can enable them by pointing to Track Changes on the Tools menu and choosing Highlight Changes from the submenu that pops up. Then, in the Highlight Changes dialog box, select Highlight Changes On Screen to show revision marks on the screen, and select Highlight Changes In Printed Document to include them when the document is printed:
Figure 12-4 shows a document that contains several revision marks. Notice how Word marks inserted text and deleted text. Notice also that it places a vertical line in the margin to flag any line that contains a tracked change. Additionally, when you move the mouse pointer over a revision mark in the window, Word displays the author, date, time, and the type of the change (for example, Inserted or Deleted):

Later in the chapter (in the section "Customizing Revision Marking"), you'll learn how to modify the way Word marks changes.
You can hide revision marking on screen or in the printed document by deselecting the appropriate option in the Highlight Changes dialog box described above. Word, however, will retain a record of all changes that have been tracked, and you can make them visible again by turning revision marking back on. (The only way to permanently remove a revision mark is to accept or reject the tracked change, as described in the next section.)
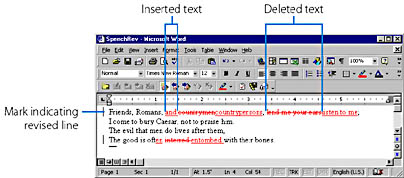
Figure 12-4. A Word document containing revision marks.
Reviewing Changes
You can review all changes that have been tracked in your document, and either accept or reject any of them. If you accept a change, the indicated revision is made permanent; if you reject a change, the text is restored to its original state. In either case, Word discards its record of the change and removes the revision mark. To review the changes, point to Track Changes on the Tools menu, and choose Accept Or Reject Changes from the submenu that appears. Word will open the Accept Or Reject Changes dialog box. (See Figure 12-5.) You can accept or reject all tracked changes in the document or review each change separately, as shown in that figure. Note that you can scroll through or edit your document while the Accept Or Reject Changes dialog box is displayed; just click in the document to edit it, and then click in the dialog box to resume reviewing your changes.
TIP
Choose the Way You View ChangesYou can select an option in the View area of the Accept Or Reject Changes dialog box to temporarily change the way Word displays your tracked changes. The Changes With Highlighting option displays revision marks in the document (as shown in Figure 12-4); the Changes Without Highlighting option hides revision marks but displays all changes made to the document; and the Original option hides the marks and shows all document text as it was before you changed it. Note that merely selecting one of these options does not make a permanent change to the document, but only affects the way tracked changes are displayed while the Accept Or Reject Changes dialog box is open.
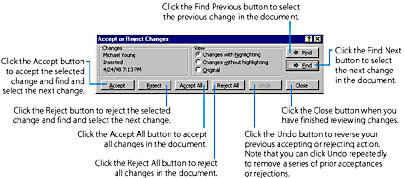
Figure 12-5. The Accept Or Reject Changes dialog box.
Notice that to help you identify the origin of each tracked change, the Accept Or Reject Changes dialog box displays the name of the author, whether the change was a deletion or an insertion, the date, and the time of the selected revision. Also, if several authors have made changes to the document, Word normally marks each author's revisions using a different color. (As you'll see in the next section, however, you can have Word use a single color for all changes.)
TIP
Use the Reviewing Toolbar to Quickly Browse Through Your ChangesYou can browse through the changes that have been tracked in your document, whether revision marks are visible or not, using the Next Change and Previous Change buttons on the Reviewing toolbar. (See Figure 12-3.) Clicking the Next Change button selects the next block of revised text in the document, and clicking Previous Change selects the previous block of revised text. You can also accept or reject the selected change, whether revision marks are visible or not, by clicking the Accept Change or Reject Change button on the Reviewing toolbar.
Customizing Revision Marking
You can modify the style as well as the color of the revision marks that Word uses, as follows:
- Choose Options from the Tools menu, and click the Track Changes tab, or click the Options button in the Highlight Changes dialog box that was described previously (in the section "Tracking Document Changes"). The Track Changes tab is shown in Figure 12-6.
- For each kind of change that Word tracks (inserted text, deleted text, changed formatting, and changed lines), choose the type of mark that Word will use by selecting an item in the corresponding Mark list box.
- For each kind of change, choose the color that Word assigns to the revised text by selecting an item in the corresponding Color list box.
For any kind of revision mark except the one used to indicate changed lines, you can select By Author to have Word use a different color for the changes of each author, or you can choose a single color that Word will use for all changes. The Auto item refers to your normal window text color (set in the Display Properties dialog box, which you access in the Windows Control Panel), which is usually black.
Figure 12-6. The Track Changes tab of the Options dialog box.
Working with different document versions
In the previous sections, you learned how to use Word's change tracking feature to keep track of the changes you make to a document, and to communicate changes or proposed changes to other members of your workgroup. Word provides two additional features that can help you keep track of the changes you or members of your workgroup have made to a document: the Compare Documents command, which helps you find the differences between two different versions of a document, and the Share Document command, which allows you to easily save and retrieve separate document versions.
Comparing Document Versions
If you have saved a previous version of a document in a separate file, you can compare the previous version to the current version and, if you want, you can restore parts of the current version to the way they were in the previous version. The procedure is as follows:
- Open the current document version.
- Point to Track Changes on the Tools menu, and choose Compare Documents from the submenu that pops up.
- Select the name of the previous document version, and click the Open button.
Word will display the Select File To Compare With Current Document dialog box, which is similar to the standard Open dialog box that's displayed when you open a document.
Word will add revision marks to the current document version to show how it differs from the previous version. These marks will be the same as those that would be created if you opened the previous document version, enabled change tracking and visible revision marks, and edited the document so that it matched the current version. You can review, accept, or reject these changes using the techniques that were explained earlier in this chapter. Note that rejecting a change restores that part of the document to the way it was in the previous version.
Maintaining Separate Document Versions
You can use Word's Versions command to store several separate versions of a document, all within a single document file. Say, for example, that you have written Chapter 1 for your latest novel, and you saved the current version in a file named Chapter1. You now want to revise the chapter, but you also want to keep the original version intact so that you can refer back to it if necessary. Without the Versions command, you would have to save the current version in a separate file (perhaps by making a copy of the document file). Using the Versions command, however, you can save a copy of the current document version right within the Chapter1.doc file, so that you can easily refer back to it later.
To do this, choose Versions from the File menu and in the Versions dialog box, click the Save Now button; Word then prompts you to add a descriptive comment for the version. You can then proceed to revise your chapter and save your work in the usual way when you're done. Now both versions of the document will be stored within the Chapter1.doc file. However, when you open the document you won't see the original version unless you again choose Versions from the File menu and use the Versions dialog box to open the original version in a separate window, as shown here:
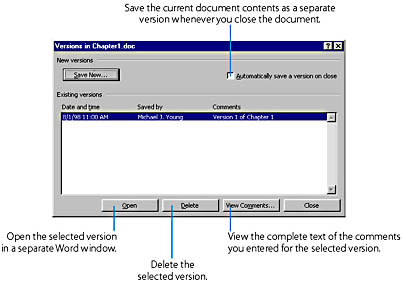
You can use this same technique to store additional document versions within the same document file.