Adding Comments to Your Document
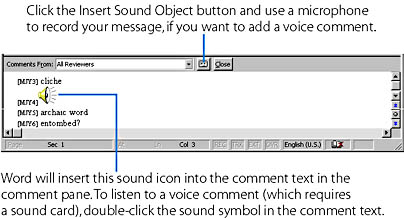
You can add comments to a Word document without modifying the main document text. You view and edit comments within a separate pane at the bottom of the document window. They don't appear on the printed document copy (although you can print them separately). Comments are useful for adding notes, explanations, suggestions, and other types of information to specific parts of your document. You might add comments to save information for your own use, or to communicate with other members of your workgroup. Figure 12-1 shows a document that includes several comments.
TIP
Save Time Using the Reviewing ToolbarYou can use the five buttons at the left end of the Reviewing toolbar for working with comments. To display the toolbar, point to Toolbars on the View menu, and choose the Reviewing option from the submenu that appears. The Reviewing toolbar is shown in Figure 12-1 and the buttons for working with comments are labeled in Figure 12-2.
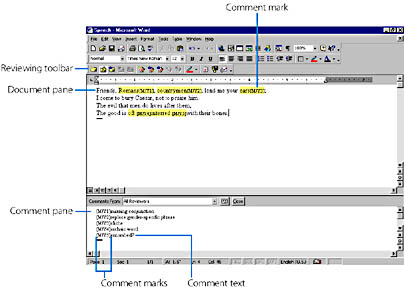
Figure 12-1. Viewing comments in a Word document.
Figure 12-2. The buttons on the Reviewing toolbar for working with comments.
ON THE WEB
The Speech.doc and SpeechRc.doc Word documents, used in the examples in the chapter, are on the Running Office 2000 Reader's Corner page. For information about connecting to this Web site, read the Introduction.
To insert a comment into a document, do the following:
- Select the text to which you want to attach the comment. To attach a comment to a single word, you can just place the insertion point anywhere within the word.
- Choose Comment from the Insert menu, or click the Insert Comment button on the Reviewing toolbar, or press Ctrl+Alt+M. Word then does the following:
- Highlights in yellow the selected text in your document (or the word before the insertion point). The comment will be attached to this text. (To see the yellow highlighting, you must turn ScreenTips on. To turn on ScreenTips, choose Options from the Tools menu, click the View tab, and select ScreenTips under Show.)
- Places a comment mark at the end of the selected text.
- Opens a separate pane in which you enter and later view the comment text.
- Inserts a matching comment mark in the comment pane and places the insertion point following the mark.
- Type the text for the comment following the mark in the comment pane. You can use the basic Word editing and formatting techniques on comments in the same way you would for any other Word text.
If you want, you can leave the comment pane open while you resume editing the document. To move the insertion point from one pane to the other, press F6 or click in the pane in which you want to work. If you want more room on the screen for your main document, you can close the comment pane by clicking the Close button at the top of the pane, or by clicking the Edit Comment button on the Reviewing toolbar.
Notice that the comment mark consists of your initial or initials, followed by the number of the comment. The initials included in comment marks let you distinguish the comments added by different members of your workgroup. Note that the comment marks in the document pane are formatted as hidden text; accordingly, they're not visible on the screen unless the comment pane is open, the Show/Hide ¶ button on the Standard toolbar is pressed in, or the Hidden Text viewing option is selected. (To locate this option, choose Options from the Tools menu, and click the View tab.)
To view the text of the comment that is attached to a particular block of text in your document, you can place the mouse pointer anywhere over the highlighted text (whether comment marks are visible or not). Word will display the name of the comment author as well as the comment text. (Note, however, that the ScreenTips option must be selected. You set this option by choosing Options from the Tools menu and clicking the View tab.)
NOTE
You can change the initials that Word adds to the comments you insert, as well as the author name that appears when you place the pointer over a comment. To do this, choose Options from the Tools menu, click the User Information tab, and enter new initials into the Initials box or a new name into the Name box.
You can browse through the comments in a document by clicking the Previous Comment or the Next Comment button on the Reviewing toolbar. Word will place the insertion point in front of the previous or next comment and will display the comment's text in a ScreenTip.
You can also view comment text within the comment pane. If the comment pane isn't open, either choose Comments from the View menu or click the Edit Comment button on the Reviewing toolbar. Initially, Word displays the comments made by all authors. If you want to view only the comments entered by a specific individual, choose the author's name (rather than All Reviewers) in the Comments From list box at the top of the comment pane. Then scroll through the comment pane—if necessary—to view the comment text. (The name used for each author is the name that was contained in the Name box on the User Information tab of the Options dialog box at the time the comment was entered.)
TIP
If you double-click a comment mark in the document, Word will open the comment pane and display the corresponding comment text.
Notice that if you scroll the comment pane, Word automatically scrolls the document pane to reveal the corresponding comment mark. Likewise, if you scroll the document pane, Word scrolls the comment pane.
TIP
Quickly Locate CommentsTo locate comment marks in the document, you can use the Find command, the Go To command, or the browse buttons, which were described in Chapter 6, "Entering and Editing Text in a Word Document" When using the Find command, enter ^a into the Find What box to find any comment (the a derives from the former name for a comment, annotation). When using the Go To command or browse buttons, select the Comment target. The Go To command lets you search for any comments or for comments entered by a specific author.