Using Other Workgroup Techniques
In the following sections, you'll learn several additional Word techniques that are useful when working in workgroups.
Protecting Documents
You might want to distribute a document—or copies of a document—to other members of your workgroup so that they can review, edit, or make additions to the document. Before you do so, however, you can protect the document to limit the kinds of changes reviewers can make, thereby ensuring the document's integrity. To protect a document, do the following:
- Make sure the document you want to protect is displayed in the active document window.
- Choose Protect Document from the Tools menu to open the Protect Document dialog box:
- Choose one of the three types of protection in the Protect Document For area of the dialog box:
- Select the Tracked Changes option to permanently enable change tracking for the document. When you select this option, change tracking can't be disabled, nor can tracked changes be accepted or rejected. (After you remove the document protection, you'll be able to review, accept, or reject any of the changes that reviewers made.) Note that selecting this option also permits comments to be added to the document.
- Select the Comments option to allow reviewers to add comments to the document, but to prevent them from changing the actual document text.
- If you added a form to the document, you can select the Forms option to prevent changes except within form fields, such as check boxes or text boxes. (A form is a collection of check boxes, text boxes, and other fields that you add to a Word document for collecting information. Word forms aren't covered in this book.) Also, if you have divided your document into sections, you can select the Forms option to disallow all changes within one or more specific document sections. Click the Sections button to select the particular section or sections you want to protect.
- To prevent reviewers from removing the protection, type a password into the Password box. (Word will display only * [asterisk] characters as you type.) You'll be asked to retype the password after you click OK.

Note that the protection you choose will apply to you as well as to other users.
If you have routed a single copy of the document among the members of your workgroup, when you receive the document back, you'll probably want to remove the protection. You can do so by choosing Unprotect Document from the Tools menu. (When the document is protected, Unprotect Document replaces the Protect Document command.) If you entered a password when you protected the document, Word will prompt you for it.
If you have distributed a separate copy of the document to each member of the workgroup, when these documents are returned to you, you can merge the changes they contain into the original document, as explained in "Merging Tracked Changes".
File-Sharing Protection
You can also protect a document against unauthorized changes by selecting file-sharing options, as follows:
- Open the document you want to protect.
- Choose Options from the Tools menu, and click the Save tab, or click the Options button in the Save As dialog box. The Save tab is shown in Figure 12-7.
- Set one or more of the options in the File Sharing group at the bottom of the Save tab, as follows:
- To prevent unauthorized users from opening the document, type a password into the Password To Open box. Word will ask you to retype the password when you click OK. No user will be able to open the document without typing this password.
- To prevent unauthorized users from changing the document, type a password into the Password To Modify box. Word will ask you to retype the password when you click OK. Any user will be able to open the document in read-only mode, which doesn't allow the user to save changes to the document. Only users who know the password, however, will be able to open the document in the normal read-write mode, which allows saving changes.
- You can have Word suggest that users open the document in read-only mode by selecting the Read-Only Recommended option. Whenever any user opens the document, Word will display a message suggesting that the document be opened in read-only mode. The user, however, can choose whether to open the document in read-only or in normal read-write mode.
Figure 12-7. The Save tab of the Options dialog box.
You can turn off file-sharing protection (assuming that the document is open in the normal read-write mode) by displaying the Save tab again and then deleting the password or deselecting the Read-Only Recommended option.
Note that you can open any document in the read-only mode—even one that's not protected—by choosing Open from the File menu, clicking the down arrow to the right of the Open button, and choosing the Open Read-Only option on the drop-down menu:
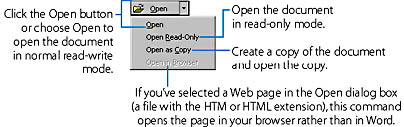
When you open a document in read-only mode, you can freely make changes to its contents. You can't, however, save the modified document under the same name (that is, you can't overwrite the original document version with the changed version), although you can save a copy of the modified document under a different name by choosing Save As from the File menu.
Merging Tracked changes
If you have distributed a separate copy of a document to each member of a workgroup, when you receive these copies back, you can merge into the original document all the changes that have been tracked within the document copies. After you do this, the original document will contain all the changes made by the other members of your workgroup; you can then review, accept, or reject each change, as described previously (in the section "Reviewing Changes").
The following is the procedure for merging changes:
- Open the original document (the one you want to receive the merged changes).
- Choose Merge Documents from the Tools menu to open the Select File To Merge Into Current Document dialog box, which is similar to the standard Open dialog box.
- In the Select File To Merge Into Current Document dialog box, select the name of a document that contains tracked changes you want to merge into the original document, and click the Open button. Word will then copy all the changes contained in the selected document into the original document that you opened in step 1.
- Repeat step 3 for any additional documents that contain tracked changes you want to merge into the original document.
TIP
Ensure That All Changes Are Tracked in Document CopiesTo successfully merge modifications from a copy of a document into the original document, the copy must not contain any untracked changes. To ensure that change tracking is enabled when the copy is edited, before you distribute the copy you might open it and select the Tracked Changes option in the Protect Document dialog box, as discussed previously (at the beginning of the section "Protecting Documents").
Highlighting Text
You can use the Word Highlight tool to permanently mark blocks of text in a document, in much the same way you would use a yellow marker pen to highlight text on a printed page. The text you mark is highlighted both on the screen and on the printed copy of the document.
To highlight a block of text, do the following:
- Select the text you want to highlight.
- To highlight using the color currently shown on the Highlight button (which is the most recently selected color), just click the Highlight button on the Formatting toolbar or on the Reviewing toolbar. To highlight using a different color, click the down arrow at the right of this button, and then click the color you want on the palette that Word displays:

You can rapidly highlight several blocks of text as follows:
- Without selecting text beforehand, click the Highlight button or click a color on the palette, as described previously.
- Using the mouse, drag over each block of text that you want to highlight.
- When you have finished highlighting text, click the Highlight button again or press the Escape key to return to normal editing mode.
You can remove highlighting by doing the following:
- Select the text from which you want to remove the highlighting.
- Click the down arrow at the right of the Highlight button.
- Click the None item on the color palette:
TIP
Hide HighlightingYou can temporarily hide all highlighting on the screen by choosing Options from the Tools menu, opening the View tab, and deselecting the Highlight option in the Show area. You can make highlighting reappear by selecting this same option. Also, highlighting will automatically become visible if you add new highlighting to a document.
You can quickly remove highlighting from several blocks of text using the same technique described for highlighting several blocks. In step 1, simply click the None item on the palette.
TIP
If you print a document containing highlighting on a monochrome printer, the highlight color will be converted to a shade of gray. For best results on a monochrome printer, choose a light highlighting color (such as yellow).
Sharing fonts
One problem that you might encounter when you work in a workgroup is that a co-worker might not be able to view or print a particular font that you have assigned to text in a document. To avoid this problem, you should make sure that your document uses only TrueType fonts. A TrueType font can be viewed or printed when you use almost any computer on which the font is installed. The common TrueType fonts (such as Times New Roman, Arial, and Courier New) are installed on virtually every computer that runs Windows.
If, however, you use one or more TrueType fonts that might not be installed on a co-worker's computer, you can embed TrueType fonts in your document so that your co-worker can view and print them even on a machine that doesn't have them installed. (Doing so, however, will increase the size of the document.)
SEE ALSO
For a description of TrueType fonts, see "Using the Font Dialog Box".