Adding Movie Clips, Scrolling Text, and Backgrounds
In this section, you'll learn how to add movie clips, scrolling text, a background sound, or a background color or image to a Word document. Although these elements are designed primarily for Web-page documents, you can add them to any type of Word document. They will function when a document is viewed in Word, as well as when a Web page you create in Word is displayed in a browser. (Note, however, that Word will display a background color or image only in Web Layout view.)
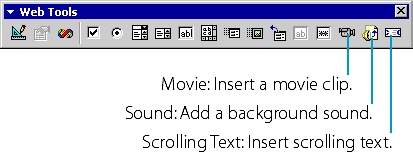
You add a movie clip, scrolling text, or a background sound by using the new Web Tools toolbar:

(The buttons that aren't labeled here are for creating Web-page forms and scripts, which are beyond the scope of this chapter.)
A movie clip displays a video sequence, with sound, in a rectangular area in your document. You can have the clip played whenever the document opens in Word or a browser, whenever the user points to it with the mouse, or both times. You can also control the number of times the clip plays. To insert a movie clip, click the Movie button on the Web Tools toolbar, and in the Movie Clip dialog box, select the file containing the movie file you want to play, choose the desired playback options, and—if you want—specify an alternate image or text that will be displayed by browsers that don't support movie clips.
A block of scrolling text travels repeatedly across the width of your document. It's also known as a marquee, and you can use it to draw attention to a message. To insert scrolling text, click the Scrolling Text button on the Web Tools toolbar, and enter the text and display options that you want into the Scrolling Text dialog box.
A background sound is played when your document opens in Word or in a browser. To assign a background sound to the document, click the Sound button on the Web Tools toolbar, and in the Background Sound dialog box, select the sound file containing the sound you want to play, and specify the number of times the sound should be repeated when the document opens. (You can choose the Infinite option to have the sound repeated continuously as long as the document is open.)
You can assign the document a background color or image by pointing to Background on the Format menu and choosing an option on the submenu that appears. You can choose a background color directly from the submenu, you can choose More Colors to select from a larger set of colors or to create a custom color, or you can choose Fill Effects to select a background image. (You can choose from a large collection of standard background images or you can select a graphics file to use for the background image.)
TIP
Use Frames to View Several Documents at Once
Frames are another new Word feature designed primarily for Web-page documents. You can show several documents simultaneously in the Word or Web-browser window by displaying each document within a separate frame, which is an adjustable pane within the window. (Note that the term frame also refers to a seldom-used Word element for positioning text on a page, which is similar to a text box.)The easiest way to create a set of Web pages that are displayed in frames is to use the Web Page Wizard. (For instructions, see the sidebar "Creating Web Pages,".) You can also use the Frames submenu on the Format menu to create a document that displays frames (known as a frames document or frames page), or to add individual frames to such a document. And you can use the Frames toolbar to add or remove frames, or to modify the properties of the frames document or of one or more frames. Note that you can use either the submenu or the toolbar to add a frame containing a table of contents for choosing the document or document section that's displayed in another frame.
For detailed information on using frames in Word, see the Word online help topic "Create Frames and Framesets."
EAN: 2147483647
Pages: 228