Formatting Text Boxes, Pictures, and Drawing Objects
This section explains how to format the different types of document objects you have learned about in this chapter: text boxes (discussed in "Using Text Boxes to Position Text on the Page"), pictures (described in "Importing Pictures"), and drawing objects (that is, AutoShape and WordArt objects, covered in "Creating Drawings in Word"). You can format these objects by using the Format dialog box or the Picture toolbar.
Using the Format Dialog Box
The Format dialog box provides the largest set of formatting options. To format an object using this dialog box, do the following:
- Click the object to select it. (To select an object that's behind text, you must first click the Select Objects button on the Drawing toolbar.)
- From the Format menu, choose the Text Box, Picture, Object, AutoShape, or WordArt command. The command name depends on the type of object you've selected.
- Select formatting options on the tabs of the Format dialog box, as shown in Figure 11-15.
This will open the Format dialog box. The actual title of the dialog box reflects the type of object you have selected—Format Text Box, Format Picture, Format Object (for some types of pictures), Format AutoShape, or Format WordArt.
Selecting the Wrapping Style
The Layout tab of the Format dialog box, shown in Figure 11-15, lets you select the wrapping style of the object. As you have seen, the wrapping style affects the way the object is positioned on the page and its relationship to the text in the body of the document. On the Layout tab, you can choose from five different wrapping styles. To choose from a larger selection of wrapping styles, and to fine-tune the positioning of the object, click the Advanced button on the Layout tab to open the Advanced Layout dialog box.
TIP
Other Ways to Set the Wrapping Style
You can also change the wrapping style of an object using the Text Wrapping button on the Picture toolbar (described in the next section). Or, you can click the Draw button on the Drawing toolbar, point to Text Wrapping on the menu that appears, and choose an option from the resulting submenu.

Figure 11-15. The Layout Tab of the Format dialog box. (A picture was selected before the dialog box was opened.)
When selecting a wrapping style, keep in mind that the styles can be broken down into three basic categories:
- Inline With Text. In this style, the object is an integral part of the body text in the document. It's positioned as if it were a single text character, and you can move or copy it using the standard text editing methods given in Chapter 6. This is the default wrapping style for a picture that you insert from a graphics file or the Clip Gallery. You can assign this style only to a picture or WordArt object (not to a text box or AutoShape object).
- Square, Tight, Through, and Top And Bottom. In these styles, you can place the object anywhere on the page. Document text will wrap around the object in various ways. The default wrapping style for a text box you insert by first selecting text is Square, and for a picture you paste into the document, it's Top And Bottom.
- In Front Of Text and Behind Text. In these styles, you can also position the object anywhere on the page. However, if the object intersects document text, it will overlap the text and will appear either in front of the text, or behind it. The default wrapping style for a text box you insert without first selecting text, an AutoShape object, or a WordArt object, is In Front Of Text.
![]()
TIP
Using a Text Wrapping Break
If an object is assigned the Square, Tight, or Through wrapping style, you can insert a special line break known as a text wrapping break into a line of text that's to the right or to the left of the object. The text following this break will be moved down below the object. To insert the break, place the insertion point at the position where you want to break the text, choose Break from the Insert menu, and select the Text Wrapping Break option in the Break dialog box.
Using the Picture Toolbar
Although the Picture toolbar is designed primarily for formatting a picture, you can use at least some of its buttons to format other types of objects. Most notably, you can use the Text Wrapping button to modify any object's wrapping style, and you can use the Format Object button (where Object is the type of the selected object) to open the Format dialog box to format the object. See Figure 11-16.
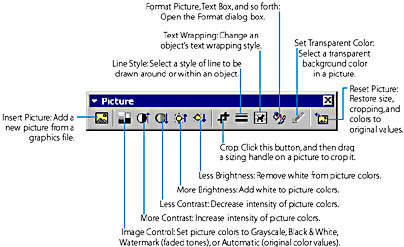
Figure 11-16. The Picture toolbar.
Cropping a Picture
Changing the size of a picture by dragging a sizing handle or by using the Size tab of the Format Picture dialog box scales the picture—that is, it compresses or expands the graphics contained in the picture. Alternatively, you can use the Crop button on the Picture toolbar or the Picture tab in the Format Picture dialog box (see Figure 11-15), to crop a picture. Cropping a picture changes the size or proportions of the picture itself without changing the size or proportions of the graphics it contains. Cropping results in either cutting off some of the graphics or adding additional white space around them. Figure 11-17 shows the difference.
To crop using the Crop button on the Picture toolbar, select the picture, click the button, and then drag the appropriate sizing handle on the picture. To use the Picture tab of the Format Picture dialog box, enter the amount that you want to crop each side of the picture—as a positive or negative number—into the Left, Right, Top, or Bottom box.
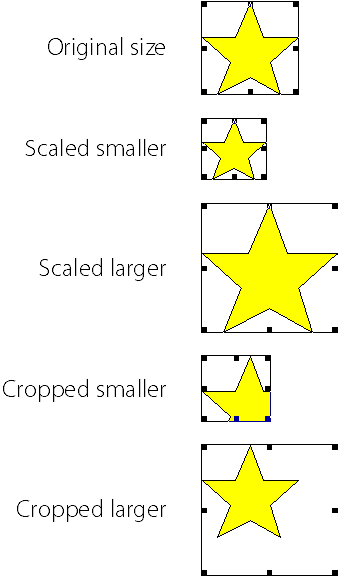
Figure 11-17. Scaling vs. cropping a picture.
EAN: 2147483647
Pages: 228