Preveiwing and Printing Documents
When you have finally finished entering text and graphics into your document, as well as editing, formatting, proofing, and adjusting the page design, you're ready to print the document. Before doing so, however, you might want to preview the printed appearance of the document on the screen and possibly make a few last-minute adjustments.
SEE ALSO
For basic information about previewing and printing documents, see "Printing Documents."
As you have already learned, Word provides two document views that display the document exactly as it will be printed: Print Layout and Print Preview. These two views have many features in common; in general, however, Print Layout view is best for editing the document and working with text boxes and graphics, while Print Preview is best for viewing the overall appearance of the document pages immediately before printing.
To switch to Print Preview, choose Print Preview from the File menu or click the Print Preview button on the Standard toolbar. The Print Preview screen appears as shown in Figure 11-18. To edit your document while in Print Preview, click the Magnifier button on the toolbar to disable the Magnifier. Click the Close button to close Print Preview and return to the view you were working in earlier.

When you're ready to print your document, choose Print from the File menu or press Ctrl+P. Word will display the Print dialog box, which is shown in Figure 11-20. Before clicking the OK button to start printing, you can choose the printer, change printer settings, and select printing options.
TIP
Print Other Document Elements
Rather than printing the document itself, you can print various document elements by choosing an item other than Document in the Print What list box of the Print dialog box. You can print the document properties (that is, the information displayed and set by the Properties command on the File menu), the comments in the document, a description of the document styles, the contents of the document's AutoText entries, or a list of the document's current shortcut key assignments.
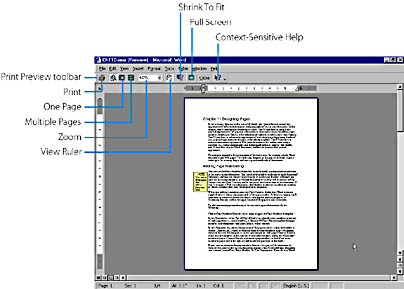
Figure 11-18. Print Preview shows how your document will appear when printed.
Pagination
Before printing your document, you might want to view and adjust the positions of the page breaks. You should do this after editing, formatting, and proofing your document because these actions can change the positions of page breaks.In Print Layout view or in Print Preview, you can readily see the positions of page breaks because each page is displayed exactly as it will print. In Normal view, Word marks the position of each page break with a dotted horizontal line if you have selected the Background Repagination option. (To select this option, choose Options from the Tools menu and click the General tab.)
As you saw in Chapter 7, "Formatting a Word Document" the following paragraph formatting features can affect the positions of page breaks: Widow/Orphan Control, Keep Lines
Together, Keep With Next, and Page Break Before. See Table 7-8, for an explanation of each of these features.
Also, the positions of page breaks can be affected by the current setting of the print options that tell Word what to include in the printed copy of the document. These options are contained in the Include With Document area of the Options dialog box's Print tab, shown in Figure 11-19. To view this tab, choose Options from the Tools menu and click the Print tab, or click the Options button in the Print dialog box (to be described shortly).
A page break that Word automatically generates when the text reaches the bottom of a page is known as a soft page break. You can also force a page break at any position in a document by inserting a hard page break. The position of a hard page break is fixed, and it always causes a page break regardless of its location on the page. To insert a hard page break at the insertion point, press Ctrl+Enter, or choose Break from the Insert menu and select the Page Break option. In Normal view, Word marks the position of a hard page break with a horizontal dotted line labeled Page Break. (In contrast, the horizontal line marking the position of a soft page break is not labeled.)

In Print Layout view, the text following a hard page break is forced to a new page, but the mark itself appears only if all nonprinting characters are displayed. (To display all nonprinting characters, select All under Nonprinting Characters on the View tab of the Options dialog box, or click the Show/Hide ¶ button.)
To remove a hard page break, just select the mark and press Delete.
Figure 11-19. The Print tab of the Options dialog box.
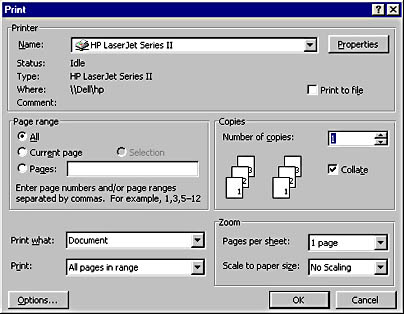
Figure 11-20. The Print dialog box.
Alternatively, you can quickly print your document using the current default printer and the default print settings by simply clicking the Print button on the Standard toolbar or on the Print Preview toolbar (which is displayed when you switch to Print Preview).
![]()
EAN: 2147483647
Pages: 228