Saving Documents and Web Pages
After you open a file in an Office application, you can add to it or revise it based on your needs and interests. When you're ready to save a version of your document to disk permanently, you must save the file. Saving a file is an important step because the changes you make to your document are stored only in temporary memory (RAM) until you transfer them to disk. If you should accidentally pull the power plug on your computer, or if your power fails in a thunderstorm, the changes you made since your last save will be lost. (This thorny problem is the dark side of personal computing, but you'll learn how to plan for this rather unlikely event later in the chapter.) In this section, you'll learn how to save Office documents using the Save and Save As commands, and you'll learn how to create Web pages (HTML documents) using the Save As Web Page command.
Using the Save Command
If your file already has a name, you can update it on disk by choosing Save from the File menu. The Save command copies the Office document you're working on from computer memory to disk, preserving it in a transferable form and safeguarding it from loss if your application closes suddenly because of power failure or other problems. It's a good idea to save your editing changes to disk every 10 minutes or so, either by choosing Save or by clicking the Save button on the toolbar. The Save command doesn't display a dialog box unless your file needs a name. In that case, Office displays the Save As dialog box, which we'll discuss in the next section.
![]()
TIP
The keyboard shortcut for the Save command is Ctrl+S. If your document doesn't have a filename yet, you'll be prompted for one.
Using the Save As Command
To assign a filename to your Office document, choose Save As from the File menu. The Save As command lets you specify the filename, disk location (such as A: for the attached floppy disk drive), and folder location of the file, and also lets you set a variety of application-specific options, including the document format of the file. Figure 3-8 shows the dialog box that appears when you use the Save As command in Word. (Word has suggested the filename Summer Picnic, because those are the first words in the document.) If you worked through the section covering the Open dialog box earlier in this chapter, you'll recognize several of the remaining dialog box options.
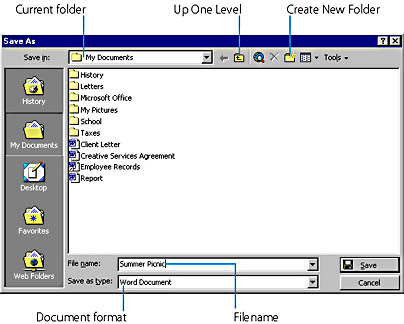
Figure 3-8. The Save As dialog box lets you assign a name to your document and save it to disk.
The Save In drop-down list box lets you specify the disk and folder location for your file. Office places your file in the current folder (the folder displayed in the list box) unless you specify a different location. You can open a subfolder (a folder below the current folder) by double-clicking the folder icon you want to open. (This moves you down a level in the folder hierarchy, or "tree.") If you want to move up a level in the folder hierarchy, click the Up One Level button. As you browse through the folders on your system, feel free to use the commands on the Views menu at the top of the dialog box (List, Details, Properties, and Preview) to get more information about the files you see.
After you set the disk and folder location for your document, you can assign a name to it using the File Name text box. Each file must have its own unique name in the folder so that you can differentiate it from other files and reference it by name. A temporary name will automatically appear highlighted in the File Name text box when you open the Save As dialog box. (In Word, the temporary name comes from the first line in your document.) To place your own filename in the File Name text box, type in the new name. (Be sure to pick a descriptive phrase that reflects the file's contents.) Because your Office applications were written specifically for Windows, you can type up to 255 characters for your filename, with a few typographic caveats. (See the "What Name Do I Choose?" sidebar.) When you're ready to save the file to disk, click the Save button or press Enter.
What Name Do I Choose?Naming a file isn't as challenging as naming a baby, though you do need to follow some important rules to get it right. Give your file a name related to its contents that you can easily remember later. In other words, don't type the first thought that comes into your head, but choose a few words that will easily distinguish the file from the other documents on your system. (We think it's a good idea to include names and dates in filenames so that later you can tell similar files apart.) Fortunately, filenames in the Windows environment are no longer limited to the eight-character restriction imposed by MS-DOS, so you can type up to 255 characters and include spaces, uppercase letters, and lowercase letters. (Although you can type up to 255 characters in the File Name box, the 255-character total also includes the characters that make up the path to the file, including the names of folders and subfolders.) We recommend that you make filenames two to four words long using 10 to 30 characters so that each filename fits well in dialog boxes. Valid filenames can include letters, numbers, and all but the following symbols:
/\<>*?|:;For example, the following filenames are appropriate for typical Office documents:
Current Status Memo (2-1999)
Fall Comdex 2000 Slide Presentation
2nd Quarter '01 Report
Fortune 500 Customers
new hires [probationary] @10-15-99
Saving in a Different Document Format
After you specify your file's name and folder location, you might want to change the format you're using to save the document. Each Office application uses its own unique document format to translate the words and pictures on the screen into a document that you can print on paper and store on disk. Accordingly, you can't move documents from one word processor to another until you pick a format that both applications can read. Fortunately, Office applications allow you to save documents in a variety of different formats so that you can open your work in many other applications.
SEE ALSO
To learn how to save Office documents in Web page (HTML) format, see "Saving Documents as Web Pages."
To specify a different document format, click the Save As Type drop-down list box in the Save As dialog box, and then click the format you want to use. Each Office application supports a different list of document formats, so you'll have to experiment a little to see which applications you can use. (You can also use the Web Page format, which will prepare your document for viewing in a Web browser and editing in other applications.) With some experimenting, you can learn to use the Save As Type feature to exchange files between many different programs; for example, you might share an important Excel worksheet from your office with Lotus 1-2-3 users at another office. Figure 3-9 shows the Save As Type drop-down list box in Word.
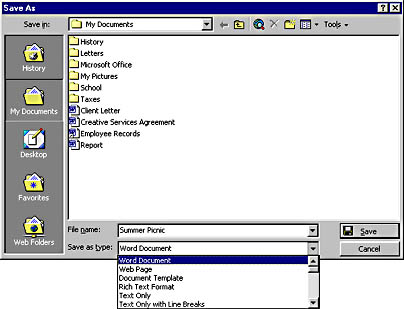
Figure 3-9. The Save As Type drop-down list box lets you save your file in other formats.
Saving Files Automatically in Word
The most useful hidden feature in Word's Save As dialog box is the Save AutoRecover option, which directs Office to automatically save a recoverable copy of your document at a time interval you specify. Save AutoRecover helps you avoid losing unsaved changes in your document because of a system crash (where you lose unsaved data), a power outage, or some other electronic disaster that terminates your application before you save your document using the Save As command.
To enable Word's Save AutoRecover feature, Open the Save As dialog box, click the Tools menu, click General Options, and then select the Save AutoRecover Info Every: check box, shown in Figure 3-10. Office will save a copy of your document to the temporary directory on your hard disk at the specified time interval. By default, Office updates this temporary file with your changes every 10 minutes, though you can adjust this interval using the scroll box in the Save dialog box. Note, however, that automatic saves don't affect the document you create using the Save command—this file is always separate and contains only the information you specifically save.
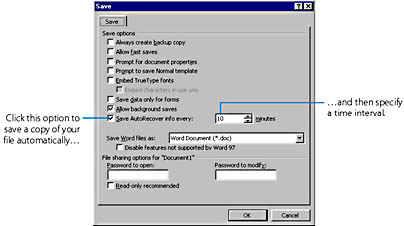
Figure 3-10. Word's Auto Recover feature prevents inadvertent data loss.
Recovering from a Crash
If you do encounter a power loss, a system freeze, a program failure, or another problem that causes you to crash, restart Word, and Office will recover the files that were active when your program crashed. (You'll have one file for each open document.) If the recovered files look correct, save them to disk formally using the Save As or Save command and you'll be back in business. Of course, this works only if you actually enabled the AutoRecover feature before Word bombed. Even then, you'll probably lose the data you entered since your last automatic save. But if you're a little lazy about saving on your own, this airbag feature might save you hours of frustration down the road. (Aren't your files worth it?)
Saving Files Automatically in Excel
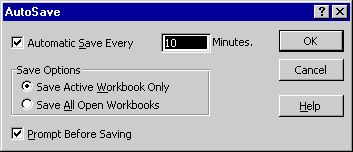
Excel doesn't have a Save AutoRecover check box in the Save As dialog box, but you can still configure it to save files automatically for you. Choose Add-Ins from the Excel Tools menu, and then select the Autosave Add-in in the list box and click OK. This action places the AutoSave command on the Tools menu; you can use this command to save your files automatically at set intervals. When you click AutoSave, you can specify how often the file is saved, and whether Excel should save just the current (active) workbook or all the open workbooks.
WARNING
The AutoSave feature isn't available in Microsoft PowerPoint, Microsoft Outlook, or Microsoft Publisher.
![]()
Saving Documents as Web Pages
In Office 2000, you now have the option of saving files in a special Web page format known as HTML (hypertext markup language). This feature allows you to create documents that you can distribute widely by means of Web pages and intranets, and that others can view in Internet browsers such as Internet Explorer and Netscape Navigator. Office applications also allow you to view your Web pages as they will appear on the Web by using the new Web Page Preview command.
To save, or publish, an Office document as a Web page, follow these steps:
- Open the document you plan to save as a Web page.
- From the File menu, choose Save As Web Page. You'll see a dialog box similar to the one shown in Figure 3-11.
The Save As Web Page dialog box is similar to the Save As dialog box. However, the Save As Type list box is set to Web Page, which will save your file using the .htm extension. In addition, the Page Title option lets you control the title text that will appear at the top of your Web page when it's loaded in the Web browser.
- Click Save to save your document as a Web page.
Office will create an HTML document in the folder you specified. In some cases, Office will also create a folder bearing the file's name that contains a few extra files that are necessary to view the Web page. (The complete list varies from application to application.) You can now distribute this file as a completed Web page on the Internet or your corporate intranet—you can view it in either Internet Explorer or Netscape Navigator.

Figure 3-11. The Save As Web Page command includes options that control how your Office document will be converted into a Web page.
NOTE
Excel, PowerPoint, and Access have a few additional Web page features that you can control using the Save As Web Page command. For more information about these features, see the individual application sections in this book.
Using Web Page Preview
If you'd like to see what your Web page will look like in an Internet browser, use the Web Page Preview command to check out all the details. We recommend this step especially if you plan to distribute the document on the Internet or to a number of people on your corporate intranet. Follow these steps:
- Choose Web Page Preview from the File menu.
Office converts the active document to Web page format and displays it in your system's default browser (typically Internet Explorer).
- Use the browser to verify the content, layout, and functionality of the Web page.
- When you're finished examining the Web page, close the browser and return to your Office application.
TIP
Is Web Page Preview Necessary?Do you really need to check out the content and layout of your completed Web page? In a word, yes. Although Office applications can convert most document features to HTML seamlessly, the nature of HTML means that a few of the items might appear on your Web page in a different place than they did in your Office application. For this reason, it always makes sense to spend a little quality time verifying the content and layout of your Web page after you create it in Office. In other words, it's a little more important than using Print Preview before you generate hard copy.