Setting Web Publication Options
The Save As Web Page command on the Excel File menu saves an existing Excel worksheet or workbook as a Web page and allows you to set a number of useful publication options. Before you use this command, verify that your worksheet contains the proper document style and content for your Web page, and that it presents information in a clear format that includes the necessary operating instructions. And remember: users with no knowledge of you or your worksheet will be opening and running this document on the Internet or an intranet (provided that they have the necessary permissions), so take care to make the user interface for the worksheet simple and intuitive.
To save, or publish, an Excel worksheet or workbook as a Web page, follow these steps:
- Open the worksheet you plan to save as an HTML document. In this example, we'll save the Invoice.xls worksheet (an order form for sewing patterns) as an interactive Web page.
ON THE WEB
The Invoice.xls example is on the Running Office 2000 Reader's Corner page. For information about connecting to this Web site, read the Introduction.
The Save As Web Page dialog box looks similar to the standard Save As dialog box displayed by all Office applications. However, you'll see four new options related to Web publishing: you can specify which part of your workbook you want to publish (the entire workbook or the active worksheet), you can specify whether you want the document to be interactive or not (an option that is valid for worksheets only, not entire workbooks), you can add an HTML document title to the Web page, and you can select advanced options by clicking the Publish button.
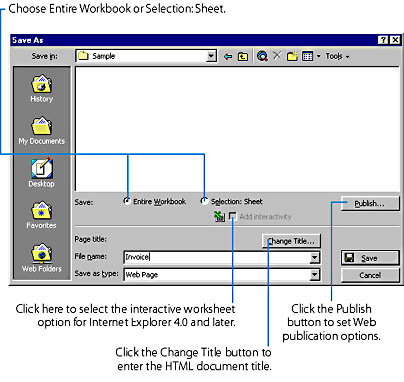
Figure 24-1. The Save As Web Page command displays this dialog box, which includes options that control how your Excel worksheet will be converted into an HTML document.
The top list box gives you the option of selecting only a portion of your worksheet for the Web page. Although we typically include the whole sheet in our interactive Excel pages to allow the user some maneuvering room, this option is nice if you want to limit what users can see and do on the screen.
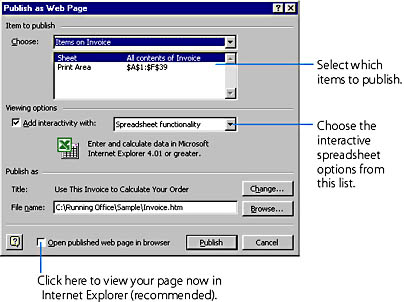
Figure 24-2. The Publish As Web Page dialog box lists the entire collection of options available to you.
The Interactivity options control what the user can do with the worksheet when it appears in the browser. To make the Web page static and noninteractive, deselect the Add Interactivity With check box. To specify the type of interactivity you want to use, select the Spreadsheet functionality option in the list box in Figure 24-2. Currently, Excel Web pages support general spreadsheet functionality, pivot table functionality, and charting functionality. (To get the chart functionality option, you need to open a chart in Excel.)
Interestingly, the interactivity features listed here are not provided by the Excel application itself, but by small ActiveX controls called Office Web Components that Excel places in the HTML document when it builds the Web page. When your completed page is viewed in Internet Explorer version 4.0 or later, these components spring to life as toolbars and simulate the capabilities of a real Excel worksheet.
The Publish As Web Page dialog box also lets you change the HTML document title and filename— the same options you saw in the Save As dialog box earlier. And the Open Published Web Page In Browser check box gives you a chance to display the completed Web page in Internet Explorer now. (If you choose this option, Excel starts Internet Explorer 5 when you click the Publish button.) We recommend that you habitually use this preview option whenever you publish Web pages, so that you can see early in the development process how the page will appear to users on the Web.
TIP
Two Ways to Preview
If you don't select the Open Published Web Page In Browser check box while you're saving your Web page, you can preview the document later by choosing Web Page Preview from the Excel File menu. Both actions launch the current Excel Web page in Internet Explorer or the default browser for your system.
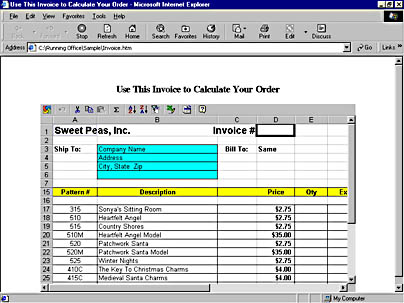
Figure 24-3. The Invoice worksheet as it appears in Internet Explorer 5.
EAN: 2147483647
Pages: 228