Managing Shared Workbooks
If you have access to a shared folder on the Internet or on an attached network, you can create shared workbooks that can be opened and used by several people simultaneously. This powerful feature allows you to distribute the responsibility for creating group tasks, such as revolving product inventories, incoming customer orders, or corporate mailing lists. Excel limits the ways in which you can modify a shared workbook. These limitations are detailed in the online Help under "Shared Workbooks, Limitations Of Shared Workbooks." But you can insert and delete rows and columns, modify worksheet cells, and sort entries based on one or more criteria. The following steps show you how to create and maintain a shared workbook.
SEE ALSO
If your workbook contains information arranged under uniform headings, you can set it up as an Excel database. See Chapter 22, "Managing Information in Lists."
NOTE
To use a shared workbook, you need access to a shared folder on the Internet or a computer network. If you or your colleagues don't have access to a shared folder, ask your network system administrator how to get one or how to create one on your own computer.
Creating a Shared Workbook
SEE ALSO
To learn how to add comments to worksheet cells, see "Entering Comments."
To create a shared workbook that can be used by several users simultaneously, follow these steps:
- Build the workbook you want to share as you would normally. Because the worksheets in your workbook will be accessed by several users, take extra care to format the contents clearly and concisely. You might also want to add cell comments that contain operation instructions and tips.
- From the Tools menu, choose Share Workbook. When the Share Workbook dialog box appears, click the Editing tab.
- Select the Allow Changes check box to define the workbook as a shared workbook, and then click OK. A dialog box appears asking you if it's all right to save your workbook (a requirement if the workbook is to be shared).
- Click OK to save the workbook.
After you save the workbook, the word Shared appears in the title bar between brackets, indicating that you're now editing a multiuser or shared workbook. As long as the Allow Changes check box is selected on the Editing tab, you won't be able to save formulas in the workbook or modify any cell formatting.
- Use Windows Explorer to copy the shared workbook to a shared folder on your network or the Internet, and then notify your associates that the file is available for use. From this moment on, each time a user saves changes to the shared workbook, the changes will be copied to the shared list and any changes made by other users will be uploaded into his or her system as well. Excel handles and distributes the revisions automatically!
CAUTION
For the shared workbook to operate properly, your co-workers need to open the same copy of the shared workbook from a shared network folder, not separate ones from their own individual hard disks. Users will know the workbook is shared if the word Shared appears in the title bar when it's loaded in Excel.
Monitoring a Shared Workbook
Once a shared workbook is active, you can monitor it by choosing the Share Workbook command to find out who is using it. To see a list of the users working on the file, follow these steps:
- Choose Share Workbook from the Tools menu. The Share Workbook dialog box appears.
- A list of the users working on the file appears on the Editing tab, as shown in Figure 18-6. The time displayed next to each user is the moment that user started editing the workbook.
- If you want to prohibit a user from working on the shared workbook, highlight the user's name and click the Remove User button. The user will be excluded from the editing session and won't be able to modify the shared copy of the file.
Figure 18-6. To see who is working on a shared workbook with you, use the Editing tab of the Share Workbook dialog box.
To "turn off" the shared workbook feature and disable multiuser editing in a workbook, choose Share Workbook from the Tools menu, click the Editing tab, and deselect the Allow Changes check box.
WARNING
Don't disable the Share Worksheet feature until each of your users has finished editing the workbook and has saved changes, or you'll lock them out of the file. Closing a shared workbook discards any revision information in the file and prohibits users from saving their changes to the multiuser copy of the workbook, even if you reopen sharing.
![]()
Accepting or Rejecting Revisions
If users enter or change data in different cells, each change will be accepted automatically and updated in everyone's workbook as each user saves his or her workbook. The changes to the workbook coming from other users will be highlighted after each save. Moving the cell pointer over each highlight will open a window showing who made the change, as shown in the following illustration:

An interesting problem arises, however, when two or more users change the same cells in different ways. Whose entry for the shared workbook should Excel accept? You have two methods for resolving the conflict.
In the first method, the most recently saved workbook's values replace the values that were entered into the cells on an earlier save. Choose this approach when you feel confident that later changes are always more accurate than earlier changes, such as when entering order numbers or tracking inventory quantities.
The second method enables the user saving the shared workbook to review the conflicting cells and decide whose changes take precedence. The user saving the workbook can accept all his or her own changes, accept all of another's changes, or decide cell by cell. Choose this method if you want to review the accuracy of changes before accepting them, or if you want to give one person's changes precedence over those of another. These choices and other multiuser options are provided on the Advanced tab of the Share Workbook dialog box, shown in Figure 18-7. To customize how your shared workbook handles conflicts in a multiuser environment, use these settings.
When you're ready to examine the list of editing activities in a shared workbook, choose Track Changes from the Tools menu, and choose either Highlight Changes or Accept Or Reject Changes from the submenu. The Highlight Changes command displays a dialog box asking you to specify the editing changes you want Excel to highlight in the workbook, as shown in Figure 18-8. (If your workbook is not currently shared, you can also use the Highlight Changes command to start sharing it as a workbook.)
You can highlight changes that were made at a particular time, by a particular user, or in a particular worksheet range. When you click OK, Excel outlines in blue each modified cell in the workbook that matches your search criteria and places a small triangle in the upper left corner of each affected cell. To see how a highlighted cell was changed, place the mouse pointer over the cell, and Excel will display a comment box containing the user name, date, time, and substance of the edit.
If you want to step through the list of revisions in the workbook and either accept or reject them, use the Accept Or Reject Changes command on the Track Changes submenu. When you choose this command, Excel saves the workbook and then displays a dialog box asking for your search criteria.
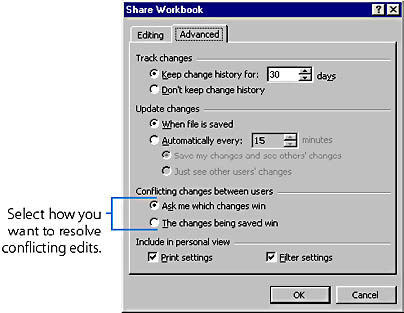
Figure 18-7. Customizing how workbooks are shared using the Advanced tab.
Figure 18-8. To have Excel automatically highlight new edits in a shared workbook, use the Highlight Changes command on the Track Changes submenu.
As you do when you choose Highlight Changes, you specify the time, person, and location of the edits you're looking for using the drop-down list boxes in the dialog box. When you click OK, Excel displays the changes one at a time in the Accept Or Reject Changes dialog box. (If more than one user wants to modify a cell, Excel identifies each user and the edits they're requesting.)
To accept an edit and store it in the shared workbook, click the Accept button. To reject the change, click the Reject button. Some cells might have more than one edit, in which case you must click the edit you want to accept. (See Figure 18-9.) After you accept or reject an edit, Excel removes the revision highlighting from that cell.
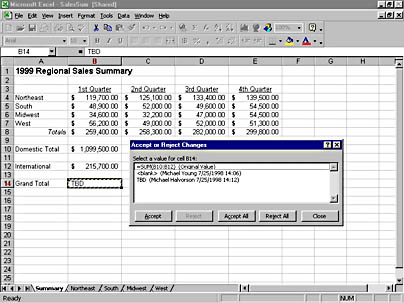
Figure 18-9. Excel tracks each edit in a shared workbook and lets you accept or reject it. If a change made by another user is inappropriate, you can discard it.
Merging Workbooks
Another method for consolidating changes in a shared workbook is to merge two copies of the workbook together using the Merge Workbooks command on the Tools menu. Merging workbooks is a useful technique when two users are working with slightly different copies of the same file and one user wants to incorporate all the changes the other user has made.
Merging workbooks is a one-step process— you simply choose the Merge Workbooks command and the file you want to merge with the active workbook, and Excel compares the two workbooks and copies any differences to the active file. Unlike the Accept Or Reject Changes command, however, the Merge Workbooks command doesn't give you a chance to compare or sort out the differences between the different copies. Its sole purpose is to update one copy of a workbook with another.
To merge two copies of a shared workbook, follow these steps:
- Before you make any edits, use the Share Workbook command on the Tools menu to identify the original file as a shared workbook. (The Merge Workbooks command works only on copies of the same file that have been marked as shared.)
- Use the Save As command on the File menu to create a second copy of the shared workbook. Give this copy of the file a unique name, and then deliver it to the user who will be making the edits by means of a network, the Internet, or a removable disk.
- When you're ready to consolidate the changes made to the file, open your original copy of the shared workbook in Excel, and then choose Merge Workbooks from the Tools menu to access the updated copy.
- Click OK to save the file to disk when prompted, and then choose the copy of the workbook in the Select Files To Merge Into Current Workbook dialog box.
- Click OK to merge the files. After a moment, Excel updates the original file by adding the changes from the merge file. (If there are no changes, Excel will notify you in a dialog box.) That's all there is to it!
NOTE
The file you specify for merging must be a copy of the original file that has a unique filename. It must also be saved as shared.
WARNING
Remember, the Merge Workbooks command doesn't give you a chance to accept or reject changes, so use it only if you want all revisions merged into your original file.
EAN: 2147483647
Pages: 228