Protecting Worksheets and Workbooks
In Chapter 17, you learned how to hide rows and columns in your worksheet from unauthorized glances. (Turn to the tip "Hide Rows or Columns for Security" if you'd like a refresher course.) Excel also lets you protect complete worksheets or an entire workbook from tampering by using a feature called password protection. When you guard worksheets or workbooks in this way, users can open the file, but they can't change the parts you have protected. If you want to share your workbooks with others, while protecting them from modification, this is the feature for you.
SEE ALSO
You can even require a password from users when they open a workbook. See "Requiring a Password for File Access."
Protecting Worksheets
To protect a worksheet in the workbook from modification, follow these steps:
- Click the worksheet tab corresponding to the worksheet you want to protect.
- From the Tools menu, choose Protection, and then choose Protect Sheet from the submenu. The Protect Sheet dialog box appears, as shown here:
- Type a short password into the Password text box, and click OK. Note that Excel distinguishes uppercase letters from lowercase letters, so remember any variations you make in your password's capitalization. If you forget this password in the future, you won't be able to unprotect the worksheet.
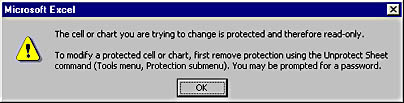
- When Excel asks you to verify your password, type it in again and then jot it down for future reference. (Try not to put it in an obvious place, however.) If anyone attempts to modify this protected worksheet in the future, Excel will display the following dialog box:
- To remove worksheet protection at a later time, choose Protection from the Tools menu, and choose the Unprotect Sheet command from the submenu. If you didn't originally use a password, that's all there is to it! If you did, the following dialog box will appear and you must enter the worksheet password:
The Protect Sheet dialog box contains a Password text box and three protection check boxes that are enabled by default. When the Contents check box is the only one selected, all the cells in the worksheet are protected, but any objects (such as clip art images) and worksheet scenarios will remain unprotected. To safeguard these items, be sure the Objects and Scenarios check boxes are also selected.
TIP
Use a Password (If Any) with CareA password isn't required to protect worksheets. If you're afraid you'll forget the password, set worksheet protection without entering a password, and you'll preserve the worksheet from accidental entries and mistakes. (However, a renegade user could easily disable worksheet protection and then modify your document.)
TIP
Lock Specific Cells or FieldsIf you want to let users modify some cells in your worksheet but not others, select the cells and clear the Locked option on the Protection tab of the Format Cells dialog box. This technique is useful if you have a field for comments or an area in the worksheet that is typically used for data entry. You must do this before you use the Protect Sheet command on the Protection submenu, or the Format Cells command will be unavailable to you. If this happens, turn off Protection, unlock the desired cells or fields, and then turn Protection back on.
Protecting Workbook Structure
To protect the structure of an entire workbook from modification (that is, to guard the names and the order of the worksheets), follow these steps:
- From the Tools menu, choose Protection, and then choose Protect Workbook from the submenu. The Protect Workbook dialog box appears, as shown in Figure 18-10.
- Type a password in the Password text box, and click OK. Note any variations you make in your password's capitalization, and take steps to remember the name. You can also click OK without typing a name to set workbook protection without a password.
- Retype the password when Excel asks for it. From this point on, no user will be able to modify the worksheet's structure without first unprotecting the workbook by choosing the Unprotect Workbook command from the Protection submenu.
The Protect Workbook dialog box contains a Password text box and two protection check boxes. When the Structure check box is selected, users can't insert, delete, hide, rename, copy, or move worksheets in the workbook, although they can modify data in the worksheets if worksheet protection is not set. When the Windows check box is selected, users can't resize the windows displaying the workbook.
Figure 18-10. The Protect Workbook dialog box.
TIP
If you work regularly in a multiuser environment, you might also enjoy the protection provided by the Protect And Share Workbook command on the Tools menu's Protection submenu. When you enable this toggle, it prevents users from modifying the revision history of a shared workbook.
Requiring a Password for File Access
If you're using Excel to track confidential information, you might want to limit access to your file by requiring a password to open it. This control goes further than protecting the content and structure of the workbook: it prevents anyone lacking an entry key from viewing your workbook at all.
WARNING
Take care when using password protection. If you forget your password, you'll have no way to open the protected file.
To save a file that has password protection, follow these steps:
- Create your workbook as you normally would. You don't need to hide or protect confidential parts of the file— your password protection will limit access to every component.
- From the File menu, choose Save As to display the Save As dialog box. If you haven't already specified a filename, type one now in the File Name text box.
- Click the Tools drop-down arrow in the upper right corner of the Save As dialog box, and then click the General Options command.
- The Save Options dialog box appears, as shown in Figure 18-11. It contains two password protection text boxes: Password To Open, which prohibits users from opening the file unless they know the specified password, and Password To Modify, which prohibits users from saving changes to the file without knowing the password.
- To limit access to your workbook, type a password into the Password To Open text box, and click OK. When Excel asks for it, reenter the password to verify that you spelled it as intended.
- The next time you (or another user) try to open the file, Excel will prompt for the password in a dialog box. To remove password protection in the future, choose Save As, click the Options button, and remove the password from the Password To Open text box.
Figure 18-11. To protect your file from unauthorized access, type a password in the Save Options dialog box.
TIP
If you want to recommend, but not require that users open the file as a read-only document, select the Read-Only Recommended check box.
EAN: 2147483647
Pages: 228