The Timer Control
The Timer Control
As we wrap up our consideration of flow control tools and techniques in this chapter, you should also consider the benefits of using the Visual Studio Timer control, which you can use to execute a group of statements for a specific period of time or at specific intervals. The Timer control is essentially an invisible stopwatch that gives you access to the system clock in your programs. The Timer control can be used like an egg timer to count down from a preset time, to cause a delay in a program, or to repeat an action at prescribed intervals.
Although timer objects aren't visible at run time, each timer is associated with an event procedure that runs every time the timer's preset interval has elapsed. You set a timer's interval by using the Interval property, and you activate a timer by setting the timer's Enabled property to True. Once a timer is enabled, it runs constantly—executing its event procedure at the prescribed interval—until the user stops the program or the timer object is disabled.
Creating a Digital Clock by Using a Timer Control
One of the most straightforward uses for a Timer control is creating a custom digital clock. In the following exercise, you'll create a simple digital clock that keeps track of the current time down to the second. In the example, you'll set the Interval property for the timer to 1000, directing Visual Studio to update the clock time every 1000 milliseconds, or once a second. Because the Microsoft Windows operating system is a multitasking environment and other programs also require processing time, Visual Studio might not update the clock every second, but it always catches up if it falls behind. To keep track of the time at other intervals, such as once every tenth of a second, you simply adjust the number in the Interval property.
Create the Digital Clock program
On the File menu, click the New Project command, and create a new project named My Digital Clock.
The new project is created and a blank form appears in the Designer.
Resize the form to a small rectangular window (one that's wider than it is tall).
You don't want the clock to take up much room.
Double-click the Timer control on the Components tab of the Toolbox.
This is the first time that you have used the Components tab and the Timer control in this book. (The Components tab provides a number of interesting controls that work “behind the scenes” in your programs.) Visual Studio creates a small timer object in the component tray beneath your form, as shown here:
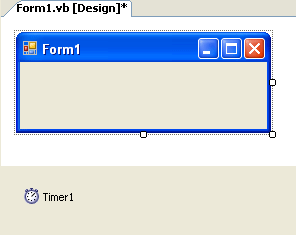
Recall from Chapter 4, “Working with Menus, Toolbars, and Dialog Boxes,” that certain Visual Studio controls don't have a visual representation on the form, and when objects for these controls are created, they appear in the component tray beneath the form. (This was the case for the MenuStrip and ToolStrip controls that you used in Chapter 4.) However, you can still select controls in this special pane and set properties for them, as you'll do for the timer object in this exercise.
Click the Label control in the Toolbox, and then draw a very large label object on the form—a label that's almost the size of the entire form itself.
You'll use the label to display the time in the clock, and you want to create a very big label to hold the 24-point type you'll be using.
NOTE
When you first create the label object, it resizes automatically to hold the text “Label1” in the default size. But when you set the AutoSize property to False in the next step, the label object is restored to the size you originally created.Open the Properties window, and set the following properties for the form and the two objects in your program:
Object
Property
Setting
Label1
AutoSize
Font
Text
TextAlign
False
Times New Roman, Bold, 24-point
(empty)
MiddleCenter
Timer1
Enabled
Interval
True
1000
Form1
Text
“Digital Clock”
TIP
If you'd like to put some artwork in the background of your clock, set the BackgroundImage property of the Form1 object to the path of a graphics file.Now you'll write the program code for the timer.
Double-click the timer object in the component tray.
The Timer1_Tick event procedure appears in the Code Editor. Experienced Visual Basic 6 programmers will notice that this event procedure has been renamed from Timer1_Timer to Timer1_Tick, clarifying what this event procedure does in the program (that is, the event procedure runs each time that the timer clock ticks).
Type the following statement:
Label1.Text = TimeString
This statement gets the current time from the system clock and assigns it to the Text property of the Label1 object. (If you'd like to have the date displayed in the clock as well as the time, use the System.DateTime.Now property instead of the TimeString property.) Only one statement is required in this program because you set the Interval property for the timer by using the Properties window. The timer object handles the rest.
Click the Save All button on the Standard toolbar to save your changes. Specify c:\vb05sbs\chap07 as the folder location.
TIP
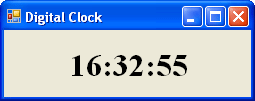
The complete Digital Clock program is available in the c:\vb05sbs\chap07\digital clock folder.Click the Start Debugging button on the Standard toolbar to run the clock.
The clock appears, as shown in the following illustration. (Your time will be different, of course.)
If you used the System.DateTime.Now property, you'll see the date in the clock also, as shown here:
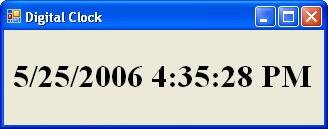
I needed to enlarge the label object and the form a little here to get the data and time to appear on one line. If your system clock information also wrapped, close the program, and resize your label and form.
Watch the clock for a few moments.
Visual Basic updates the time every second.
Click the Close button in the title bar to stop the clock.
The Digital Clock program is so handy that you might want to compile it into an executable file and use it now and then on your computer. Feel free to customize it by using your own artwork, text, and colors.
EAN: N/A
Pages: 168