Writing Do Loops
Writing Do Loops
As an alternative to a For…Next loop, you can write a Do loop that executes a group of statements until a certain condition is True. Do loops are valuable because often you can't know in advance how many times a loop should repeat. For example, you might want to let the user enter names in a database until the user types the word “Done” in an input box. In that case, you can use a Do loop to cycle indefinitely until the “Done” text string is entered.
A Do loop has several formats, depending on where and how the loop condition is evaluated. The most common syntax is
Do While condition block of statements to be executed Loop
For example, the following Do loop prompts the user for input and displays that input in a text box until the word “Done” is typed in the input box:
Dim InpName As String Do While InpName <> "Done" InpName = InputBox("Enter your name or type Done to quit.") If InpName <> "Done" Then TextBox1.Text = InpName Loop The conditional statement in this loop is InpName <> "Done", which the Visual Basic compiler translates to mean “loop as long as the InpName variable doesn't contain exactly the word ‘Done'.” This brings up an interesting fact about Do loops: if the condition at the top of the loop isn't True when the Do statement is first evaluated, the Do loop is never executed. Here, if the InpName string variable did contain the “Done” value before the loop started (perhaps from an earlier assignment in the event procedure), Visual Basic would skip the loop altogether and continue with the line below the Loop keyword.
If you always want the loop to run at least once in a program, put the conditional test at the bottom of the loop. For example, the loop
Dim InpName As String Do InpName = InputBox("Enter your name or type Done to quit.") If InpName <> "Done" Then TextBox1.Text = InpName Loop While InpName <> "Done" is essentially the same as the previous Do loop, but here the loop condition is tested after a name is received from the InputBox function. This has the advantage of updating the InpName variable before the conditional test in the loop so that a preexisting “Done” value won't cause the loop to be skipped. Testing the loop condition at the bottom ensures that your loop is executed at least once, but often it forces you to add a few extra statements to process the data.
NOTE
The previous code samples asked the user to type “Done” to quit. Note that the test of the entered text is case sensitive, which means that typing “done” or “DONE” doesn't end the program. You can make the test case-insensitive by using the StrComp function, which I'll discuss in Chapter 13, “Exploring Text Files and String Processing.”
Avoiding an Endless Loop
Because of the relentless nature of Do loops, it's very important to design your test conditions so that each loop has a true exit point. If a loop test never evaluates to False, the loop executes endlessly, and your program might not respond to input. Consider the following example:
Dim Number as Double Do Number = InputBox("Enter a number to square. Type –1 to quit.") Number = Number * Number TextBox1.Text = Number Loop While Number >= 0 In this loop, the user enters number after number, and the program squares each number and displays it in the text box. Unfortunately, when the user has had enough, he or she can't quit because the advertised exit condition doesn't work. When the user enters -1, the program squares it, and the Number variable is assigned the value 1. (The problem can be fixed by setting a different exit condition.) Watching for endless loops is essential when you're writing Do loops. Fortunately, they're pretty easy to spot if you test your programs thoroughly.
IMPORTANT
Be sure that each loop has a legitimate exit condition.
The following exercise shows how you can use a Do loop to convert Fahrenheit temperatures to Celsius temperatures. The simple program prompts the user for input by using the InputBox function, converts the temperature, and displays the output in a message box.
Convert temperatures by using a Do loop
On the File menu, click New Project.
The New Project dialog box appears.
Create a new Visual Basic Windows Application project named My Celsius Conversion.
The new project is created, and a blank form appears in the Designer. This time, you'll place all the code for your program in the Form1_Load event procedure so that Visual Basic immediately prompts you for the Fahrenheit temperature when you start the application. You'll use an InputBox function to request the Fahrenheit data, and you'll use a MsgBox function to display the converted value.
Double-click the form.
The Form1_Load event procedure appears in the Code Editor.
Type the following program statements in the Form1_Load event procedure:
Dim FTemp, Celsius As Single Dim strFTemp As String Dim Prompt As String = "Enter a Fahrenheit temperature." Do strFTemp = InputBox(Prompt, "Fahrenheit to Celsius") If strFTemp <> "" Then FTemp = CSng(strFTemp) Celsius = Int((FTemp + 40) * 5 / 9 - 40) MsgBox(Celsius, , "Temperature in Celsius") End If Loop While strFTemp <> "" End
TIP
Be sure to include the End statement at the bottom of the Form1_Load event procedure.This code handles the calculations for the project. The first line declares two single-precision variables, FTemp and Celsius, to hold the Fahrenheit and Celsius temperatures, respectively. The second line declares a string variable named strFTemp that holds a string version of the Fahrenheit temperature. The third line declares a string variable named Prompt, which will be used in the InputBox function, and assigns it an initial value. The Do loop repeatedly prompts the user for a Fahrenheit temperature, converts the number to Celsius, and then displays it on the screen by using the MsgBox function.
The value that the user enters in the input box is stored in the strFTemp variable. The InputBox function always returns a value of type string, even if the user enters numbers. Because we want to perform mathematical calculations on the entered value, strFTemp must be converted to a number. The CSng function is used to convert a string into the Single data type. CSng is one of many conversion functions to convert a string to a different data type. The converted single value is then stored in the FTemp variable.
The loop executes until the user clicks the Cancel button or until the user presses Enter or clicks OK with no value in the input box. Clicking the Cancel button or entering no value returns an empty string (""). The loop checks for the empty string by using a While conditional test at the bottom of the loop. The program statement
Celsius = Int((FTemp + 40) * 5 / 9 - 40)
handles the conversion from Fahrenheit to Celsius in the program. This statement employs a standard conversion formula, but it uses the Int function to return a value that contains no decimal places to the Celsius variable. (Everything to the right of the decimal point is discarded.) This cutting sacrifices accuracy, but it helps you avoid long, unsightly numbers such as 21.11111, the Celsius value for 70 degrees Fahrenheit.
Click the Save All button on the Standard toolbar to save your changes. Specify the c:\vb05sbs\chap07 folder as the location.
Now you'll try running the program.
TIP
The complete Celsius Conversion program is available in the c:\vb05sbs\chap07\celsius conversion folder.Click the Start Debugging button on the Standard toolbar.
The program starts, and the InputBox function prompts you for a Fahrenheit temperature.
Type 212.
Your screen looks like this:
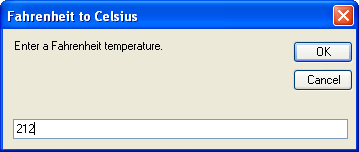
Click OK.
The temperature 212 degrees Fahrenheit is converted to 100 degrees Celsius, as shown in this message box:
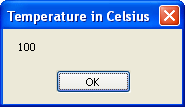
Click OK. Then type 72 in the input box, and click OK again.
The temperature 72 degrees Fahrenheit is converted to 22 degrees Celsius.
Click OK, and then click Cancel in the input box.
The program closes, and the development environment returns.
Using the Until Keyword in Do Loops
The Do loops you've worked with so far have used the While keyword to execute a group of statements as long as the loop condition remains True. With Visual Basic, you can also use the Until keyword in Do loops to cycle until a certain condition is True. You can use the Until keyword at the top or bottom of a Do loop to test a condition, just like the While keyword. For example, the following Do loop uses the Until keyword to loop repeatedly until the user enters the word “Done” in the input box:
Dim InpName As String Do InpName = InputBox("Enter your name or type Done to quit.") If InpName <> "Done" Then TextBox1.Text = InpName Loop Until InpName = "Done" As you can see, a loop that uses the Until keyword is similar to a loop that uses the While keyword, except that the test condition usually contains the opposite operator—the = (equal to) operator versus the <> (not equal to) operator, in this case. If using the Until keyword makes sense to you, feel free to use it with test conditions in your Do loops.
EAN: N/A
Pages: 168