Setting the Properties
Setting the Properties
As you discovered in Chapter 1, you can change properties by selecting objects on the form and changing their settings in the Properties window. You'll start by changing the property settings for the two buttons.
Set the button properties
Click the first button (Button1) on the form.
The button is selected and is surrounded by resize handles.
Click the Properties window title bar.
TIP
If the Properties window isn't visible, click the Properties Window command on the View menu, or press F4.Resize the Properties window (if necessary) so that there is plenty of room to see the property names and their current settings.
Once you get used to setting properties, you will probably use the Properties window without enlarging it, but making it bigger helps when you first try to use it. The Properties window in the following illustration is a good size for setting properties:
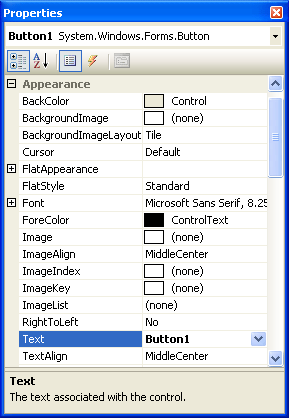
The Properties window lists the settings for the first button. These include settings for the background color, text, font height, and width of the button. Because there are so many properties, Visual Studio organizes them into categories and displays them in outline view. If you want to see the properties in a category, click the plus sign (+) next to the category title.
Scroll in the Properties window until you see the Text property located in the Appearance category.
Double-click the Text property in the left column of the Properties window.
The current Text setting (“Button1”) is highlighted in the Properties window.
Type Spin, and press Enter.
The Text property changes to “Spin” in the Properties window and on the button on the form. Now you'll change the Text property of the second button to “End”. (You'll select the second button in a new way this time.)
Open the Object list at the top of the Properties window.
A list of the interface objects in your program appears as follows:
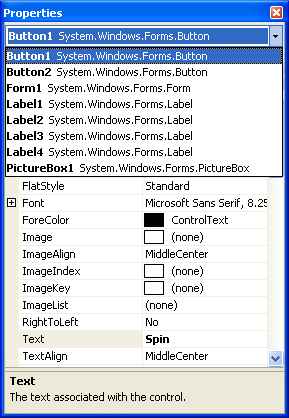
Click Button2 System.Windows.Forms.Button (the second button) in the list box.
The property settings for the second button appear in the Properties window, and Visual Studio highlights Button2 on the form.
Double-click the current Text property (“Button2”), type End, and then press Enter.
The text of the second button changes to “End”.
TIP
Using the Object list is a handy way to switch between objects in your program. You can also switch between objects on the form by clicking each object.
Now you'll set the properties for the labels in the program. The first three labels will hold the random numbers generated by the program and will have identical property settings. (You'll set most of them as a group.) The descriptive label settings will be slightly different.
Set the number label properties
Click the first number label (Label1), hold down the Shift key, click the second and third number labels, and then release the Shift key. (If the Properties window is in the way, move it to a new place.)
A selection rectangle and resize handles appear around each label you click. You'll change the TextAlign, BorderStyle, and Font properties now so that the numbers that will appear in the labels will be centered, boxed, and identical in font and point size. (All of these properties are located in the Appearance category of the Properties window.) You'll also set the AutoSize property to False so that you can change the size of the labels according to your precise specifications. (The AutoSize property is located in the Layout category.)
TIP
When more than one object is selected, only those properties that can be changed for the group are displayed in the Properties window.Click the AutoSize property in the Properties window, and then click the arrow that appears to the right.
Set the AutoSize property to False so that you can size the labels manually.
Click the TextAlign property, and then click the arrow that appears to the right.
A graphical assortment of alignment options appears in the list box; you can use these settings to align text anywhere within the borders of the label object.
Click the center option (MiddleCenter).
The TextAlign property for each of the selected labels changes to MiddleCenter.
Click the BorderStyle property, and then click the arrow that appears to the right.
The valid property settings (None, FixedSingle, and Fixed3D) appear in the list box.
Click FixedSingle in the list box to add a thin border around each label.
Click the Font property, and then click the ellipsis button (the button with three dots that's located next to the current font setting).
The Font dialog box appears.
Change the font to Times New Roman, the font style to Bold, and the point size to 24, and then click OK.
The label text appears in the font, style, and size you specified.
Now you'll set the text for the three labels to the number 0—a good “placeholder” for the numbers that will eventually fill these boxes in your game. (Because the program produces the actual numbers, you could also delete the text, but putting a placeholder here gives you something to base the size of the labels on.)
Click a blank area on the form to remove the selection from the three labels, and then click the first label.
Double-click the Text property, type 0, and then press Enter.
The text of the Label1 object is set to 0. You'll use program code to set this property to a random “slot machine” number later in this chapter.
Change the text in the second and third labels on the form to 0 also.
Move and resize the labels now so that they are appropriately spaced.
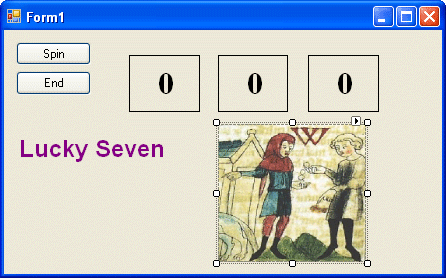
Your form looks something like this:
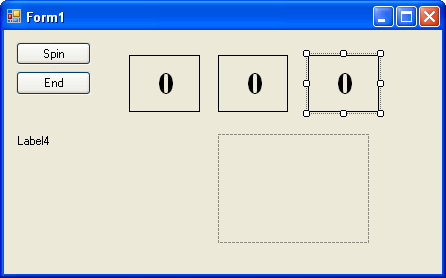
Now you'll change the Text, Font, and ForeColor properties of the fourth label.
Set the descriptive label properties
Click the fourth label object (Label4) on the form.
Change the Text property in the Properties window to Lucky Seven.
Click the Font property, and then click the ellipsis button.
Use the Font dialog box to change the font to Arial, the font style to Bold, and the point size to 18. Then click OK.
The font in the Label4 object is updated, and the label is resized automatically to hold the larger font size because the object's AutoSize property is set to True.
Click the ForeColor property in the Properties window, and then click the arrow in the second column.
Visual Studio displays a list box with Custom, Web, and System tabs for setting the foreground colors (the color of text) of the label object. The Custom tab offers many of the colors available in your system. The Web tab sets colors for Web pages and lets you pick colors using their common names. The System tab displays the current colors used for user interface elements in your system.
Click the purple color on the Custom tab.
The text in the label box changes to purple.
Now you're ready to set the properties for the last object.
The Picture Box Properties
When the person playing your game hits the jackpot (that is, when at least one 7 appears in the number labels on the form), the picture box object will contain a picture of a person dispensing money. This picture is a digitized image from an unpublished fourteenth-century German manuscript stored in JPEG format. (As a history professor, I run across these things.) You need to set the SizeMode property to accurately size the picture and set the Image property to specify the name of the JPEG file that you will load into the picture box. You also need to set the Visible property, which specifies the picture state at the beginning of the program.
Set the picture box properties
Click the picture box object on the form.
Click the SizeMode property in the Properties window (listed in the Behavior category), click the arrow to the right, and then click StretchImage.
Setting SizeMode to StretchImage before you open a graphic causes Visual Studio to resize the graphic to the exact dimensions of the picture box. (Typically, you set this property before you set the Image property.)
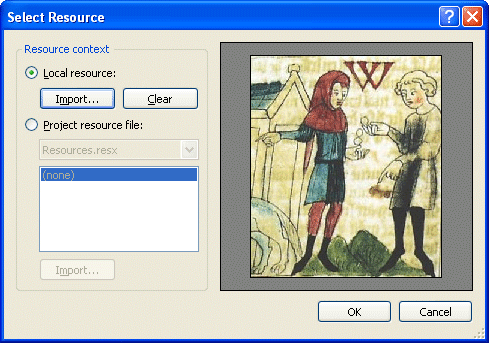
Click the Image property in the Properties window, and then click the ellipsis button in the second column.
The Select Resource dialog box appears.
Click the Local Resource option, and then click the Import button.
In the Open dialog box, navigate to the c:\vb05sbs\chap02 folder.
This folder contains the digital photo PayCoins.jpg.
Select PayCoins.jpg, and then click Open.
A medieval illustration of one person paying another appears in the Select Resource dialog box. (The letter W represents winning.)
Click OK.
The PayCoins photo is loaded into the picture box. Because the photo is relatively small (24 KB), it opens quickly on the form.
Resize the picture box object now to fix any distortion problems that you see in the image.
I sized my picture box object to be 148 pixels wide by 138 pixels high. You can match this size by using the width and height dimensions located on the lower-right side of the Visual Studio IDE. (The dimensions of the selected object are given on the lower-right side, and the location on the form of the object's upper-left corner is given to the left of the its dimensions.)
This particular image displays best when the picture box object retains a square shape.
NOTE
As you look at the picture box object, you might notice a tiny shortcut arrow near the upper-right corner. This arrow is a button that you can click to quickly change a few common picture box settings and open the Select Resource dialog box. (The shortcut arrow is a new feature in Visual Studio 2005, and you'll see it again in Chapter 4, “Working with Menus, Toolbars, and Dialog Boxes,” when you use the ToolStrip control.)Now you'll change the Visible property to False so that the image will be invisible when the program starts.
Click the Visible property in the Behavior category of the Properties window, and then click the arrow to the right.
The valid settings for the Visible property appear in a list box.
Click False to make the picture invisible when the program starts.
Setting the Visible property to False affects the picture box when the program runs, but not now while you're designing it. Your completed form looks similar to this:
TIP
You can also double-click property names that have True and False settings (so-called Boolean properties), to toggle back and forth between True and False. Default Boolean properties are shown in regular type, and changed settings appear in bold.You're done setting properties for now, so if your Properties window is floating, double-click its title bar to return it to the docked position.
EAN: N/A
Pages: 168
- Integration Strategies and Tactics for Information Technology Governance
- Assessing Business-IT Alignment Maturity
- Linking the IT Balanced Scorecard to the Business Objectives at a Major Canadian Financial Group
- A View on Knowledge Management: Utilizing a Balanced Scorecard Methodology for Analyzing Knowledge Metrics
- Measuring ROI in E-Commerce Applications: Analysis to Action