Adding Animation to Your Programs
Adding Animation to Your Programs
Displaying bitmaps and drawing shapes adds visual interest to a program, but for programmers, the king of graphical effects has always been animation. Animation is the simulation of movement produced by rapidly displaying a series of related images on the screen. Real animation involves moving objects programmatically, and it often involves changing the size or shape of the images along the way.
In this section, you'll learn how to add simple animation to your programs. You'll learn how to update the Top and Left properties of a picture box, control the rate of animation by using a timer object, and sense the edge of your form's window.
Moving Objects on the Form
In Visual Basic 6, a special method named Move allows you to move objects in the coordinate system. The Move method is no longer supported by Microsoft Visual Basic .NET 2003 or Visual Basic 2005 controls. However, you can use the method and properties shown in the following table instead.
Keyword | Description |
Left | This property can be used to move an object horizontally (left or right). |
Top | This property can be used to move an object vertically (up or down). |
Location | This property can be used to move an object to the specified location. |
SetBounds | This method sets the boundaries of an object to the specified location and size. |
The following sections discuss how you can use the Left, Top, and Location properties to move objects.
To move an object in a horizontal direction, use the Left property, which uses the syntax
object.Left = horizontal
where object is the name of the object on the form that you want to move, and horizontal is the new horizontal, or x-axis, coordinate of the left edge of the object, measured in pixels. For example, the following program statement moves a picture box object to a location 300 pixels to the right of the left window edge:
PictureBox1.Left = 300
To move a relative distance to the right or left, you would add or subtract pixels from the current Left property setting. For example, to move an object 50 pixels to the right, you add 50 to the Left property, as follows:
PictureBox1.Left = PictureBox1.Left + 50
In a similar way, you can change the vertical location of an object on a form by setting the Top property, which takes the syntax
object.Top = vertical
where object is the name of the object on the form that you want to move, and vertical is the new vertical, or y-axis, coordinate of the top edge of the object, measured in pixels. For example, the following program statement moves a picture box object to a location 150 pixels below the window's title bar:
PictureBox1.Top = 150
Relative movements down or up are easily made by adding or subtracting pixels from the current Top property setting. For example, to move 30 pixels in a downward direction, you add 30 to the current Top property, as follows:
PictureBox1.Top = PictureBox1.Top + 30
The Location Property
To move an object in both vertical and horizontal directions, you can use a combination of the Left and Top property settings. For example, to relocate the upper-left corner of a picture box object to the (x, y) coordinates (300, 200), you enter the following program code:
PictureBox1.Left = 300 PictureBox1.Top = 200
However, the designers of Visual Studio don't recommend using two program statements to relocate an object if you plan to make numerous object movements in a program (for example, if you plan to move an object hundreds or thousands of times during an elaborate animation effect). Instead, you should use the Location property with the syntax
object.Location = New Point(horizontal, vertical)
where object is the name of the object, horizontal is the horizontal x-axis coordinate, vertical is the vertical y-axis coordinate, and Point is a structure identifying the pixel location for the upper-left corner of the object. For example, the following program statement moves a picture box object to an (x, y) coordinate of (300, 200):
PictureBox1.Location = New Point(300, 200)
To perform a relative movement using the Location property, the Location.X and Location.Y properties are needed. For example, the program statement
PictureBox1.Location = New Point(PictureBox1.Location.X - 50, _ PictureBox1.Location.Y - 40)
moves the picture box object 50 pixels left and 40 pixels up on the form. Although this construction seems a bit unwieldy, it's the recommended way to relocate objects in relative movements on your form at run time.
Creating Animation by Using a Timer Object
The trick to creating animation in a program is placing one or more Location property updates in a timer event procedure so that at set intervals the timer causes one or more objects to drift across the screen. In Chapter 7, “Using Loops and Timers,” you learned how to use a timer object to update a simple clock utility every second so that it displayed the correct time. When you create animation, you set the Interval property of the timer to a much faster rate—1/5 second (200 milliseconds), 1/10 second (100 milliseconds), or less. The exact rate you choose depends on how fast you want the animation to run.
Another trick is to use the Top and Left properties and the size of the form to “sense” the edges of the form. By using these values in an event procedure, you can stop the animation (disable the timer) when an object reaches the edge of the form. And by using the Top property, the Left property, form size properties, and an If…Then or Select Case decision structure, you can make an object appear to bounce off one or more edges of the form.
The following exercise demonstrates how you can animate a picture box containing a Sun icon (Sun.ico) by using the Location property and a timer object. In this exercise, you'll use the Top property to detect the top edge of the form, and you'll use the Size.Height property to detect the bottom edge. The Sun icon will move back and forth between these extremes each time you click a button.
Animate a Sun icon on your form
Click the Close Project command on the File menu, and then create a new project named My Moving Icon.
Using the Button control, draw two button objects in the lower-left corner of the form.
Using the PictureBox control, draw a small rectangular picture box object in the lower-right corner of the form.
This is the object that you'll animate in the program.
Double-click the Timer control on the Components tab of the Toolbox to add it to the component tray below the form.
The timer object is the mechanism that controls the pace of the animation. Recall that the timer object itself isn't visible on the form, so it's shown below the form in the component tray reserved for non-visible objects.
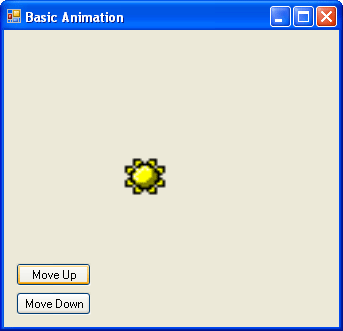
Set the following properties for the button, picture box, timer, and form objects. To set the PictureBox1 object's Image property, select All Files in the Files of Type list box before you browse to the file (files of the .ico type are not displayed by default).
Object
Property
Setting
Button1
Text
“Move Up”
Button2
Text
“Move Down”
PictureBox1
Image
SizeMode
“c:\vb05sbs\chap15\sun.ico”
StretchImage
Timer1
Interval
75
Form1
Text
“Basic Animation”
After you set these properties, your form looks similar to this:

Double-click the Move Up button to edit its event procedure.
The Button1_Click event procedure appears in the Code Editor.
Type the following program code:
GoingUp = True Timer1.Enabled = True
This simple event procedure sets the GoingUp variable to True and enables the timer object. The actual program code to move the picture box object and sense the correct direction is stored in the Timer1_Tick event procedure. The GoingUp variable is underlined now because you have not declared it yet.
Near the top of the form's program code (below the statement Public Class Form1), type the following variable declaration:
Dim GoingUp As Boolean 'GoingUp stores current direction
This variable declaration makes GoingUp available to all the event procedures in the form, so the underline in the Button1_Click event procedure is removed. I've used a Boolean variable because there are only two possible directions for movement in this program—up and down.
Display the form again, double-click the Move Down button, and then enter the following program code in the Button2_Click event procedure:
GoingUp = False Timer1.Enabled = True
This routine is very similar to the Button1_Click event procedure, except that it changes the direction from up to down.
Display the form again, double-click the Timer1 object, and then enter the following program code in the Timer1_Tick event procedure:
If GoingUp = True Then 'move picture box toward the top If PictureBox1.Top > 10 Then PictureBox1.Location = New Point _ (PictureBox1.Location.X - 10, _ PictureBox1.Location.Y - 10) End If Else 'move picture box toward the bottom If PictureBox1.Top < (Me.Size.Height - 75) Then PictureBox1.Location = New Point _ (PictureBox1.Location.X + 10, _ PictureBox1.Location.Y + 10) End If End If
As long as the timer is enabled, this If…Then decision structure is executed every 75 milliseconds. The first line in the procedure checks whether the GoingUp Boolean variable is set to True, indicating that the icon is moving toward the top of the form. If it's set to True, the procedure moves the picture box object to a relative position 10 pixels closer to both the top and left edges of the form.
If the GoingUp variable is currently set to False, the decision structure moves the icon down instead. In this case, the picture box object moves until the edge of the form is detected. The height of the form can be determined by using the Me.Size.Height property. (I subtract 75 from the form height so that the icon is still displayed on the form.) The Me object in this example represents the form (Form1).
As you'll see when you run the program, this movement gives the icon animation a steady drifting quality. To make the icon move faster, you decrease the Interval setting for the timer object. To make the icon move slower, you increase the Interval setting.
Run the Moving Icon program
Click the Start Debugging button to run the program.
The Moving Icon program runs in the IDE.
Click the Move Up button.
The picture box object moves up the form on a diagonal path, as indicated here:
After a few moments, the button comes to rest at the upper edge of the form.
NOTE
If you placed the picture box object in the lower-right corner of the form as instructed in step 3 of the previous exercise, you see something similar to this illustration. However, if you placed the picture box object in another location, or created a smaller form, the image might drift off the screen when you click Move Up or Move Down. Can you tell why?Click the Move Down button.
The picture box moves back down again to the lower-right corner of the screen.
Click both buttons again several times, and ponder the animation effects.
Note that you don't need to wait for one animation effect to end before you click the next button. The Timer1_Tick event procedure uses the GoingUp variable immediately to manage your direction requests, so it doesn't matter whether the picture box has finished going in one direction. Consider this effect for a moment, and imagine how you could use a similar type of logic to build your own Visual Basic video games. You could increase or decrease the animation rates according to specific conditions or “collisions” on screen, and you could force the animated objects to move in different directions. You could also change the picture displayed by the picture box object based on where the icon is on the screen or what conditions it encounters.
When you're finished running the program, click the Close button on the form to stop the demonstration.
Click the Save All button to save the project, and specify the c:\vb05sbs\chap15 folder as the location.
TIP
The complete Moving Icon program is located in the c:\vb05sbs\chap15\moving icon folder.
EAN: N/A
Pages: 168