| In traditional cel animation or flip-book animation, you create the illusion of movement by showing a series of images, each slightly different from the rest, simulating snapshots of the movement. When you create each of these drawings and place them in a series of keyframes, that process is called frame-by-frame animation. When you create only the most crucial snapshots and allow Flash to interpolate the minor changes that take place between those snapshots, you're creating tweened animation. You learn more about tweening in Chapters 9 and 10. A classic example of frame-by-frame animation is a bouncing ball. You can create a crude bouncing ball in just three frames. To set up the initial keyframe 1. | Create a new Flash document, and name it something like Frame-by-Frame Bounce.
By default, Flash creates a document with one layer and a keyframe at frame 1. Choose View > Grid > Show Grid to help you reposition your graphics in this task.
| 2. | In the Timeline, select keyframe 1.
Use the Frame View pop-up menu to set the Timeline to Preview in Context mode. This setting makes it easy to keep track of what you do in the example.
| 3. | In the Tools panel, select the oval tool.
| 4. | Set the stroke color to No Color.
| 5. | Near the top of the Stage, draw a circle (Figure 8.22).
Figure 8.22. In keyframe 1, draw a circle near the top of the Stage. This circle will become a bouncing ball. 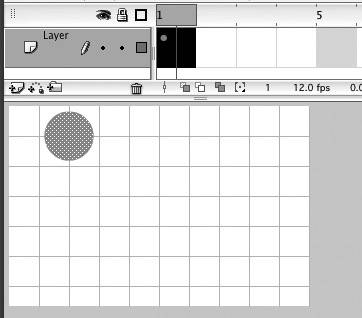
This circle will be your ball. Make it fairly large. To make the most efficient use of your graphic, convert the circle to a symbol (see Chapter 7).
When to Use Frame-by-Frame Animation With frame-by-frame animation, the more frames you add, the smaller you can make the differences between frames and the smoother the action is. Adding keyframes, however, also adds to your final movie's file size, which in turn affects the download time for people viewing your movie over the Web. Your goal is to strike a happy medium. In the bouncing ball example, you could help keep file size down by making the ball a symbol so that adding another keyframe for the ball in a new position adds little to the size of the file. In the real world, however, if you can use a symbol, you might prefer to use a more labor-efficient animation technique, motion tweening. Reserve frame-by-frame techniqes for animations where shapes are constantly changing in subtle ways that you need to control precisely. Otherwise, use Flash's motion-tweening and shape-tweening tools (see chapters 9 and 10). |
|
To create the second keyframe 1. | In the Timeline, select frame 2.
| 2. | Choose Insert > Timeline > Keyframe.
Flash creates a keyframe in frame 2 that duplicates your ball from keyframe 1.
| 3. | In keyframe 2, select the ball and reposition it at the bottom of the Stage (Figure 8.23).
Figure 8.23. Use the Insert > Timeline > Keyframe command to duplicate the ball from keyframe 1 in keyframe 2. Then drag the ball to reposition it. 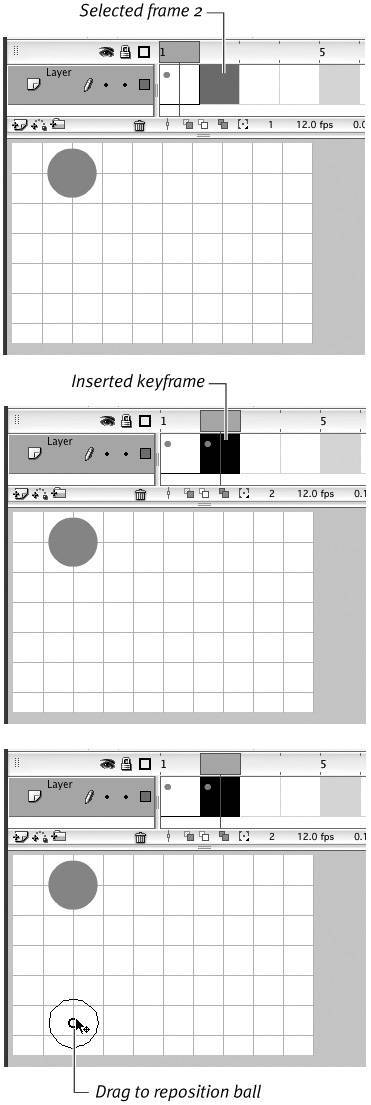
|
To create the third keyframe 1. | In the Timeline, select frame 3.
| 2. | Choose Insert > Timeline > Keyframe.
Flash creates a keyframe in frame 3 that duplicates your ball from keyframe 2.
| 3. | In keyframe 3, select the ball and reposition it in the middle of the Stage (Figure 8.24).
Figure 8.24. Use the Insert > Timeline > Keyframe command to duplicate the ball from keyframe 2 in keyframe 3. Drag the ball to reposition it again. 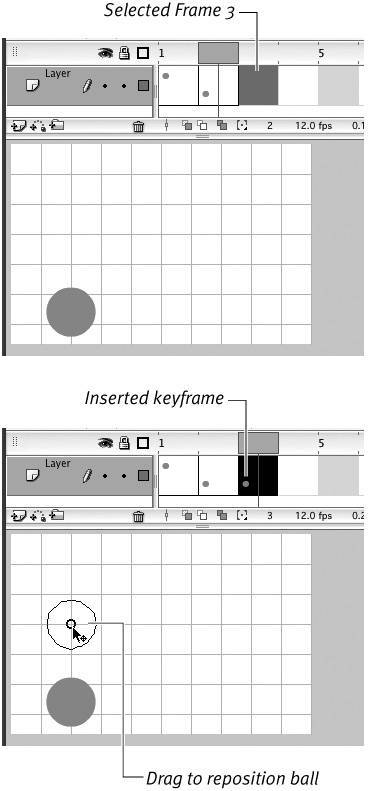
That's it. Believe it or not, you have just created all the content you need to animate a bouncing ball. To see how it works, in the Timeline, click keyframes 1, 2, and 3 in turn. As Flash changes the content of the Stage at each click, you see a very crude animation.
|
|