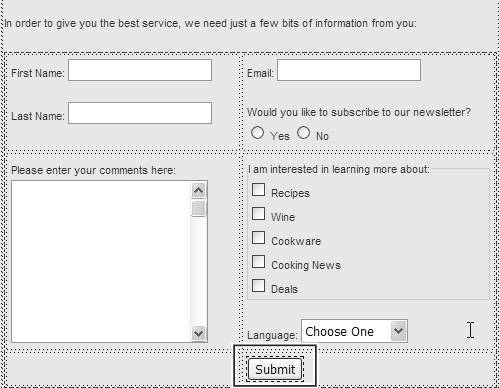
Adding a Button


A form on your site doesn't do you much good unless you can get the information that's entered into it, and that's the primary use of a button. A Submit button triggers the action specified in the form tag (described earlier in this chapter). Another type of button is the Reset button, which allows a user to go back to a form's original state.

To add a button:

1.
Choose where in your form you want your button to appear, and click the button icon on the Insert Bar. The default valuethe Submit buttonwill appear on your document ( Figure 10.26 ).

Figure 10.26. Add a Submit button to your Web form so you can receive your visitor's completed form.


2.
If the button hasn't been automatically selected, select it, and you'll see the options you can change for your new button in the Property Inspector ( Figure 10.27 ):

  • Button name : This is the name of the button; generally , you'll use "Submit" to specify that it's a Submit button, and "Reset" to show that it's a Reset button ( Figure 10.28 ).

  • Value: This is the message that will be displayed on the Submit button itself. It's common for it to say "Submit," but it can also say, "Place order," "OK," or whatever you think your users will understand.

  • Action: There are three possible actions. Submit form and Reset form do what you'd expect. None creates a generic button, which can later be set to trigger a JavaScript action (covered in Chapter 12).

Figure 10.27. The buttons you'll usually use are Submit and Reset; this one's a Submit button.


Figure 10.28. A button can be changed to a Reset button using the Property Inspector.


Tip

  • There is actually one other type of button: an image button. It is created by clicking the image field button on the Insert Bar. You'll be prompted to browse for an image file in your site, and the image will then appear in your document. When a visitor comes to your site and completes the form, clicking on that image will trigger an immediate submission of the form.


Submit/Reset or Reset/Submit?

If you want to start a fight in a group of designers, just ask which order your Submit and Reset buttons should be in. There are two vocal schools of thought, and they tend to break down into Windows advocates versus Mac advocates.

In a nutshell , Windows users expect to find the OK/Submit button as the first button in a group, while Mac users are accustomed to always seeing it as the right-most button. As shown in Figures 10.29 and 10.30 , interface designers who work on cross-platform applications are able to change the order depending on the user's platform. While this is the same General Preferences dialog on both platforms, notice that where Mac and Windows users click to accept their changes is very different.

Figure 10.29. Dreamweaver's General Preferences on Windows show the buttons as OK, Cancel, and Help at the bottom right.


Figure 10.30. The General Preferences on the Mac have Help at the bottom left, and Cancel and OK at the bottom right.


If you're working on a Web site you don't have that flexibility, but you should be aware that visitors to your site will have expectations about how your forms should workand at least some of those expectations will disagree with yours. We're not going to make the call here as to which is preferable; that call should be made based on your visitor logs and your own personal preferences.


Macromedia Dreamweaver 8 for Windows & Macintosh Visual QuickStart Guide
Macromedia Dreamweaver 8 for Windows & Macintosh
ISBN: 0321350278
EAN: 2147483647
Year: 2005
Pages: 239

flylib.com © 2008-2017.
If you may any questions please contact us: flylib@qtcs.net