| You can resize tables horizontally or vertically, and also make columns wider and rows taller. You can also specify the width and height of tables, rows, and columns numerically . To resize an entire table: | 1. | Click the bottom or the right edge of the table. The table will be selected, and a border with resize handles appears around it.
| | 2. | Drag one of the resize handles. To widen the table, drag the handle on the right edge of the table; to make the table taller, drag the handle on the bottom edge of the table; and to make the table grow in both directions simultaneously , drag the handle at the bottom-right corner of the table. Holding down the Shift key as you drag will maintain the proportions of the table.
| To resize a table numerically: | 1. | Click the bottom or the right edge of the table to select it.
| | 2. | In the Property Inspector, enter a number in the W (for width) field ( Figure 9.23 ). In the pop-up menu next to the field, choose either %, which makes the table width a percentage of the overall width of the page, or pixels, to set an absolute size for the table width.  | | 3. | Enter a number in the H (for height) field. In the pop-up menu next to the field, choose either % or pixels.
| | 4. | Press the Tab key or click in the document window to apply your changes.
|  Tip Tip -
You can mix different units for the width and height of a table. So, for example, you can specify that the table's width is 50% of the page width, and set it to be 350 pixels tall.
To resize columns: | 1. | Select the column you want to resize.
| | 2. | Drag the column's right border to make the column wider. or In the Property Inspector, type a number in the W (for width) field ( Figure 9.24 ). The width unit is in pixels. Alternatively, click the triangle in the dimension line above the column and choose Clear Column Width from the resulting popup menu; this makes the column resize to fit the contents. 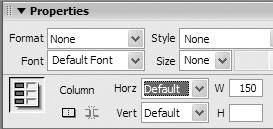 | To resize rows: | 1. | Select the row you want to resize.
| | 2. | Drag the bottom border of the row to make the row taller. or In the Property Inspector, type a number in the H (for height) field ( Figure 9.25 ). The height unit is in pixels. 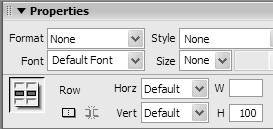 | Tips -
If you set a width in percentage for a table, the table resizes based on the width of the user 's browser window. This may really change the look of your table. You should make sure that you preview the page in a Web browser and resize the browser window to see the effect. -
Tables always stretch to fit the content inside the table. -
Text inside cells usually wraps to fit the width of the cell. To force the cell to expand to the width of the text, you can turn off text wrapping on a cell-by-cell basis. Click in the cell, and then in the Property Inspector, click the "No wrap" check box. -
Don't be misled into thinking you have ultimate control over row height and column width, and therefore control over what your site visitor sees. Different browsers display content differently, and short of previewing your site with every browser ever made on every computer platform, there's no way to be absolutely certain that your site visitor will see exactly what you intended.
| When you have a table selected, there are six buttons in the Property Inspector that can be very handy and save you a bunch of time ( Figure 9.26 ). These buttons clear the width and height values for the table, or convert table units from percent to pixels or vice versa. 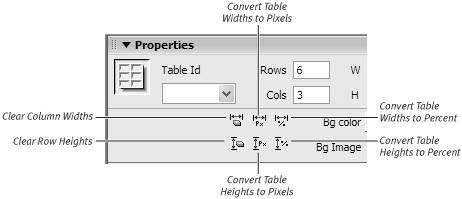
Clear Column Widths and Clear Row Heights are great for collapsing a table to fit its contents. Convert Table Widths to Pixels and Convert Table Heights to Pixels let you change widths or heights from relative to fixed measurements. Convert Table Widths to Percent and Convert Table Heights to Percent does the opposite , converting a fixed size table to a relative one. |
 |