It's a fairly common thing to create things like text headlines in a graphics program such as Photoshop or Fireworks. By doing the text as a graphic, the designer has more flexibility and control over the use of fonts, text effects, and colors. Of course, you can't select the text, so it can't be copied , which is a drawback. Graphics also take longer to download than text. But the benefit of being able to get the exact look you need sometimes offsets those drawbacks.
Rather than using a separate graphics program to create text, Dreamweaver allows you to create graphical text as a Flash file, which the program refers to as Flash text . The Flash file is resizable without a loss of quality, and it is often smaller than an equivalent graphic rendered as a GIF or JPEG file, resulting in faster download times.
| 1. | Click to place the insertion point where you want the Flash text to appear.
|
| 2. | Choose Insert > Media > Flash Text. or In the Common category of the Insert Bar, choose Flash Text from the Media pop-up menu. The Insert Flash Text dialog appears ( Figure 8.34 ). Many of the choices in this dialog are optional; at a bare minimum you will need to enter text in the Text field and choose the font and size . 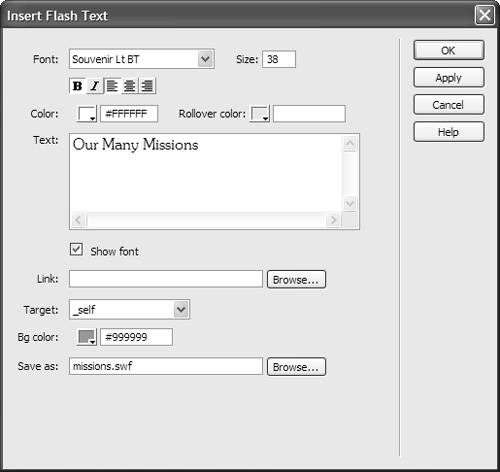 |
| 3. | In the Text field, type the text that you want to turn into Flash text. To start a new line, press Enter (Return).
By entering the text first, you'll be able to see how the text will look in the font that you've chosen . This field, however, doesn't show you a preview of the font size, bold, italic, or text color .
|
| 4. | From the Font pop-up menu, choose the font.
Your entry in the Text field changes to reflect the font you chose.
|
| 5. | In the Size field, enter the font size in pixels.
|
| 6. | If desired, click either or both the Bold or Italic button.
|
| 7. | By default, the text is left aligned. If you want center or right alignment for the Flash text, click the appropriate button.
This alignment refers not to the alignment of the text on the page, but rather the alignment of text within the Flash graphic image you are creating.
|
| 8. | If you want to change the text color, click the color well next to Color, then set the color from the resulting color picker.
|
| 9. | If you want the Flash text to change color when the user positions the mouse cursor over the text, click the color well next to Rollover color, then set the color from the resulting color picker.
|
| 10. | If you want the Flash text to be a link, enter the destination of the link in the Link field. Or, click the Browse button to select the link's destination.
|
| 11. | Change the target of the link with a choice from the Target pop-up menu.
|
| 12. | If you want to change the background color of the Flash text, click the color well next to Bg color, then set the color from the resulting color picker.
You will usually want to change this color to match the background color of the page; if you do not, the background of the Flash text will be white.
|
| 13. | In the Save as field, enter a name for the Flash text. If you want to save the Flash file in a particular place in your site (we usually save them in the images folder), click the Browse button to bring up a save dialog.
|
| 14. | To see how your Flash text will appear, click the Apply button. The Flash text appears in the document window ( Figure 8.35 ). 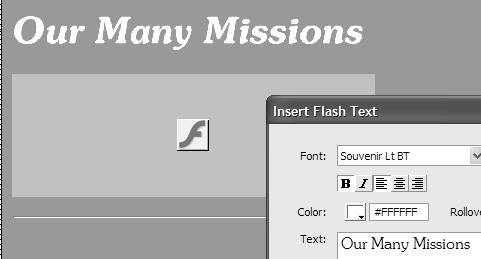 |
| 15. | If you want to make further changes, do so in the Insert Flash Text dialog. Otherwise, click OK to save your changes and dismiss the dialog. The Flash Accessibility Attributes dialog appears ( Figure 8.36 ). 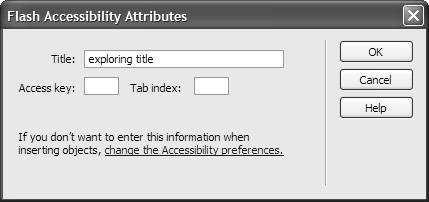 |
| 16. | Enter alternate text for the Flash text in the Title field.
|
| 17. | Click OK.
|
| 1. | Double-click the Flash text you want to change.
The Insert Flash Text dialog appears.
|
| 2. | Make changes in the dialog as needed, then click OK.
|
 Tip
Tip