| When SBS 2003 was released in October 2003 at the Worldwide Partner Conference in New Orleans, Steve Ballmer also announced the next version of a free patch management tool. Two years later, and almost at the same time as Service Pack 1 for SBS, it finally was released. Windows Software Update Services (WSUS) or Wah-Suhs as we call it, basically puts the Microsoft Update website on your own server where you can control the patches. It is perfectly safe to place WSUS on the SBS 2003 box itself. There are two ways to set up a WSUS deployment scenario for a consultant. First, you can merely remote into your client's server, approve patches, and automate the deployment. Second, you can, as a consultant, be the remote patch tool for your clients themselves, whereby you are the master WSUS patch engine, and their servers will point to your system as the master patch engine. However, you need to ensure that a few items are in place: You either need to be a Microsoft Certified Partner or a Microsoft Registered Partner, and you must have a Service Line Agreement in place. WSUS provides the consultant with a way to deploy and manage patches from a single console per network, or, with additional complexity, all of his networks from a single console. There are some items of legal note to be aware of when you take the responsibility of patch management for your client: Do not attempt to guarantee quality of patches for your client. Even with all the testing tools at your disposal, you are guaranteed to miss somethinghardware issues, deep buried software issues. It is a guarantee that you will not be able to find all issues ahead of time. Do not attempt to test Office and Windows patches. Microsoft has a patch testing process that includes external testers, OEMs, and ISVs. Microsoft ensures that its flagship products', Office and Windows, patches are tested. Performing testing on the interaction of Windows XP and Office is a waste of your time. Do begin to build a database of prior patch issues with your client base. SBS networks were affected with file locking issues with Office 2003 and Windows XP on SBS 2000 networks due to SMB signing issues. Make note of patches that affect core functionality and watch for issues. Document the files included in those patches that caused issues in the past and look for those files in future patches, thus keeping an eye out for patches that may need additional testing procedures. Understand the best ways to have you or your client test patches. Review what the patch is fixing and make sure that you look for issues in what is being patched. Make sure that VPNs connect, Remote Web Workplace is functional, printing functions work, and network devices connect. Remember that in some cases you are accepting EULAs on behalf of your client and thus you may want to specifically have in writing the understanding of the level of responsibility between yourself and your client on patching. Do not attempt to guarantee patches. Set up a managed monitoring service for your clients and consider including security patches in this monthly service, but do not include service packs in this plan. Service packs tend to need more planning for a small firm than security patches. If your client is not ready for the "managed plan" yet, prepare recommended improvements based on your review of the client's issues.
The process for installing WSUS on a SBS server is fairly straightforward. Although there are step-by-step whitepapers for installation on the Windows 2003 platform, the installation for SBS 2003 has been a bit streamlined. You can choose to deploy WSUS on the SBS server itself, or if you have a member server that merely does file and print sharing, you can deploy the WSUS on the member server. If the member server is a Terminal Services and application sharing box, you will want to deploy WSUS on the SBS box itself. Given that this book's emphasis is on SBS 2003 with the application of Service Pack 1, we will assume that you have a server either installed or via OEM channels that already has the Service Pack 1 installed, or you have deployed it. If you do not have SP1 already installed, it's recommended that you do that first because it will place on your system the needed files such as the needed .NET SP1 and Background Intelligent Transfer System (BITS). Although you can install WSUS on a box without Service Pack 1, it's generally recommended to do so first. Generally, it's wise to be on later platforms, and WSUS will only patch and support Windows 2000 Professional with Service Pack 3 or 4, Windows 2000 Server with Service Pack 3 or 4, Windows XP Professional, Gold (no sp), Service Packs 1 and 2, and Windows 2003 (all versions). Because SBS already has several websites competing for the default website location of port 80, the port of 8530 is chosen instead. The installation takes up to about 8GB if you plan on storing the security patches locally, so be sure to choose a location preferably not on the C: drive to install the patch location. When setting up the group policy to have the WSUS patch server location be seen by the workstations, make sure that you have http://servername:8530 listed. In addition, there have been several reported issues with the clients not "checking in" with the console, thus you should review the up-to-date release notes at the time you install as well as review late-breaking tech notes on the WSUS wiki (http://www.wsuswiki.com/) and the WSUS blog (http://blogs.technet.com/wsus)two online resources that have late-breaking issues. For many SBS installations, it is recommended that you place a domain name in Client Side Targeting to force the clients to check in to the server. Otherwise, the workstations may not show up in the console to then allow you to move them into the patch zones. Alternatively, you can set up your WSUS strictly on a group policy basis, which is documented fully at the Smallbizserver.net website at http://www.smallbizserver.net/Default.aspx?tabid=159. Using either method, the key element here is when you set up the zones you identify your risk tolerance. Remember our lengthy discussion of thinking about the risk and threats to your client's network? This is the time to bring that back into focus. Workstations have different risk than servers, than do servers with line of business applications, than do laptops. Place each type of risk asset into the appropriate patch category and then assign how it will be patched. Automatic approval? Manual approval? This is your call on how the network responds when a security patch is to be deployed. Resources on the Microsoft website include Installing WSUS In addition to the recommended prerequisite of the SBS 2003 Service Pack 1, preferably the server you are installing WSUS on will be at least a 750 megahertz (MHz) processor and have 1GB of RAM memory or more. The SBS platform already has the necessary .NET and IIS services running. To begin the process, you first go to the WSUS download site, register using Microsoft Passport, answer all necessary questions, and download the installer. Unlike other Microsoft software, you need to answer some questions about you and the firm you are deploying this on (see Figure 22.5). However, the form is only built for one company, and you should review the choices for opting out of the marketing and notification options. It appears that the intent of the form is to gather information for each client; however, the use of Passport technology ties it to the individual consultant's information. Figure 22.5. Registration for WSUS, including firm information. 
Note There has been some discussion of whether you can install WSUS on one server and forklift the entire database of synchronized patches onto another server; however, given the need for individual firm sign-up on the registration form, it is unclear whether this is allowed. This registration process is a bit unusual. At this time, it is the only free software on the Microsoft website that requires this level of questions and responses. Answer the questions based on your normal client deployment.
Before beginning the installation, review your drive space locations. You will not want to install the patches, which have a reserved space of 6GB minimum, on the root drive. Although the WSUS documents state that it could be as large as 30GB of patches, if you set up the WSUS to ensure that you only download for your language, you should minimize the patch storage size. Make sure that you are logged in as the domain administrator and double-click the installer file WSUSSetup.exe to begin the process by saving it to your computer. The latest version of WSUSSetup.exe is available on the Microsoft website for Windows Server Update Services at http://go.microsoft.com/fwlink/?LinkId=47374. After you download the installer, launch it and follow these steps to complete the installation: 1. | On the Welcome page of the wizard, click Next.
| 2. | Review the EULA and accept the terms of the agreement.
| 3. | On the Select Update Source page (see Figure 22.6), take the default of C:\WSUS or choose to move the installation to another partition if you don't have enough space on the main partition.
Figure 22.6. Although the default for WSUS prompts you to load this on C:, consultants recommend an alternative location. 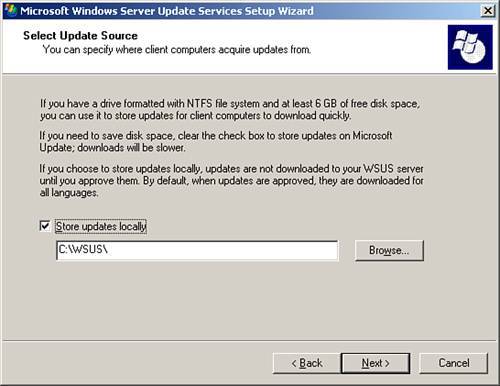
| 4. | On the Database Options page, install WMSDE if the computer you are installing to runs Windows Server 2003. (At this point, you will need 2GB more; again, the recommendation is to not place this on your root drive.)
Best Practice: Selecting the Best Location for WSUS Databases When deploying WSUS on your server you have two choices: WMSDE and SQL Server. For a consultant deploying WSUS remotely, installing with a WMSDE database is fully self-contained and can be done entirely from a remote location. If using SQL server, the install needs to be done at the site to deploy the necessary media. You can choose to store patches locally, or if you do not, the clients will connect to Microsoft Update directly to get approved updates, and the server will just be a conduit for an approval process. Remember that this reserves 6GB of storage, so it's wise to not use the default of C:\WSUS, which is offered to you, and instead place it on a D: or other location. Although in general, it's recommended to keep the default options, given that the defaults place everything on C:, it is recommended to review and change if hard drive locations are tight on space, and click Next. Most consultants recommend that this go on a partition other than your main root drive. To reduce traffic to the Internet by having each workstation pull updates from the Microsoft servers every time an update is installed, configure WSUS to store the update data on the local SBS server. To keep the full catalog of update information stored locally, you will need 68GB of space on the server. You will also want to store the update data on a drive other than the system drive. (WMSDE is the default storage database for WSUS, but you can use SQL to store the patches. If you are interested in SQL as a deployment storage option, more information is in the WSUS whitepaper.) Remember that WMSDE is the larger expanded version of the SQL lite desktop application that does not have a 2GB database limit. So although the 2GB is indicated in the wizard, plan accordingly and choose database locations that will not later cause size problems on your system. If you cannot use WMSDE, a SQL Server instance must be provided for WSUS to use, by clicking Use an Existing Database Server on This Computer and typing the instance name in the SQL Instance Name box. For more information about database software options besides WMSDE, see the "Deploying Microsoft Windows Server Update Services" whitepaper. This must be installed prior to the WSUS installation if you prefer a SQL database. For consultants installing WSUS over a remote connection, remember that the WMSDE install can be done totally remotely, whereas a SQL install needs someone to find and insert the Premium CD-ROM when prompted. The recommendation for SBS installs is to use the default WMSDE.
|
| 5. | Keep the default options or choose an alternative partition for the WMSDE, and click Next.
| 6. | WSUS on SBS 2003 deploys on port 8530 rather than port 80, and the software now installs on your system (see Figure 22.7).
Figure 22.7. Selection of the default port that WSUS uses for purposes of deployment to workstations. 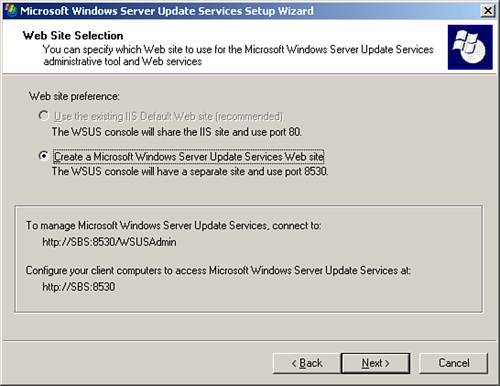
|
Best Practice: Setting Up a Mirror WSUS Server For consultants who want to set up a mirror server and be the centralized patch approver for all their clients, it's recommended that you review the documents in the "Deploying Microsoft Windows Server Update Services" whitepaper located at http://www.microsoft.com/downloads/details.aspx?FamilyId=E99C9D13-63E0-41CE-A646-EB36F1D3E987&displaylang=en. Keep in mind that you will need to be a Microsoft Certified Partner or a Microsoft Registered Partner with an SPLA agreement in place. It also is recommended to ensure that an SSL configuration is set up between your clients and your deployment server. More information on this can be found at http://go.microsoft.com/fwlink/?LinkID=41777. From that document there are certain things to keep in mind: Securing your WSUS deployment with SSL increases the workload of the server. You should plan for about a 10% loss of performance because of the additional cost of encrypting all metadata sent over the wire. If you are using remote SQL, the connection between the WSUS server and the server running the database is not secured with SSL. If the database connection must be secured, consider the following recommendations: Put the database on the WSUS server (the default WSUS configuration). Put the remote SQL Server and the WSUS server on a private network. Deploy IPsec on your network to secure network traffic. For information about how to deploy IPsec in your environment, see "Overview of IPSec Deployment" (http://www.microsoft.com/).
Again, be aware of the additional requirements and legal issues that you may face in being the master deployment center. |
When you are finished, you are prompted to launch the WSUS administration site at http://servername:8530/WSUSAdmin/. Synchronization for the First Time On completion of the installation, you set the synchronization and proxy settings. To administer WSUS, go to http://servername:8530/WSUSAdmin/ to begin the process. The key here is that it is only through synchronization with the Microsoft servers that you pick up the patches. Although you can set a manual synchronization, be aware that the process does take time, thus it's recommended to enable an automatic synchronization. Follow these steps to complete the initial synchronization: 1. | On the WSUS console toolbar, click Options, and then click Synchronization Options. Your initial view of WSUS should look like the information in Figure 22.8.
Figure 22.8. Status screen showing the initial view of a deployed WSUS console on SBS. 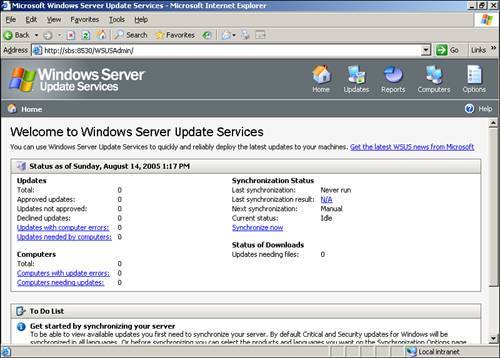
| 2. | If you are using ISA server, or are behind a hardware firewall, you need to include proxy information. In the Proxy Server box, select the Use a Proxy Server When Synchronizing check box, and then type the proxy server name and port number (port 80 by default) in the corresponding boxes.
| 3. | If you want to connect to the proxy server by using specific user credentials, select the Use User Credentials to Connect to the Proxy Server check box, and then type the username, domain, and password of the user in the corresponding boxes. If you want to enable basic authentication for the user connecting to the proxy server, select the Allow Basic Authentication (Password in Clear Text) check box.
| 4. | Under Tasks, click Save Settings, and then click OK in the confirmation dialog box.
| 5. | You must manually synchronize one time to see the additional software options beyond Windows such as Office, Exchange, and SQL. Carefully review as well the additional software offerings such as drivers and security rollups (see Figure 22.9).
Figure 22.9. Review the synchronization options for additional software such as drivers, feature packs, and so on. 
| 6. | Make sure that you change the option in the Advanced Synchronization Options Web Page Dialog window to download only those patches that match the locale of the server. This ensures that you are not downloading unnecessary security patches on your network when they are not needed (see Figure 22.10).
Figure 22.10. Selection of language of patches to ensure the minimal install of patches over the Internet connection. 
|
Setting Up Group Policy for WSUS on Your Server Follow these steps to create a new group policy object for WSUS on the SBS server. For more information about group policy on SBS, see Chapter 21, "Group Policy." 1. | In the Server Management Console, expand Advanced Management, Group Policy Management, Forest, Domains, and then click your SBS domain. Right-click on the domain and select Create and Link a GPO Here.
| 2. | Name your policy something descriptive. Click OK.
| 3. | Right-click on the new policy object and select Edit. Then expand Computer Configuration, Administrative Templates, Windows Components, and then click Windows Update.
| 4. | In the details pane, double-click Specify Intranet Microsoft Update Service Location. Type the HTTP URL of the same WSUS server in both Set the Intranet Update Service for Detecting Updates and Set the Intranet Statistics Server. For example, type http:// servername:8530 in both text boxes, where servername is the name of your WSUS server, as shown in Figure 22.11. Click OK when finished.
Figure 22.11. Specification of Intranet Microsoft Update Server location in Group Policy Console. 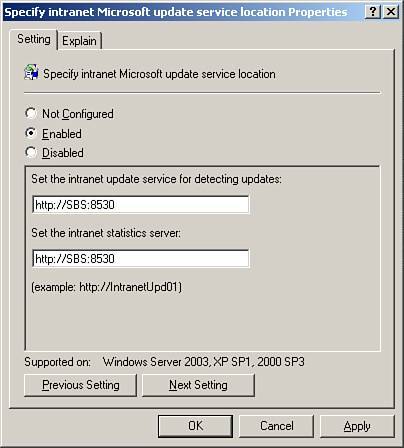
| 5. | Double-click on Configure Automatic Updates. Select the appropriate setting under Configure Automatic Updating based on your previously determined risk level, as shown in Figure 22.12. Click OK when finished.
Figure 22.12. Specifying behavior of automatic updates (see previous discussion of automatic update selection impact in Figure 22.4). 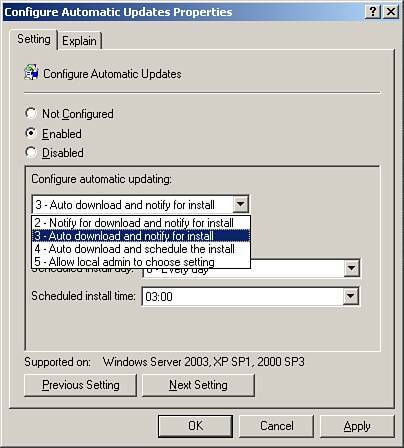
| 6. | Double-click on Enable Client-Side Targeting and enter the name of the SBS server, as shown in Figure 22.13. This ensures that the workstations check in with the server appropriately. Click OK when finished.
Figure 22.13. Specifying a name for client-side targeting to ensure that workstations check in with the server. 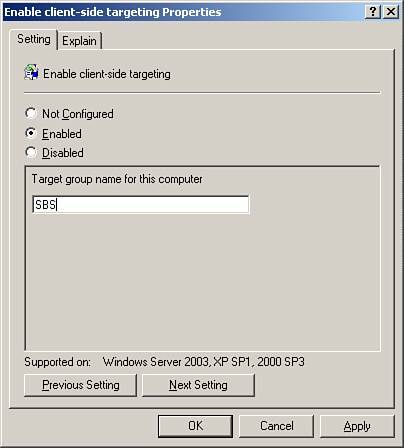
Note There is a known issue with some workstations not reporting in to the server; either use this as a workaround or obtain this hotfix for the serverFIX: IIS 6.0 may send an "HTTP 100 Continue" response in the middle of the response stream when you send a POST request: http://support.microsoft.com/?id=898708. | 7. | Double-click on No Auto Restart for Scheduled Automatic Update Installations. Click on the Enabled radio button to ensure that clients will not be abruptly restarted. Click OK when finished.
After you have finished, review the settings in the Group Policy Settings window. This should look similar to Figure 22.14.
Figure 22.14. Review the group policy settings. 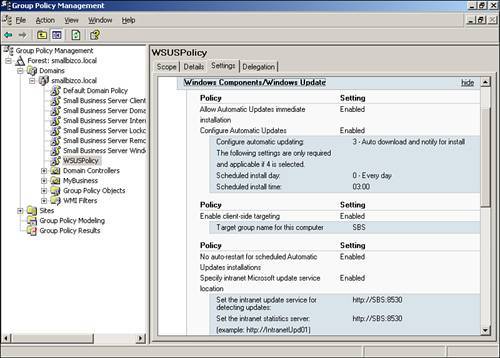
|
At a command prompt on the server type in gpupdate /force to speed up the process of the deployment of the group policy settings and the checking in of the workstations. After the workstations have checked in to the server, you can set up groupings and use the Move Computer tool in the console to move them into your patching groups. Preferably you should have at a minimum three zones: Server zoneThis ensures that patches will be manually approved for the servers and deployed only when the consultant wants the servers to be patched. Remember that many times in an SBS network, the server may be the device that needs less immediate patching due to its use of the enhanced IE lockdown, ports closed, and the use of XP SP2 firewalls on workstations. Workstation zoneIn most small business firms, this is your "risk" zone. Because workstations install with local administrator rights, these machines need quick patching. Laptop zoneYou may need to set up different patch needs for your mobile devices. Line of business applicationAdditional zones that you may need to set up include different patch needs for your workstations or servers that have key line-of-business applications.
Best Practice: Establishing Patch Zones and Risk Zones Now you as the consultant get to prove your worth. This is where the earlier discussion of risks meets group policy. What have been historical issues with patching in the past? Do some workstations and applications have no issues? Is there one application only deployed on a few workstations that is troublesome? Identify those systems that can have patches automatically pushed to them and those applications that cannot. Set up zones for users who will be your main patch testers and communicate to them (via email) when their machine has been patched so that they can notify you when they see issues. Discuss this process ahead of time and use this opportunity to define when you can patch. |
In the Computer Groups screen, manually type in your patch zones, and as the workstations and server(s) check in you can reassign them to the particular zone. Approval Process After you perform this initial synchronization, you are ready to begin the process of setting up the approval. Although you can set up your zones to patch automatically, it's generally recommended to manually approve servers after appropriate testing or review of community patch issues have been done. For manual approvals perform the following steps: 1. | On the WSUS console toolbar, click Updates. By default, the list of updates is filtered to show only Critical and Security Updates that have been approved for detection on client computers. Use the default filter for this procedure.
| 2. | On the list of updates, select the updates you want to approve for installation. Information about a selected update is available on the Details tab. To select multiple contiguous updates, press and hold down the Shift key while selecting; to select multiple noncontiguous updates, press and hold down the Ctrl key while selecting.
| 3. | Under Update Tasks, click Change approval. The Approve Updates dialog box appears (see Figure 22.15).
Figure 22.15. Approval process for patching. 
| 4. | In the Group Approval Settings for the Selected Updates list, click Install from the list in the Approval column for the Test group, and then click OK.
|
You can change your patch zone or group settings to be automatically deployed if you want. Again, this may be recommended for some workstations but not for all computers. For additional resources on scripting WSUS for faster deployment of patches, review the following resources: Microsoft TechNet column: "Tales from the ScriptJuly 2005: I'll Get You, My Pretty…And We'll Manage Windows Update, Too!": http://www.microsoft.com/technet/community/columns/scripts/default.mspx and http://uphold2001.brinkster.net/vbshf/forum/forums/thread-view.asp?tid=199&posts=1. An automatic synchronization should be set up and then you need to decide which machines are automatically updated, and which machines are manually updated. In general, we recommend that servers be manually updated, and thus you need to set the automatic deployment method for the Server group to always be manual But for workstations and member servers, you can decide based on your prior risk and patching analysis. You may want them to be set for automatic deployment of patches, and you may even consider an automatic reboot at an unused time of the day. Remember that a forced unattended reboot in the middle of the night can also be done on workstations using restricted user mode. They do not need local administrator rights for patch deployment if the patch policy is set to a mandatory reboot process. Remember that because WSUS relies on the same technology as Windows Update and Microsoft Update, any issues on a workstation with those mechanisms affect WSUS as well. Therefore, the same recommended log file and troubleshooting tools are recommended. You may need to delete the catroot2 folder, reregister DLL files, or perform any of the other techniques described inside the Microsoft Update troubleshooting tool. For more resources on using and streamlining WSUS, we recommend signing up for the WSUS listserve on the website www.patchmanagement.org and following the WSUS blog at http://blogs.technet.com/wsus/ and the WSUS wiki at http://www.wsuswiki.com/. On a regular basis, administrators discuss issues they have seen with particular patches not deploying properly and the solutions they have had with that particular patch. In general, most issues are on the client side requiring registering of DLLs or other client-side issues. |