CreatingModifying SBS Group Policy Objects
Creating/Modifying SBS Group Policy ObjectsIf you need to modify group policy for the network in any way, such as disabling SMB signing for Macintosh file sharing access or configuring workstations to point to the SBS server for WSUS, you need to develop a plan of action for creating, testing, and then deploying the group policy elements on the network. Often, an inexperienced network administrator will find a need to implement a group policy change on the network and charge right in to making the change in a default policy object. There are several problems with this approach, the most significant being that if one of the default policy objects becomes corrupt, the network can quickly become unusable. Like anything else related to implementation in an SBS environment, a logical approach is in order. Planning the GPOBefore running headlong into a group policy change, stop and ask a few questions first:
By asking a few simple questions, you can determine up front where the policy object needs to be placed and whether the settings need a separate policy object or can be bundled in with another policy object. Determining the GPO LocationA new GPO can be placed in several locations in Active Directory: at the site level (which is generally not used in the SBS environment), at the domain level, or at any of the OU levels created by the SBS setup. Alternatively, you can create a new OU in Active Directory and associate the new GPO with that. Here are a few guidelines for determining where to place the GPO:
Determining the GPO ScopeIn many cases, creating new policy elements in an SBS environment means creating or modifying GPOs at the domain level. A few issues can impact how new policy elements are applied. A default SBS installation already has several custom GPOs created at the domain level. Before you create or modify a GPO to contain your policy elements, review the existing GPOs to see whether the policy elements you want to change are already defined. If the policy elements are present in an existing SBS GPO (not the Default Domain Policy or Default Domain Controllers Policy GPOs), it may make more sense to change the settings in that GPO than to create a new GPO and make sure that the object is processed in the correct order at the domain level. If you decide that creating a new GPO at the domain level is the best place to implement the policy changes, you need to determine the correct placement in the GPO processing order for the domain-level GPOs. If the new GPO contains settings that conflict with settings in the Default Domain policy GPO, you need to make sure that the new GPO processes after the Default Domain policy GPO has processed. Another option to consider for making sure that your policy changes do not get overridden by another policy object is to make the settings on the GPO Enforced. If a policy is marked as Enforced, any subsequent policy objects with conflicting policy settings will not have their changes applied. Testing the GPOBefore unleashing your policy changes on the network, test the policy settings to make sure that the changes do not adversely impact your normal network environment. There are several ways to create a test environment within your production network so that you can see the results of the policy changes without affecting all users or computers in the environment. The remainder of this section walks you through the process of creating sample objects in your SBS environment to test the process and give you a real-world example of how to create and implement a GPO test on your network. Creating a Test OUThe first step to establishing a test environment is to create a Test OU in Active Directory. Follow these steps to create the Test OU:
Creating a Test GPONext you need a GPO associated with the Test OU. Follow these steps to create the GPO:
Now that the GPO exists, you need to edit the settings in the GPO. As an example, follow these steps to create an easily identifiable policy setting in the new GPO:
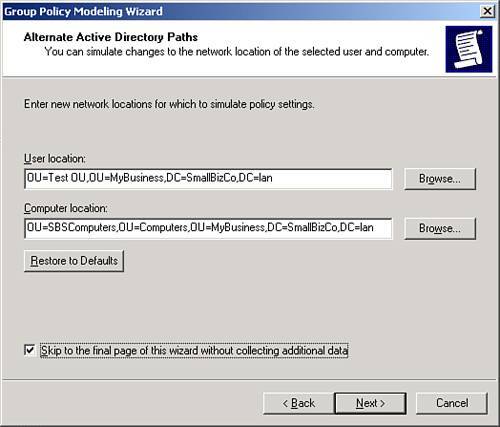
Running a Group Policy Modeling ReportNow that the Test OU and Test GPO have been created and modified, you can run a modeling report to make sure that the settings get applied properly. Follow these steps to run the group policy modeling report and use the new Test OU for results:
Now you can browse through the report and see in the Summary page that the Test GPO was applied under the User Configuration Summary section. You can also see in the Settings page, as shown in Figure 20.14, that the phrase "GPO Testing" was applied to the Internet Explorer title bar by the Test GPO. Figure 20.14. The winning GPO is listed in the Settings of the group policy monitoring report.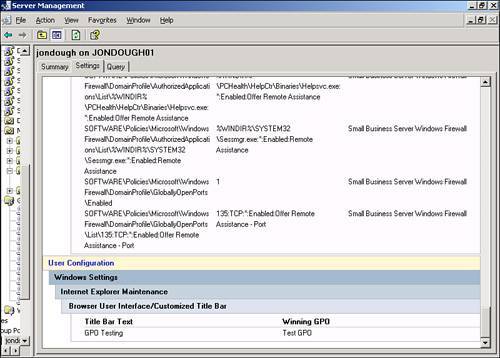 Running a Live TestAfter you have verified that the policy settings are processed in the modeling report, you should now test the settings on a live box. There are two basic methods for doing this. The first is to move either the computer or user object for the accounts you want to test into the Test OU. The next time the computer reboots and the user logs in, it picks up the settings from the Test OU. The drawback of this method is that you have to remember to move the user or computer object back to its original location after you complete the test. Caution If you have a more complex group policy scheme that has GPOs applied at multiple OUs, you would need to make sure that moving the user or computer object to the Test OU would not remove it from the processing path for the existing GPO structure. If that happens, you will not have a valid test result. The other method for testing is to attach the Test GPO to the OU or Domain object where it will reside in production and filter access to the Test GPO through security group settings. This would involve creating a security group, possibly called GPO Testers, in Active Directory and giving only that group read access to the policy object. When you are ready to test, add the desired users or computers to that security group and reboot the workstation to have the Test GPO apply. Again, you would need to remove the members of that security group after the GPO has been implemented successfully on the network. No matter which method you choose, try to test with several user and computer accounts to make sure that there are no unexpected behaviors resulting from the changes you made to group policy. Implementing the GPOAfter you have fully tested the policy changes and are satisfied that you have not created any new problems on the network as a result, you can go ahead and implement the changes on the network. How you do this depends on how you created the test environment. If you created a test policy object and linked it to a test OU, rename the GPO, unlink it from the test OU, and link it to the OU or domain element where you want it to go. To link an existing policy object to an Active Directory object, follow these steps:
If you linked the test GPO to the desired domain element and restricted access to it with security group or other filters, remove the filters.
|
EAN: 2147483647
Pages: 253