| Sharing files between Macintosh and PC workstations has always been a challenge. The process has always been a little easier on the Macintosh side of the fence because Macintosh workstations have long been able to read and write PC-formatted floppy disks and CDs. Storing files on a common server is the easiest way to share files between platforms, but even that approach is not without its difficulties. This section covers the configurations necessary to allow Macintosh clients to connect to the SBS server and store files on the server. Connecting Using Services for Macintosh (Mac OS 9 and/or Mac OS X) Microsoft began providing file-sharing support for the Macintosh platform back with Windows NT with a product called Services for Macintosh. When Services for Macintosh was installed on a Windows NT server, the server would appear to a Macintosh client as though it were an AppleShare server, the standard server technology from Apple. To do this, Services for Macintosh had to do two tasks. First, it had to install and configure the AppleTalk protocol on the network interface so that the Macintosh workstations could see the NT server on the network. Second, it had to add another file format layer on top of NTFS to mimic the Apple Files System (AFS). Given these two modifications, Macintosh workstations could connect to a Windows NT server and share files on the server with other Macintosh clients and with PC workstations. With the release of Windows 2000 came an update to Services for Macintosh. These updates included some significant changes in the way that Services for Macintosh was installed and configured on the server. No real changes were made to the AppleTalk network protocol; it has remained fairly constant since Apple first introduced it. But significant changes were made to the way the file system was handled because the newer Macintosh operating systems used an updated file system to handle larger sized drives. The Services for Macintosh product did not change significantly from Windows 2000 to Windows 2003, and there is no difference between the version that comes with SBS and the version included with other Windows 2003 server versions. Unfortunately, some of the limitations introduced with the Services for Macintosh product with Windows 2000 have remained. Still, Services for Macintosh remains the only way to connect Macintosh computers running Mac OS 9 or earlier to a Windows server without a third-party product. And for an environment that has Macintoshes running both OS 9 and OS X, Services for Macintosh is the only way to connect both platforms to the server so that files can be shared effortlessly between the platforms. Services for Macintosh uses the AppleTalk network protocol to allow Mac OS 9 and Mac OS X workstations to connect to the SBS server as though it were an AppleShare server. There are several key differences between the way a Macintosh sees files and folders on an AppleShare server and the way Windows PCs see files and folders on a Windows share. When using this method to allow Macs to access files on the server, you will have to create a new share on the server for the Macs to use, even if the share already exists for Windows PCs. Best Practice: Installing File Services for Macintosh If the network environment has Macintosh workstations running both Mac OS 9 and Mac OS X, you should configure the server with File Services for Macintosh and run AppleShare connections on both Mac OS versions. This is the only way to guarantee file compatibility between the OS 9 and OS X workstations without going to a third-party product. |
Installing File Services for Macintosh Services for Macintosh is not installed on an SBS server by default. Use the following steps to install Services for Macintosh on the SBS server: 1. | Open Add or Remove Programs in the Control Panel.
| 2. | Click Add/Remove Windows Components.
| 3. | Select Other Network File and Print Services and click Details.
| 4. | Enable File Services for Macintosh.
| 5. | Click OK.
| 6. | Click Next.
| 7. | Wait for the components to install, and click Finish.
| 8. | Close the Windows installer and the Add or Remove Programs Control Panel.
|
Configuring File Server for Macintosh After the service is installed, the server must be configured so that the Macintosh clients can see the server and access shares. By default, Services for Macintosh is configured only to allow connections from Macintosh clients that have the Microsoft User Authentication Module (UAM) installed. Because most systems will not have that component installed yet, the server needs to be reconfigured to accept connections from clients with the UAM installed or those still using the clear-text authentication method provided by Apple. Ultimately, you will want to install the UAM on all Macintosh workstations and change this setting back to Microsoft because the Microsoft UAM encrypts the username and password for authentication across the network. Follow these steps to configure Services for Macintosh to allow the Apple clear-text authentication method and identify the name of the server as it will appear on the Macintosh network: 1. | Right-click on My Computer (server) and select Manage.
| 2. | Right-click on Shared Folders and select Configure File Server for Macintosh.
| 3. | Change Enable Authentication to Apple Clear Text or Microsoft.
| 4. | Click Apply and then click OK.
| 5. | Make note of the server name listed in the Server Name for AppleTalk Workstations field. You will need this name later.
|
Creating Shares on the Server Unfortunately, Services for Macintosh cannot use existing Windows shares, so if you want to have Macintosh clients access data on existing Windows shares, you will have to re-create those shares specifically for the Macintoshes. Any future shares can be created as both Windows and Macintosh shares at the same time, but any existing shares that need to be accessed by both platforms will need to have separate entries in the share listings. Follow these steps to create Macintosh shares for existing Windows shares: 1. | Right-click on My Computer and select Manage.
| 2. | Expand the Shared Folders icon.
| 3. | Right-click on Shares and select New Share.
| 4. | Click Next.
| 5. | Enter the path to the folder on the hard drive or click Browse to select the folder.
| 6. | Click Next.
| 7. | If the folder selected is already shared to your Windows clients, uncheck the Microsoft Windows Users check box.
| 8. | Enable the Apple Macintosh Users check box and enter a name for the share in the Share Name field.
| 9. | Click Next.
| 10. | Click Finish.
| 11. | Click Close.
| 12. | Right-click on the new share and select Properties.
| 13. | Uncheck the This Volume Is Read-Only check box and click OK.
| 14. | Close the Properties window.
|
Installing the Microsoft UAM To take advantage of the additional security provided by the Microsoft UAM, you need to install it on each Macintosh that will connect to the server using Services for Macintosh. Follow these steps to download and install the correct UAM for the Macintosh: 1. | Go to: http://www.microsoft.com/mac/otherproducts/otherproducts.aspx?pid=windows2000sfm.
| 2. | Install the appropriate UAM for your operating system:
OS X: Download the UAM for OS X 10.1 or later installer. Open the MSUAM_for_X folder and run Install MSUAM for X.pkg.
OS 9 and earlier: Download the UAM for OS 8.5 to 9.2 installer. Open the MSUAM_for_Classic folder and copy the MS UAM 5.0 file into the AppleShare Folder in the System Folder.
|
Enabling AppleTalk on the Macintosh (OS X Only) Macintosh computers running Mac OS 9 or earlier have the AppleTalk network protocol enabled by default. With Mac OS X version 10.2 and later, the AppleTalk protocol is disabled by default. For Macintosh computers running OS X 10.2 or later, AppleTalk must be enabled on the workstation. Follow these steps to enable the AppleTalk protocol on the Mac OS X workstations: 1. | Open System Preferences by selecting the Apple menu, System Preferences, as shown in Figure 17.1.
Figure 17.1. The Apple menu contains links to several operating system functions, including a shortcut to the System Preferences application. 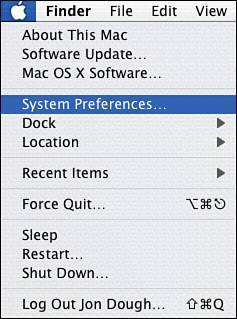
| 2. | Click the Network icon.
| 3. | Select Built-in Ethernet and click Configure.
| 4. | Click the AppleTalk tab and enable the Make AppleTalk Active check box.
| 5. | Click Apply Now and close System Preferences.
|
Configuring Directory Access on the Macintosh (OS 10.2 and Later) In addition to enabling AppleTalk in the Network preferences, the AppleTalk protocol must also be enabled in the Directory Access application. Follow these steps to enable AppleTalk and disable the Active Directory and SMB components within Directory Access. These instructions and figures specifically cover the user interface in Mac OS 10.3. The steps still apply to Mac OS 10.2, but the interface will appear slightly differently. These steps cannot be completed on Mac OS 10.1 and earlier. 1. | Open the Directory Access application by selecting Macintosh HD, Applications, Utilities, Directory Access.
| 2. | Click the lock to make changes (see Figure 17.2).
Figure 17.2. Directory Access settings can be locked and unlocked to prevent accidental configuration changes. 
| 3. | Enter the appropriate username and password for the Macintosh.
| 4. | Disable Active Directory, SMB, and LDAPv3.
| 5. | Enable AppleTalk (see Figure 17.3).
Figure 17.3. In an AppleTalk-only environment, only AppleTalk, Rendezvous, and SLP are needed in Directory Access. 
| 6. | Click Apply and quit Directory Access.
|
Connecting to the ServerConnect to Share Method (OS X Only) Now that the server and the workstation are both configured, you can connect to the server share from the Macintosh. In Macintosh-speak, this is known as mounting a volume because a new disk volume icon appears on the desktop when the share connection is made. There are two methods for doing this from a Mac OS X workstation. Follow these steps to use the Connect to Share method: 1. | From the Finder, press Command-K (Apple key plus the "k" key).
| 2. | In the Server Address field, enter afp://servername, where servername is the AppleTalk name of the server listed in the File Server for Macintosh properties.
Note If you know the share you want to connect to, you can enter the share name at the end of the URL, as in afp://servername/Users Shared Folders. This will mount the share directly instead of presenting you with a dialog showing all the available shares. | 3. | Click Connect.
| 4. | Enter the username and password to connect to the server.
| 5. | Select the volume or volumes you want to mount (see Figure 17.4) and click OK. The volume(s) will mount on the desktop.
Figure 17.4. The Connect to Server dialog displays all the available volumes on the server. 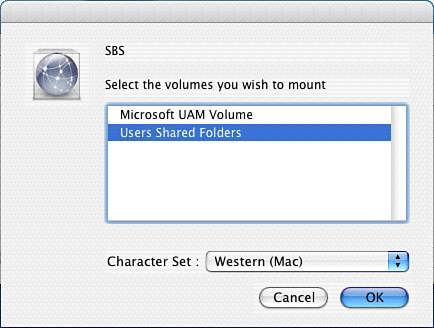
|
Caution One problem that has been reported across the Macintosh SBS community is a timeout problem when connecting shares using the AppleTalk method under OS X. Periodically, shares on the server will get disconnected from the Macintosh for no apparent reason, forcing the user to reconnect to the share to access the resources on it. Most of the time, this problem can be resolved by adjusting the Power Save settings. Another fix is detailed in Microsoft KB article 297684 (http://support.microsoft.com/?id=297684). Yet another workaround is to force the Mac OS X AppleTalk connection to use pure AppleTalk instead of AppleTalk over IP, which is the default (and faster) connection method. To force a volume mapping to use AppleTalk instead of AppleTalk over IP, enter afp:/at/servername in the Server Address field instead of afp://servername. By using the AppleTalk protocol instead of AppleTalk over IP, the connection to the server is regularly updated, avoiding the timeout issues. However, using true AppleTalk adds additional traffic to the network and significantly slows down the file access to the server. Use this method only as a last resort to address this problem.
Connecting to the ServerBrowse Method (OS 10.3 and Later Only) Another way to access the volumes on the server is to browse to them through the Finder interface directly. With OS X 10.3 and later versions, the Finder window contains a Network icon in addition to the regular file shortcuts. Follow these steps to use the browse method to access resources on the SBS server: 1. | Open Macintosh HD.
| 2. | Click the Network icon in the left panel.
| 3. | Look for the server name in the right pane (see Figure 17.5). It may take up to a minute for the server name to appear. You may also need to look for the server in the Local folder if one is displayed.
Figure 17.5. Mac OS X displays available servers in the file browser interface. 
| 4. | Double-click on the server name.
| 5. | Enter the username and password and click Connect.
| 6. | Select the share from the list presented.
| 7. | The share now appears on the desktop and in the volume list in the left pane (see Figure 17.6).
Figure 17.6. Network volumes are listed in the top left of the file browser interface. 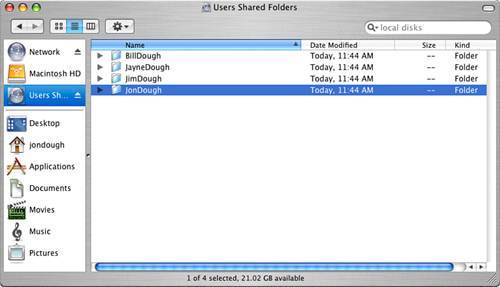
|
Connect to the ServerChooser Method This method for connecting to a share on the SBS server is the only method that can be used by Macintosh workstations running OS 9 or earlier. Although it is possible to use this method on a Macintosh running OS X, it can only be done when Classic mode has been started. Unless the Macintosh user is running applications in Classic mode that need to access data on the server, it is not recommended that you use this method with Mac OS X. Follow these steps: 1. | Open Macintosh HD.
| 2. | Open System Folder, then Apple Menu Items, and double-click Chooser. Alternatively, you can select the Chooser icon from the Apple menu (Mac OS 9 and earlier only, see Figure 17.7).
Figure 17.7. The Chooser application can be easily found in the Apple menu under Mac OS 9. 
| 3. | Classic mode starts up if not already running (Mac OS X only).
| 4. | Click the AppleShare icon, select the server in the right-hand pane, and click OK.
| 5. | Enter the username and password and click Connect.
| 6. | Select the volume or volumes to mount and click OK. The volume(s) will mount on the desktop.
| 7. | Close the Chooser.
|
Connecting Using SMB (Mac OS X 10.3 Only) With Mac OS 10.2, Apple added the capability for the Mac OS to connect to shares on a Windows server using native Windows methods. This can be done thanks to a service called Samba that is used to connect to SMB shares. The Samba implementation in Mac OS 10.3 was improved significantly over the implementation in Mac OS 10.2, so if a Macintosh workstation is going to regularly access a Windows server using SMB, it should be upgraded to at least Mac OS 10.3, if not 10.4. This section of the chapter covers the issues related to accessing SMB shares and the steps to follow to correctly configure the server and the workstation. Best Practice: Connecting Macintosh Workstations Using SMB If the only Macintosh workstations in the network are running Mac OS X 10.3 and later, use the SMB method for connecting the Macintoshes to the server. Although using the AppleTalk method described earlier in the chapter will work, the SMB connection method is easier to manage from the server, and the Macintosh workstations will benefit from faster network connections than when connecting over AppleTalk. |
The .local Issue There are several prerequisites that you need to confirm before you can connect a Macintosh to an SBS server using SMB (Windows) shares. First, you need to know the internal domain name of the network. If the internal domain name ends in .local (for example, domainname.local), you need to change the network configuration on the Macintosh before you can continue. This is because the Rendezvous service introduced into Mac OS X in version 10.2 uses multicast DNS with a .local name to function. The Macintosh will not be able to successfully use the SBS DNS server to resolve addresses in the .local domain if multicast DNS is enabled on the Mac. This has changed with Mac OS 10.4, which can look up names in the .local namespace by default. Best Practice: Setting Up a New Active Directory Namespace As discussed in Chapter 3, "Planning a New SBS Installation," if you are planning a new SBS installation, select an internal domain name that does not end with .local. If you discover that there will be a mixture of PCs and Macintosh computers on the network prior to an SBS installation and there is not an existing Active Directory network, use .lan or .office or some other top-level domain name that is not a public domain and not .local. Also, avoid the temptation to use .mac in the domain namespace because this unregistered top-level domain may very well be used by Apple Computer in the future in support of their .Mac network services. Even if there are not any Macintosh systems on the local network, the SBS community is beginning to move away from the use of .local in the Active Directory namespace as a best practice. |
If your network does not have a .local internal domain name, or if you are running Mac OS 10.4, you can skip to the "SMB Signing" section later in the chapter. Otherwise, follow these steps to configure the Macintosh to be able to successfully resolve names in the .local namespace. First configure DNS on the Macintosh by following these steps: 1. | Open System Preferences by selecting the Apple menu, System Preferences.
| 2. | Click the Network icon.
| 3. | Select Built-in Ethernet and click Configure.
| 4. | Enter the IP address of the Windows server in the DNS Servers field.
| 5. | Enter the internal domain name in the Search Domains field.
| 6. | Click Apply Now.
| 7. | If an address appears next to the IPv6 Address field, click Configure IPv6 and select Off from the Configure IPv6 drop-down menu.
| 8. | Click OK.
| 9. | Quit System Preferences.
|
Next enable unicast .local resolution by performing these steps (Not needed for OS 10.4 or later.): 1. | Open the Terminal application (select Macintosh HD, Applications, Utilities, Terminal).
| 2. | At the command prompt, type sudo su and press Return.
| 3. | Enter the password for the current user account and press Return.
| 4. | Type cd /usr/sbin and press Return.
| 5. | Type cat > EnableUnicastDotLocal and press Return. You will not see a command prompt at this point.
| 6. | Enter the following four lines exactly as shown, pressing Return at the end of each line (the filename is local.ONE not local.L):
#!/bin/tcsh echo domain.local > /etc/resolver/local.1 grep v domain /etc/resolv.conf >> /etc/resolver/local.1 echo search_order 2 >> /etc/resolver/local.1
| 7. | After you press Return at the end of the last line, press Control-D. The command prompt appears again.
| 8. | Type chmod +x EnableUnicastDotLocal and press Return.
| 9. | Type /usr/sbin/EnableUnicastDotLocal and press Return.
| 10. | Type cat /etc/resolver/local.1 and press Return. You should see domain.local and the IP address of the server listed in the output, which will look similar to the following:
domain.local search domainname.local nameserver 192.168.16.2 search_order 2
| 11. | Press Control-D and quit the Terminal application.
|
SMB Signing All Windows 2003 domain controllers enable SMB encryption by default. The Mac OS uses a package called Samba to enable the Mac to connect to SMB shares on a Windows server, but the implementation of Samba in Mac OS 10.3 and earlier cannot make encrypted connections to SMB shares. Connecting a Mac to an SMB share on an SBS server requires disabling the SMB signing policies for the SBS server. If your company security policy prohibits you from modifying these security policies, you need to enable AppleTalk connectivity to your server instead using the steps listed in the "Connecting Using SMB (Mac OS X 10.3 Only)" section of the chapter. Connecting Down-Level Clients to SBS Server Shares The Macintosh is not the only SMB client that cannot interact with SMB encryption. Windows 98 PCs, UNIX/Linux systems, and many network-aware multifunction printer devices (those that include scanning features particularly) also cannot connect to SBS shares by default. Following the steps in this section to disable SMB signing by creating a new group policy object allows these other devices to connect to the server shares as well. See Chapter 20, "Group Policy," for more detailed information on group policy and its use with SBS. |
Instead of making changes to the Default Domain Policy to disable SMB signing, create a new group policy object with the appropriate policy settings. This is in line with the additional group policy objects created by the SBS setup. Follow these steps: 1. | On the SBS server, open the Server Management console.
| 2. | Expand Advanced Management.
| 3. | Expand Group Policy Management.
| 4. | Expand the forest.
| 5. | Expand Domains.
| 6. | Select the local domain. The SBS policy objects display in the right-hand pane along with the Default Domain Policy as shown in Figure 17.8.
Figure 17.8. All the Group Policy Objects for the domain are listed under the domain object in the console. 
| 7. | Right-click the domain icon (domainname.local) in the console tree and select Create and Link a GPO Here.
| 8. | Enter SMB Signing Disabled for the GPO Name and click OK.
| 9. | Right-click on the new GPO in the right-hand pane and select Edit to open the Group Policy Object Editor.
| 10. | Under Computer Configuration, expand Windows Settings.
| 11. | Expand Security Settings.
| 12. | Expand Local Policies.
| 13. | Select Security Options.
| 14. | In the right-hand pane, scroll down to Microsoft Network Server: Digitally Sign Communications (Always) and double-click on the policy object.
| 15. | Select the Disabled radio button and make sure that the Define This Policy Setting check box is enabled as shown in Figure 17.9.
Figure 17.9. The security policy setting needs to be disabled to allow SMB access from the Macintosh. 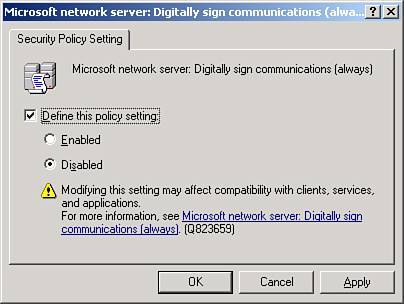
| 16. | Click OK.
Caution Other published documents that discuss disabling SMB signing advise disabling the Microsoft Network Server: Digitally Sign Communications (If Client Agrees) setting as well. This is not recommended because it could cause problems with other PCs configured to require SMB signing by default. If a Windows XP workstation has the Microsoft Network Client: Digitally Sign Communications (Always) setting enabled and the server has this second setting disabled, the Windows XP workstation will not be able to access any shares on the server. The only item that needs to be disabled in the SBS server group policy is the Microsoft Network Server: Digitally Sign Communications (Always) item for Macintosh and other down-level clients to connect to SMB shares successfully. | 17. | Close the Group Policy Object Editor.
| 18. | Using the arrows in the pane, move the SMB Signing Disabled policy just above the Default Domain Policy in the window.
| 19. | Right-click on the SMB Signing Disabled policy object and select Enforced. In the Linked Group Policy Objects window, the SMB Signing Disabled object should show Yes under both Enforced and Link Enabled. Figure 17.10 shows the correct placement of the SMB Signing Disabled policy object as well as the correct Enforced and Link Enabled settings.
Figure 17.10. The new SMB Signing Disabled policy is Enforced and Enabled. 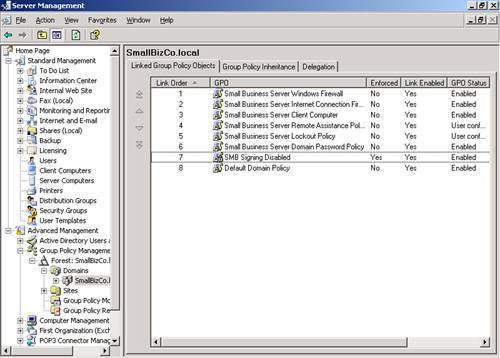
| 20. | Open a command prompt on the server.
| 21. | Type gpupdate /force and press Enter.
| 22. | When the policy update completes, close the command prompt.
|
Configure the Mac for Active Directory Access Despite rumors to the contrary, Mac OS X systems running 10.2 or later can participate in Windows Active Directory networks. This is not required for the Macintosh to access shares on the server, nor does it give system administrators the same level of control over the Macs as PCs through group policy or logon scripts because the Macs will not process either. But with a Mac correctly configured in an Active Directory environment, Windows domain credentials can be used to log on to the Mac, and individual user profiles for those domain users can be stored on the Mac hard drive. To join the Macintosh to Active Directory, begin by configuring Directory Access by following these steps: 1. | Open Directory Access (select Macintosh HD, Applications, Utilities, Directory Access).
| 2. | Click the lock to make changes.
| 3. | Enter the password for the local Macintosh account.
| 4. | Enable SMB and click Configure.
| 5. | Enter the NetBIOS name of the domain in the Workgroup field. If the full domain name is SmallBizCo.local, the NetBIOS domain name would be SmallBizCo.
| 6. | Enter the IP address of the server in the WINS Server field.
| 7. | Click OK twice.
| 8. | Click Apply.
|
Next join the Macintosh to the Active Directory Domain by following these steps: 1. | In the Directory Access application, select Active Directory and click Configure.
| 2. | In the Active Directory Forest field, enter the fully qualified domain name of your SBS domain (for example, domain.local or domain.lan).
| 3. | In the Active Directory Domain field, enter the fully qualified domain name of your SBS domain (for example, domain.local or domain.lan).
| 4. | In the Computer ID field, enter a unique network name for the Macintosh.
| 5. | Click the arrow next to Show Advanced Options.
| 6. | Clear the Authenticate in Multiple Domains check box.
| 7. | Enable the Prefer This Domain Server check box and enter the fully qualified domain name of your SBS server (for example, server.domain.local or server.domain.lan).
| 8. | Click Bind.
| 9. | Enter the username and password for a domain account that has permissions to add a workstation to the domain. If you want the Macintosh to belong to an OU (Organizational Unit) or container other than Computers.domain.local, make the appropriate changes in the Computer OU field.
| 10. | Click OK. The Macintosh goes through a five-step process to join the domain. When it is successful, the Bind button changes to Unbind as shown in Figure 17.11.
Figure 17.11. Joining a Mac to Active Directory is configured in the Directory Access application. 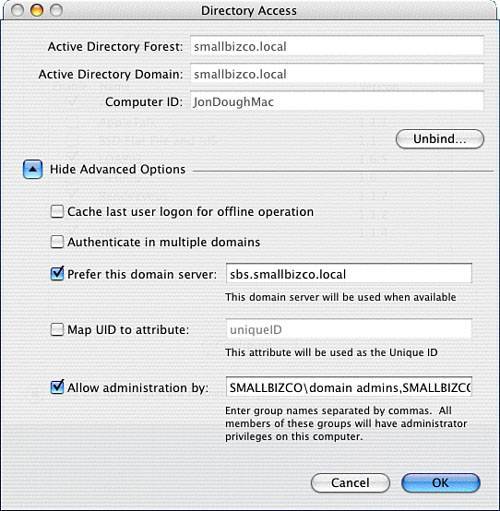
| 11. | Click OK.
| 12. | Click the Authentication tab.
| 13. | Select Custom Path from the Search drop-down menu.
| 14. | Click Add.
| 15. | Select /Active Directory/domain.local and click Add.
| 16. | Click the Services tab.
| 17. | Enable the Active Directory check box.
| 18. | Click Apply.
| 19. | Quit Directory Access.
|
Logging In with Active Directory Credentials Most Macintosh systems are configured to automatically log on with the default username and password at boot time. To log on to the Macintosh with the Active Directory account, you would need to first log off the currently authenticated account. To do this, click on the Apple menu and select Log Out [current user], where [current user] is the full name of the currently logged in account. Then click Log Out to complete the logoff process. At this point, you are presented with a logon screen that includes an icon for Other. When you click on Other, you can enter the username and password for a domain user in domainname\username form and authenticate against Active Directory. Note that doing this creates a new profile on the Macintosh for the domain user account that will have none of the settings or documents from the local user profile. If you want to have the option of logging in with the Active Directory account when the Macintosh is turned on, you need to disable the automatic logon feature of the OS. To do this, select System Preferences from the Apple menu and click on the Security icon. Activate the Disable Automatic Logon check box and quit System Preferences. The next time the Macintosh is restarted, the logon window will be presented. |
Follow these steps to connect to a share on the SBS server from the Macintosh: 1. | From the Finder, press Command-K (Apple key + k).
| 2. | In the Server Address field, enter smb://netbiosservername/sharename and click Connect.
| 3. | Enter the domain username and password for access and click OK.
| 4. | A new window with the contents of the share opens.
|
Note You can also enter smb://netbiosservername/ without the sharename, and after you authenticate you will be prompted to select which share to connect.
You can also use these alternative steps to connect to a share on the SBS server from the Macintosh: 1. | Open Macintosh HD.
| 2. | Click the Network icon in the left panel.
| 3. | Shortly, you should see several items: Servers and one or more folders with the NetBIOS and fully qualified names of the domain.
| 4. | Double-click on the folder with the NetBIOS name of the domain.
| 5. | After a moment, icons for the server and other workstations in the domain appear in the folder as shown in Figure 17.12. Double-click on the server icon.
Figure 17.12. When correctly configured, the Macintosh can see all NetBIOS machines in the local domain. 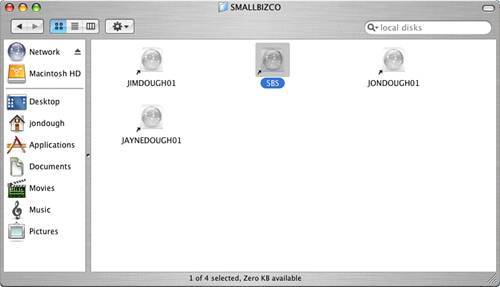
| 6. | Enter network authentication informationthe domain should be filled in, and you will probably need to change the usernameand click OK.
| 7. | Select a share from the pop-up list and click OK. The share now appears as an icon on the desktop and in the left panel of the Macintosh HD window.
|
|