Recovering Exchange Databases from Backup
| The sole point of an Exchange backup is for the data to be restored to disk at some point in time and the data to be accessed via client applications. Do this often to validate the integrity of your backup, practice your techniques, and fine-tune and reevaluate the process for timing to suitability. A large percentage of backups fail to restore successfully. This can be for a variety of reasons from devices that are no longer compatible with the archived backup to operator error that may be due to lack of training or practice. Having a backup on media and a backup log that states that the backup process verified the data transfer is not enough. A backup operator should restore data from the media to the hard disk and verify it at least once a month and do a full disaster recovery restore and verify (possibly to a test server or the Recovery Storage Group and a dummy RestoreVerify user) at least once a quarter. This is the only way to verify the disaster recovery plan and will highlight any issues with the media, the hardware, the operator, or the efficiency of the plan itself. The aim here is to successfully restore the most current or archived data in the least time, with a minimum of disruption to the business and its ongoing services. As part of your disaster recovery implementation plan, you should create a recovery checklist, similar to the following, that is appropriate to your own environment and plan:
This list is by no means definitive and needs to be tailored to your own processes. In restoring Exchange, patience under pressure is a virtue, and time is the key. Events Requiring Exchange RecoveryMany scenarios may require the recovery of Exchange data:
Some events, such as lost email or lost mailboxes, may be recovered almost instantly if deleted item retention is turned on in Exchange and the recovery is attempted within the retention period. Otherwise, recovery will require restoration from backup media via one or more methods. Your backup plan should take into account the possible types of disaster and the type of backup and schedule that is both cost effective and timely for the business. Your disaster recovery plan needs to incorporate a suitable range of recovery methods based on the recovery time best suited to each disaster and the business needs. Recovery ProcessAs mentioned previously, Microsoft Exchange 2003 has features that reduce the time required to recover from disasters. In that context two terms apply here, soft recovery and hard recovery. Soft RecoveryAn uncontrolled shutdown of the Exchange 2003 Server databases can leave them in a State: Dirty Shutdown, as indicated by an entry in the headers. On remounting the databases, if Exchange finds them in this state, it attempts a soft recovery by automatically playing back the relevant log files as indicated by the pointer in the checkpoint file. This ensures that the Exchange databases operate in a consistent state. Hard RecoveryA hard recovery occurs after you restore a database from backup, either automatically as for example when you select the Last Backup Set option in NTBackup's Restore Wizard, or use the ESEutil /cc option from the command line. A hard recovery replays the available logs into the database to bring it up to date, after which, on remounting, an additional soft recovery is also triggered. Using the SBS Backup Wizard to RestoreThe backup created by the SBS Backup Wizard is a full System State backup, including an Exchange aware, online backup of Microsoft Exchange data stores and logs. The backup can be restored either as part of the complete system restore from Directory Services Restore mode or from the Windows 2003 Server install prior to the SBS server and component server setup. In this event, the system will be brought back online with Exchange operational and the data stores as they were at the time of the backup. There is no separate SBS Wizard for restoring Exchange data only. However, you can restore Exchange data using NTBackup and other techniques outlined in the following sections by selecting to restore only the Microsoft Information Store\First Storage Group from the SBS backup. Using NTBackup to RestoreNTBackup uses application programming interface (API) calls to the Exchange Extensible Storage Engine (ESE) to restore Exchange database files and their associated log files. Figure 13.14 shows a typical flowchart of a restore operation. Figure 13.14. Flowchart of a restore operation. A direct overwrite restore operation requires that the data stores be dismounted until the restore process has been successfully completed. With large databases, and slow backup media, this can take some time considering that transfer and repair rates can be in the order of 3 to 6GB per hour. There are also latency issues associated with making changes in Exchange. Do not stop the Exchange Information Store service (MSExchangeIS), and if it is stopped, restart it from System Services. To dismount the store, right-click on the store in Exchange System Manager and select Dismount Store. A red down-arrow icon indicates that the store is dismounted as can be seen in Figure 13.15. Figure 13.15. Dismounting Exchange stores.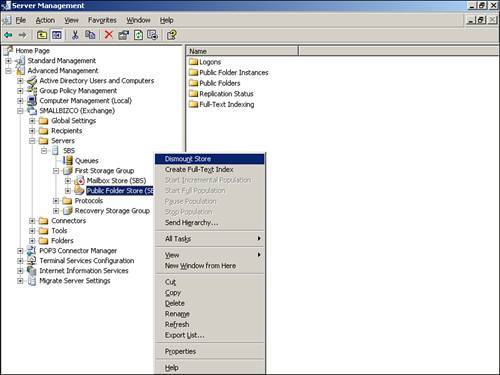
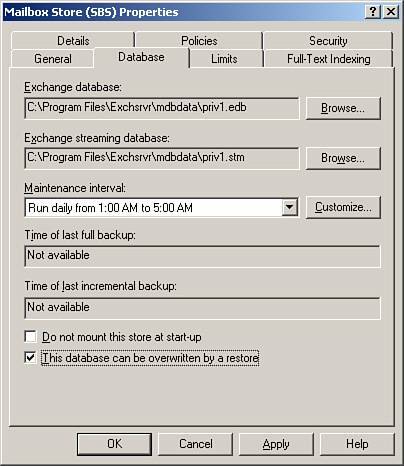
If you are restoring the databases to their original location and you have not re-created the databases in the interim, you do not need to set the This Database Can Be Overwritten By a Restore property on the database as shown in Figure 13.16. This is required only if the GUID (Unique Identifier) of the source and destination databases are different, as would be the case in a move of data in a migration, or if for some reason you have to create new databases before you restore. However, not selecting the overwrite option can increase the time required for the system to mount the store. Figure 13.16. This database can be overwritten by a restore. Note that the storage group and database display names also need to match. If they do not, you can rename the storage group and database names from the submenu of these items in the Exchange System Manager and Folder Explorer. In essence, the process is as follows:
You must restore a full backup set before you can restore a differential or incremental backup set. The restore.env file is created by the restore of a full online or copy database. Restoring differential or incremental backups is reliant on its existence. Because of this reliance the incremental and differential backups need to be restored to the full backup's temporary folder. Because the old databases are overwritten, it may be useful to take an offline copy of the database and log in the event that they are needed if the restore fails. The backup may be unrecoverable, and the database may need to be repaired and/or additional data extracted from it. Using the Recovery Storage GroupThe Recovery Storage Group was designed to aid in speedy recovery of Exchange data with a minimum of downtime for the business/users by allowing the recovery of mailboxes while the Exchange server continues to service messaging requests. This also saves the need for a separate recovery server. Individual or multiple mailboxes restored to the Recovery Storage Group from a backup can be combined or merged with live mailboxes directly from the Exchange System Manager with a few clicks using the Exchange Task Wizard. Using ExMerge and its advanced features, more selective mailbox data including previously purged messages can be merged or copied to live mailboxes. There are, however, limitations as follows:
The Recovery Storage Group is easily created from the Exchange System Manager with the default settings as shown in Figure 13.17. Figure 13.17. Creating the Recovery Storage Group.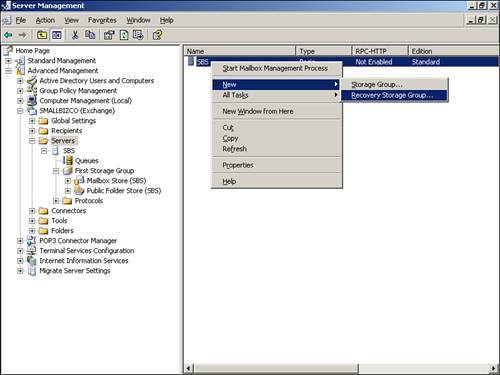 The Mailbox Store for the Recovery Storage Group is also easily created by selecting Add Database to Recover from the Action menu for the Recovery Storage Group and selecting the database to recover as shown in Figure 13.18. Figure 13.18. Creating the Recovery Storage Group Mailbox Store.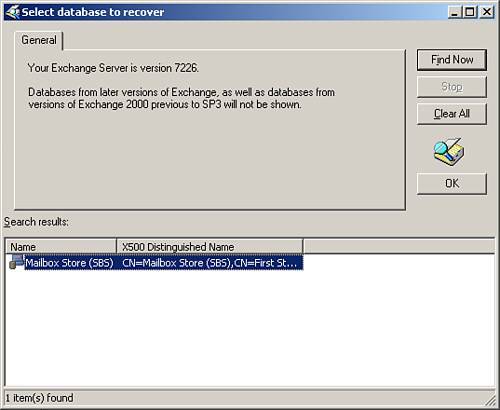 Once the Recovery Storage Group and its Mailbox Store exist, any restore from backup of the Exchange databases to the original location will automatically be directed to the Recovery Storage Group. If you want to allow a normal restore to the storage group itself while the Recovery Storage Group exists, you can set a Registry key to override the behavior as follows: HKLM\System\CurrentControlSet\Services\MSExchangeIS\ParametersSystem Create a DWORD value called Recovery SG Override, and set its Value Data to 1. Remember to flip this value or delete the key when finished to avoid future accidents. The ability to copy or merge from the Recovery Storage Group to the default (First Storage) group can provide a means of dramatically reducing the recovery downtime. The technique uses a messaging dial tone database. A new (clean) database is created and users are brought online immediately to provide Dial Tone Service. Although there is no access to historic data, the business is online, and messaging can move forward. Data can be restored to the Recovery Storage Group from backup and/or repaired or recovered database and logs. The most important online mailboxes can then be progressively populated with the historic data in the Recovery Storage Group. Although expeditious, the process can still take considerable time, particularly if the mailboxes are large. In a variation that inserts a brief downtime, but can dramatically reduce the rebuild time, the databases are switched. When the data has been satisfactorily restored to the Recovery Storage Group, both the Mailbox Store and the Recovery Storage Group are dismounted. The databases are then swapped, placing the high-volume database back as the users' live mailboxes and the low-volume database, which can be merged in minimal time, as the RSG database. Having the two databases in the same partition helps decrease transfer times during the swap process. Minimizing the amount of data being merged into the mailboxes also lessens the impact on other running server processes. The steps for creating and using the dial tone messaging are as follows:
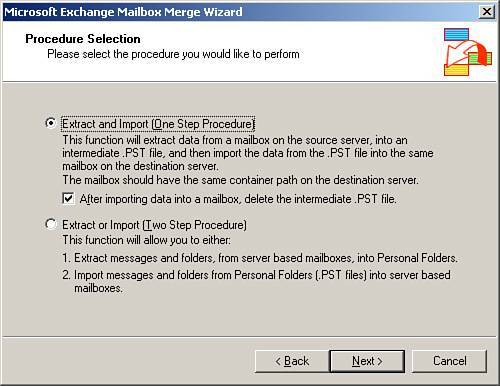
For the process to be efficient, you should definitely practice the technique on a spare server or virtual machine. Using ExMerge to RestoreExMerge is a powerful tool, not only for backing up Exchange data to .pst files, but also for merging .pst data into existing mailboxes. It can, however, be used only with mailboxes, and not public folders. In moving data to and from .pst files, some metadata can be lost, and the process breaks Exchange's single storage, so the sum of the resultant data may be significantly greater than the original. As shown in Figure 13.19, ExMerge allows for both single step restore, in which the backup to .pst files, merge, and cleanup occur as a single transaction, and dual step restore, where you can either export (back up) to .pst files or import/merge .pst files to mailboxes. Figure 13.19. ExMerge step selection. Although some of the functionality has been incorporated into the Exchange Tasks Wizard of the Recovery Storage Group, ExMerge provides far greater control over data to be recovered. With scripting, and the use of the .ini file, which can be created by saving the options from the GUI, even greater functionality, such as the ability to map disparately named mailboxes and .pst files, can be achieved . ExMerge cannot, however, create destination mailboxes on the server if they do not exist. The data selection criteria provide the following options:
Using Third-Party Solutions to RestoreThird-party software solutions may provide for restoration of either the entire Exchange database or individual mailboxes either directly or via the Recovery Storage Group and the backup APIs. Functionality varies based on vendor and price. Carefully consider your requirements set before selecting a package and verify that not only the backup but also the restore functionality is suitable and timely. |
EAN: 2147483647
Pages: 253