Using a COM Component from a .NET Client
To see how a .NET application can use a COM component, you first have to create a COM component. Creating COM components is not possible with C# or Visual Basic 2005; you need either Visual Basic 6 or C++ (or any other language that supports COM). This chapter uses the Active Template Library (ATL) and C++.
| Tip | A short note about building COM components with Visual Basic 2005 and C#: With Visual Basic 2005 and C# it is possible to build .NET components that can be used as COM objects by using a wrapper that is the real COM component. It would make no sense for a .NET component that is wrapped from a COM component to be used by a .NET client with COM interop. Because this is not a COM book, it does not discuss all aspects of the code but only what you need to build the sample. |
Creating a COM Component
To create a COM component with ATL and C++, create a new ATL Project. You can find the ATL Project Wizard within the Visual C++ Projects group when you select File ![]() New
New ![]() Project. Set the name to COMServer. With the Application Settings, select Dynamic Link Library and click Finish.
Project. Set the name to COMServer. With the Application Settings, select Dynamic Link Library and click Finish.
The ATL Project Wizard just creates the foundation for the server. A COM object is still needed. Add a class in Solution Explorer and select ATL Simple Object. In the dialog that starts up, enter COMDemo in the field for the Short name. The other fields will be filled automatically, but change the interface name to IWelcome (see Figure 23-7). Click Finish to create the stub code for the class and the interface.
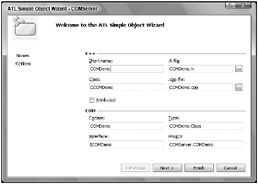
Figure 23-7
The COM component offers two interfaces, so that you can see how QueryInterface() is mapped from .NET, and just three simple methods, so that you can see how the interaction takes place. In class view, select the interface IWelcome and add the method Greeting() (see Figure 23-8) with these parameters:
HRESULT Greeting([in] BSTR name, [out, retval] BSTR* message); 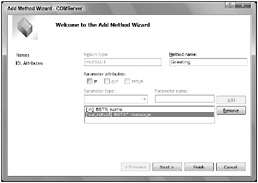
Figure 23-8
The IDL file COMDemo.idl defines the interface for COM. Your wizard-generated code from the file COMDemo .idl should look similar to the following code. The unique identifiers (uuids) will differ. The interface IWelcome defines the Greeting() method. The brackets before the keyword _interface define some attributes for the interface. uuid defines the interface ID and dual marks the type of the interface:
[ object, uuid(), dual, nonextensible, helpstring("IWelcome Interface"), pointer_default(unique) ] interface IWelcome : IDispatch{ [id(1), helpstring("method Greeting")] HRESULT Greeting( [in] BSTR name, [out,retval] BSTR* message); }; The IDL file also defines the content of the type library, which is the COM object (coclass) that implements the interface IWelcome.
[ uuid(), version(1.0), helpstring("COMServer 1.0 Type Library") ] library COMServerLib { importlib("stdole2.tlb"); [ uuid(), helpstring("COMDemo Class") ] coclass COMDemo { [default] interface IWelcome; }; }; | Important | With custom attributes, it is possible to change the name of the class and interfaces that are generated by a .NET wrapper class. You just have to add the attribute custom with the identifier 0F21F359-AB84-41e8-9A78- 36D110E6D2F9, and the name under which it should appear within .NET. |
Add the custom attribute with the same identifier and the name Wrox.ProCSharp.COMInterop.Server.IWelcome to the header section of the IWelcome interface. Add the same attribute with a corresponding name to the class CCOMDemo:
[ object, uuid(), dual, nonextensible, helpstring("IWelcome Interface"), pointer_default(unique), custom(, "Wrox.ProCSharp.COMInterop.Server.IWelcome") ] interface IWelcome : IDispatch{ [id(1), helpstring("method Greeting")] HRESULT Greeting([in] BSTR name, [out,retval] BSTR* message); }; library COMServerLib { importlib("stdole2.tlb"); [ uuid(), helpstring("COMDemo Class") custom(, "Wrox.ProCSharp.COMInterop.Server.COMDemo"), ] coclass COMDemo { [default] interface IWelcome; }; Now add a second interface to the file COMDemo.idl. You can copy the header section of the IWelcome interface to the header section of the new IMath interface, but be sure to change the unique identifier that is defined with the uuid keyword. You can generate such an ID with the guidgen utility. The interface IMath offers the methods Add() and Sub():
// IMath [ object, uuid(""), dual, nonextensible, helpstring("IMath Interface"), pointer_default(unique), custom(, "Wrox.ProCSharp.COMInterop.Server.IMath") ] interface IMath : IDispatch { [id(1)] HRESULT Add([in] LONG val1, [in] LONG val2, [out, retval] LONG* result); [id(2)] HRESULT Sub([in] LONG val1, [in] LONG val2, [out, retval] LONG* result); }; The coclass COMDemo must also be changed so that it implements both the interfaces IWelcome and IMath. The IWelcome interface is the default interface:
[ uuid(), helpstring("COMDemo Class"), custom(, "Wrox.ProCSharp.COMInterop.Server.COMDemo") ] coclass COMDemo { [default] interface IWelcome; interface IMath; }; Now, you can set the focus away from the IDL file toward the C++ code. In the file COMDemo.h, you can find the class definition of the COM object. The class CCOMDemo uses multiple inheritance to derive from the template classes CComObjectRootEx, CComCoClass, and IDisplatchImpl. CComObjectRootEx offers an implementation of the IUnknown interface functionality such as AddRef and Release, CComCoClass creates a factory that instantiates objects of the template argument, which here is CComDemo, and IDispatchImpl offers an implementation of the methods from the IDispatch interface.
With the macros that are surrounded by BEGIN_COM_MAP and END_COM_MAP a map is created to define all the COM interfaces that are implemented by the COM class. This map is used by the implementation of the QueryInterface method.
class ATL_NO_VTABLE CCOMDemo : public CComObjectRootEx<CComSingleThreadModel>, public CComCoClass<CCOMDemo, &CLSID_COMDemo>, public IDispatchImpl<IWelcome, &IID_IWelcome, &LIBID_COMServerLib, /*wMajor =*/ 1, /*wMinor =*/ 0> { public: CCOMDemo() { } DECLARE_REGISTRY_RESOURCEID(IDR_COMDEMO) BEGIN_COM_MAP(CCOMDemo) COM_INTERFACE_ENTRY(IWelcome) COM_INTERFACE_ENTRY(IDispatch) END_COM_MAP() DECLARE_PROTECT_FINAL_CONSTRUCT() HRESULT FinalConstruct() { return S_OK; } void FinalRelease() { } public: STDMETHOD(Greeting)(BSTR name, BSTR* message); }; OBJECT_ENTRY_AUTO(__uuidof(COMDemo), CCOMDemo) With this class definition, you have to add the second interface, IMath, as well as the methods that are defined with the IMath interface:
class ATL_NO_VTABLE CCOMDemo : public CComObjectRootEx<CComSingleThreadModel>, public CComCoClass<CCOMDemo, &CLSID_COMDemo>, public IDispatchImpl<IWelcome, &IID_IWelcome, &LIBID_COMServerLib, /*wMajor =*/ 1, /*wMinor =*/ 0> public IDispatchImpl<IMath, &IID_IMath, &LIBID_COMServerLib, 1, 0> { public: CCOMDemo() { } DECLARE_REGISTRY_RESOURCEID(IDR_COMDEMO) BEGIN_COM_MAP(CCOMDemo) COM_INTERFACE_ENTRY(IWelcome) COM_INTERFACE_ENTRY(IMath) COM_INTERFACE_ENTRY2(IDispatch, IWelcome) END_COM_MAP() DECLARE_PROTECT_FINAL_CONSTRUCT() HRESULT FinalConstruct() { return S_OK; } void FinalRelease() { } public: STDMETHOD(Greeting)(BSTR name, BSTR* message); STDMETHOD(Add)(long val1, long val2, long* result); STDMETHOD(Sub)(long val1, long val2, long* result); }; OBJECT_ENTRY_AUTO(__uuidof(COMDemo), CCOMDemo)
Now, you can implement the three methods in the file COMDemo.cpp with the following code. The CComBSTR is an ATL class that makes it easier to deal with BSTRs. In the Greeting() method, only a welcome message is returned, which adds the name passed in the first argument to the message that is returned. The Add() method just does a simple addition of two values, and the Sub() method does a subtraction and returns the result:
STDMETHODIMP CCOMDemo::Greeting(BSTR name, BSTR* message) { CComBSTR tmp("Welcome, "); tmp.Append(name); *message = tmp; return S_OK; } STDMETHODIMP CCOMDemo::Add(LONG val1, LONG val2, LONG* result) { *result = val1 + val2; return S_OK; } STDMETHODIMP CCOMDemo::Sub(LONG val1, LONG val2, LONG* result) { *result = val1 - val2; return S_OK; } Now, you can build the component. The build process also configures the component in the registry.
Creating a Runtime Callable Wrapper
You can now use the COM component from within .NET. To make this possible, you must create a runtime callable wrapper (RCW). Using the RCW, the .NET client sees a .NET object instead of the COM component; there is no need to deal with the COM characteristics because this is done by the wrapper. An RCW hides the IUnknown and IDispatch interfaces (see Figure 23-9) and deals itself with the reference counts of the COM object.
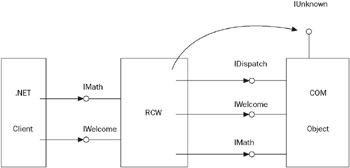
Figure 23-9
The RCW can be created by using the command-line utility tlbimp or by using Visual Studio. Starting the command
tlbimp COMServer.dll /out:Interop.COMServer.dll
creates the file Interop.COMServer.dll that contains a .NET assembly with the wrapper class. In this generated assembly, you can find the namespace COMWrapper with the class CCOMDemoClass and the interfaces CCOMDemo, IMath, and IWelcome. The name of the namespace can be changed by using options of the tlbimp utility. The option /namespace allows you to specify a different namespace, and with /asmversion you can define the version number of the assembly.
| Tip | Another important option of this command-line utility is /keyfile, which is used for assigning a strong name to the generated assembly. Strong names are discussed in Chapter 16, “Assemblies.” |
An RCW can also be created by using Visual Studio. To create a simple sample application, create a C# console project. In Solution Explorer, add a reference to the COM server by selecting the COM tab, and scroll down to the entry COMServer 1.0 Type Library (see Figure 23-10). Here, all COM objects are listed that are configured in the registry. Selecting a COM component from the list creates an assembly with an RCW class.
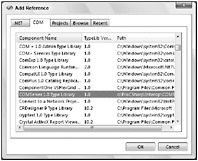
Figure 23-10
Using the RCW
After creating the wrapper class, you can write the code for the application to instantiate and access the component. Because of the custom attributes in the C++ file, the generated namespace of the RCW class is Wrox.ProCSharp.COMInterop.Server. Add this namespace as well as the namespace System .Runtime.InteropServices to the declarations. From the namespace System.Runtime .InteropServices, the Marshal class will be used to release the COM object:
using System; using System.Runtime.InteropServices; using Wrox.ProCSharp.COMInteorp.Server namespace Wrox.ProCSharp.COMInterop.Client { class Program { [STAThread] static void Main(string[] args) { Now, the COM component can be used similarly to a .NET class. obj is a variable of type COMDemo. COMDemo is a .NET interface that offers the methods of both the IWelcome and IMath interfaces. However, it is also possible to cast to a specific interface such as IWelcome. With a variable that is declared as type IWelcome, the method Greeting() can be called.
| Tip | Although COMDemo is an interface, you can instantiate new objects of type COMDemo. Contrary to normal interfaces, you can do this with wrapped COM interfaces. |
COMDemo obj = new COMDemo(); IWelcome welcome = obj; Console.WriteLine(welcome.Greeting("Christian")); If the object - as in this case - offers multiple interfaces, a variable of the other interface can be declared, and by using a simple assignment with the cast operator, the wrapper class does a QueryInterface() with the COM object to return the second interface pointer. With the math variable, the methods of the IMath interface can be called:
IMath math; math = (IMath)welcome; int x = math.Add(4, 5); Console.WriteLine(x); If the COM object should be released before the garbage collector cleans up the object, the static method Marshal.ReleaseComObject() invokes the Release() method of the component, so that the component can destroy itself and free up memory:
Marshal.ReleaseComObject(math); } } } | Tip | Earlier you learned that the COM object is released as soon as the reference count is 0. Marshal .ReleaseComObject() decrements the reference count by 1 by invoking the Release() method. Because the RCW does just one call to AddRef() to increment the reference count, a single call to Marshal.ReleaseComObject() is enough to release the object no matter how many references to the RCW you keep. |
After releasing the COM object using Marshal.ReleaseComObject(), you may not use any variable that references the object. In the example, the COM object is released by using the variable math. The variable welcome, which references the same object, cannot be used after releasing the object. Otherwise, you will get an exception of type InvalidComObjectException.
| Important | Releasing COM objects when they are no longer needed is extremely important. COM objects make use of the native memory heap, whereas .NET objects make use of the managed memory heap. The garbage collector only deals with managed memory. |
As you can see, with a runtime callable wrapper, a COM component can be used similarly to a .NET object.
A special case of a runtime callable wrapper is a primary interop assembly, which is discussed next.
Primary Interop Assemblies
A primary interop assembly is an assembly that is already prepared by the vendor of the COM component. This makes it easier to use the COM component. A primary interop assembly is a runtime-callable wrapper that might differ from an automatically generated RCW.
You can find primary interop assemblies in the directory <program files>\Microsoft .NET\Primary Interop Assemblies. A primary interop assembly already exists for the use of ADO from within .NET. If you add a reference to the COM library Microsoft ActiveX Data Objects 2.7 Library, no wrapper class is created because a primary interop assembly already exists; the primary interop assembly is referenced instead.
Threading Issues
As discussed earlier in this chapter, a COM component marks the apartment (STA or MTA) it wants to live in, based on whether it is implemented as thread-safe or not. However, the thread has to join an apartment. What apartment the thread should join can be defined with the [STAThread] and [MTAThread] attributes, which can be applied to the Main() method of an application. The attribute [STAThread] means that the thread joins an STA, whereas the attribute [MTAThread] means that the thread joins an MTA. Joining an MTA is the default if no attribute is applied.
It is also possible to set the apartment state programmatically with the ApartmentState property of the Thread class. The ApartmentState property allows you to set a value from the ApartmentState enumeration. ApartmentState has the possible values STA and MTA (and Unknown if it wasn’t set). Be aware that the apartment state of a thread can only be set once. If it is set a second time, the second setting is ignored.
| Important | What happens if the thread chooses a different apartment from the apartments supported by the component? The correct apartment for the COM component is created automatically by the COM runtime. However, the performance decreases if the apartment boundaries are crossed while calling the methods of a component. |
Adding Connection Points
To see how COM events can be handled in a .NET application, first the COM component must be extended. Implementing a COM event in an ATL class using attributes looks very similar to the events in .NET, although the functionality is different.
First, you have to add another interface to the interface definition file COMDemo.idl. The interface _ICompletedEvents is implemented by the client, which is the .NET application, and called by the component. In this example, the method Completed() is called by the component when the calculation is ready. Such an interface is also known as an outgoing interface. An outgoing interface must either be a dispatch or a custom interface. Dispatch interfaces are supported by all clients. The custom attribute with the ID defines the name of this interface that will be created in the RCW. The outgoing interface must also be written to the interfaces supported by the component inside the coclass section, and marked as a source interface:
library COMServerLib { importlib("stdole2.tlb"); [ uuid(), helpstring("_ICompletedEvents Interface"), custom(, "Wrox.ProCSharp.COMInterop.Server.ICompletedEvents"), ] dispinterface _ICompletedEvents { properties: methods: [id(1)] void Completed(void); }; [ uuid(), helpstring("COMDemo Class") custom(, "Wrox.ProCSharp.COMInterop.Server.COMDemo"), ] coclass COMDemo { [default] interface IWelcome; interface IMath; [default, source] dispinterface _ICompletedEvents; }; The implementation to fire the event back to the client can be created using a wizard. Open the class view, select the class CComDemo, open the context menu, and start the Implement Connection Point Wizard (see Figure 23-11). Select the source interface ICompletedEvents for implementation with the connection point.
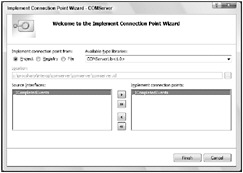
Figure 23-11
The wizard creates the proxy class CProxy_ICompletedEvents to fire the events to the client. Also, the class CCOMDemo is changed. The class now inherits from IConnectionPointContainerImpl and the proxy class. The interface IConnectionPointContainer is added to the interface map, and a connection point map is added to the source interface _ICompletedEvents.
class ATL_NO_VTABLE CCOMDemo : public CComObjectRootEx<CComSingleThreadModel>, public CComCoClass<CCOMDemo, &CLSID_COMDemo>, public IDispatchImpl<IWelcome, &IID_IWelcome, &LIBID_COMServerLib, /*wMajor =*/ 1, /*wMinor =*/ 0>, public IDispatchImpl<IMath, &IID_IMath, &LIBID_COMServerLib, 1, 0>, public IConnectionPointContainerImpl<CCOMDemo>, public CProxy_ICompletedEvents<CCOMDemo> { public: //... BEGIN_COM_MAP(CCOMDemo) COM_INTERFACE_ENTRY(IWelcome) COM_INTERFACE_ENTRY(IMath) COM_INTERFACE_ENTRY2(IDispatch, IWelcome) COM_INTERFACE_ENTRY(IConnectionPointContainer) END_COM_MAP() //... public: BEGIN_CONNECTION_POINT_MAP(CCOMDemo) CONNECTION_POINT_ENTRY(__uuidof(_ICompletedEvents)) END_CONNECTION_POINT_MAP() };
Finally, the method Fire_Completed() from the proxy class can be called inside the methods Add() and Sub() in the file COMDemo.cpp:
STDMETHODIMP CCOMDemo::Add(LONG val1, LONG val2, LONG* result) { *result = val1 + val2; Fire_Completed(); return S_OK; } STDMETHODIMP CCOMDemo::Sub(LONG val1, LONG val2, LONG* result) { *result = val1 - val2; Fire_Completed(); return S_OK; } After rebuilding the COM DLL, you can change the .NET client to use these COM events just like a normal .NET event:
static void Main() { COMDemo obj = new COMDemo(); IWelcome welcome = obj; Console.WriteLine(welcome.Greeting("Christian")); obj.Completed += new ICompletedEvents_CompletedEventHandler( delegate { Console.WriteLine("Calculation completed"); }); IMath math = (IMath)welcome; int result = math.Add(3, 5); Console.WriteLine(result); Marshal.ReleaseComObject(math); } As you can see, the RCW offers automatic mapping from COM events to .NET events. COM events can be used similarly to .NET events in a .NET client.
Using ActiveX Controls in Windows Forms
ActiveX controls are COM objects with a user interface and many optional COM interfaces to deal with the user interface and the interaction with the container. ActiveX controls can be used by many different containers such as Internet Explorer, Word, Excel, and applications written using Visual Basic 6, MFC (Microsoft Foundation Classes), or ATL (Active Template Library). A Windows Forms application is another container that can manage ActiveX controls. ActiveX controls can be used similarly to Windows Forms controls as you see shortly.
ActiveX Control Importer
Similar to runtime callable wrappers, you can also create a wrapper for ActiveX controls. A wrapper for an ActiveX control is created by using the command-line utility Windows Forms ActiveX Control Importer, aximp.exe. This utility creates a class that derives from the base class System.Windows.Forms.AxHost that acts as a wrapper to use the ActiveX control.
You can enter this command to create a wrapper class from the Web Forms Control:
aximp c:\windows\system32\shdocvw.dll
ActiveX controls can also be imported directly using Visual Studio. If the ActiveX control is configured within the toolbox, it can be dragged and dropped onto a Windows Forms control that creates the wrapper.
Creating a Windows Forms Application
To see ActiveX controls running inside a Windows Forms application, create a simple Windows Forms application project. With this application, you will build a simple Internet browser that uses the Web Browser control, which comes as part of the operating system.
Create a form as shown in Figure 23-12. The form should include a toolstrip with a text box and three buttons. The text box with the name toolStripTextUrl is used to enter a URL, three buttons with the names toolStripButtonNavigate, toolStripButtonBack, and toolStripButtonForward to navigate Web pages, and a status strip with the name statusStrip.
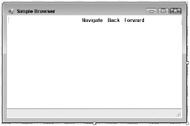
Figure 23-12
Using Visual Studio, you can add ActiveX controls to the toolbar to use it in the same way as a Windows Forms control. On the Customize Toolbox context menu, select the Add/Remove Items menu entry and select the Microsoft Web Browser control in the COM Components category (see Figure 23-13).
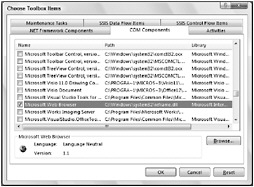
Figure 23-13
This way, an icon will show up in the toolbox. Similarly to other Windows controls, you can drag and drop this icon to the Windows Forms designer to create (with the aximp utility) a wrapper assembly hosting the ActiveX control. You can see the wrapper assemblies with the references in the project: AxSHDocVw and SHDocVw. Now you can invoke methods of the control by using the generated variable axWebBrowser1, as shown in the following code. Add a Click event handler to the button toolStripButtonNavigate in order to navigate the browser to a Web page. The method Navigate() used for this purpose requires a URL string with the first argument that you get by accessing the Text property of the text box control toolStripTextUrl:
private void OnNavigate(object sender, System.EventArgs e) { axWebBrowser1.Navigate(toolStripTextUrl.Text); } With the Click event handler of the Back and Forward buttons, call the GoBack() and GoForward() methods of the browser control:
private TraceSource trace = new TraceSource("SimpleBrowser"); private void OnBack(object sender, System.EventArgs e) { try { axWebBrowser1.GoBack(); } catch (COMException ex) { trace.TraceEvent(TraceEventType.Information, 44, String.Format("Error going back, {0} {1}", ex.Message, ex.ErrorCode)); } } private void OnForward(object sender, System.EventArgs e) { try { axWebBrowser1.GoForward(); } catch (COMException ex) { trace.TraceEvent(TraceEventType.Information, 44, String.Format("Error going forward, {0} {1}", ex.Message, ex.ErrorCode)); } } The Web control also offers some events that can be used just like a .NET event. Add the event handler OnStatusChange() to the event StatusTextChange to set the status that is returned by the control to the status strip in the Windows Forms application:
private void OnStatusChange(object sender, AxSHDocVw.DWebBrowserEvents2_StatusTextChangeEvent e) { statusStrip.Items[0].Text = e.text; } Now, you have a simple browser that you can use to navigate to Web pages (see Figure 23-14).
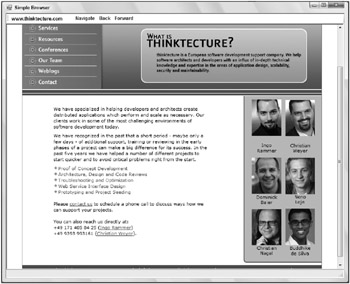
Figure 23-14
Using COM Objects from within ASP.NET
COM objects can be used in a similar way to what you have seen before from within ASP.NET. However, there is one important distinction. The ASP.NET runtime by default runs in an MTA. If the COM object is configured with the threading model value Apartment (as all COM object that have been written with Visual Basic 6 are), an exception is thrown. For performance and scalability reasons, it is best to avoid STA objects within ASP.NET. If you really want to use an STA object with ASP.NET, you can set the AspCompat attribute with the Page directive as shown in the following snippet. Be aware that the Web site performance might suffer when you are using this option:
<%@ Page AspCompat="true" Language="C#" %> | Important | Using STA COM objects with ASP.NET can lead to scalability problems. It’s best to avoid using STA COM objects with ASP.NET. |