Localization Example Using Visual Studio
In this section, you create a simple Windows application that shows how to use Visual Studio 2005 for localization. This application does not use complex Windows Forms and does not have any real inner functionality, because the key feature it is intended to demonstrate here is localization. In the automatically generated source code, change the namespace to Wrox.ProCSharp.Localization and the class name to BookOfTheDayForm. The namespace is not only changed in the source file BookOfTheDayForm.cs but also in the project settings, so that all generated resource files will get this namespace, too. You can change the namespace for all new items that are created by selecting Common Properties from the Project ![]() Properties menu.
Properties menu.
| Tip | Windows Forms applications are covered in more detail in Chapter 28, “Windows Forms,” Chapter 29, “Viewing .NET Data,” and Chapter 30, “Graphics with GDI+.” |
To show some issues with localization, this program has a picture, some text, a date, and a number. The picture shows a flag that is also localized. Figure 20-13 shows this form of the application as seen in the Windows Forms Designer.
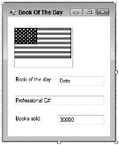
Figure 20-13
The following table lists the values for the Name and Text properties of the Windows Forms elements.
| Name | Text |
|---|---|
| labelBookOfTheDay | Book of the day |
| labelItemsSold | Books sold |
| textDate | Date |
| textTitle | Professional C# |
| textItemsSold | 30000 |
| pictureFlag |
In addition to this form, you might want a message box that displays a welcome message; this message might change depending on the current time of day. This example demonstrates that the localization for dynamically created dialogs must be done differently. In the method WelcomeMessage(), display a message box using MessageBox.Show(). Call the method WelcomeMessage() in the constructor of the form class BookOfTheDayForm, before the call to InitializeComponent().
Here is the code for the method WelcomeMessage():
public void WelcomeMessage() { DateTime now = DateTime.Now; string message; if (now.Hour <= 12) { message = "Good Morning"; } else if (now.Hour <= 19) { message = "Good Afternoon"; } else { message = "Good Evening"; } MessageBox.Show(message + "\nThis is a localization sample"); } The number and date in the form should be set by using formatting options. Add a new method, SetDateAndNumber(), to set the values with the format option. In a real application, these values could be received from a Web service or a database, but this example is just concentrating on localization. The date is formatted using the D option (to display the long date name). The number is displayed using the picture number format string ###,###,###, where # represents a digit and “,“ is the group separator.
public void SetDateAndNumber() { DateTime today = DateTime.Today; textDate.Text = today.ToString("D"); int itemsSold = 327444; textItemsSold.Text = itemsSold.ToString(",,"); } In the constructor of the BookOfTheDayForm class, both the WelcomeMessage() and SetDateAndNumber() methods are called:
public BookOfTheDayForm() { WelcomeMessage(); InitializeComponent(); SetDateAndNumber(); } A magic feature of the Windows Forms Designer is started when you set the Localizable property of the form from false to true. This results in the creation of an XML-based resource file for the dialog box that stores all resource strings, properties (including the location and size of Windows Forms elements), embedded pictures, and so on. In addition, the implementation of the InitializeComponent() method is changed; an instance of the class System.Resources.ResourceManager is created, and to get to the values and positions of the text fields and pictures, the GetObject() method is used instead of writing the values directly into the code. GetObject() uses the CurrentUICulture property of the current thread for finding the correct localization of the resources.
Here is part of InitializeComponent() from the file BookOfTheDayForm.Designer.cs before the Localizable property is set to true, where all properties of textboxTitle are set:
private void InitializeComponent() { //... this.textTitle = new System.Windows.Forms.TextBox(); //... // // textTitle // this.textTitle.Location = new System.Drawing.Point(24, 152); this.textTitle.Name = "textTitle"; this.textTitle.Size = new System.Drawing.Size(256, 20); this.textTitle.TabIndex = 2; this.textTitle.Text = "Professional C#"; The code for the IntializeComponent() method is automatically changed by setting the Localizable property set to true:
private void InitializeComponent() { System.ComponentModel.ComponentResourceManager resources = new System.ComponentModel.ComponentResourceManager( typeof(BookOfTheDayForm)); //... this.textTitle = new System.Windows.Forms.TextBox(); //... resoures.ApplyResources(this.textTitle, "textTitle"); Where does the resource manager get the data from? When the Localizable property is set to true, the resource file BookOfTheDay.resX is generated. In this file, you can find the scheme of the XML resource, followed by all elements in the form: Type, Text, Location, TabIndex, and so on.
The class ComponentResourceManager is derived from ResourceManager and offers the method ApplyResources(). With ApplyResources() the resources that are defined with the second argument are applied to the object in the first argument.
The following XML segment shows a few of the properties of textBoxTitle: the Location property has a value of 13, 133; the TabIndex property has a value of 2; the Text property is set to Professional C#; and so on. For every value, the type of the value is stored as well. For example, the Location property is of type System.Drawing.Point, and this class can be found in the assembly System.Drawing.
Why are the locations and sizes stored in this XML file? With translations, many strings have completely different sizes and no longer fit into the original positions. When the locations and sizes are all stored inside the resource file, everything that is needed for localizations is stored in these files, separate from the C# code:
<data name="textTitle.Anchor" type="System.Windows.Forms.AnchorStyles, System.Windows.Forms"> <value>Bottom, Left, Right</value> </data> <data name="textTitle.Location" type="System.Drawing.Point, System.Drawing> <value>13, 133</value> </data> <data name="textTitle.Size" type="System.Drawing.Size, System.Drawing> <value>196, 20</value> </data> <data name="textTitle.TabIndex" type="System.Int32, mscorlib> <value>2</value> </data> <data name="textTitle.Text"> <value xml:space="preserve">Professional C#</value> </data> When changing some of these resource values, it is not necessary to work directly with the XML code. You can change these resources directly in the Visual Studio 2005 Designer. Whenever you change the Language property of the form and the properties of some form elements, a new resource file is generated for the specified language. Create a German version of the form by setting the Language property to German, and a French version by setting the Language property to French. For every language, you get a resource file with the changed properties: in this case, BookOfTheDayForm.de.resX and BookOfTheDayForm.fr.resX.
The following table shows the changes needed for the German version.
| German Name | Value |
|---|---|
| $this.Text (title of the form) | Buch des Tages |
| labelItemsSold.Text | Bücher verkauft: |
| labelBookOfTheDay.Text | Buch des Tages: |
The following table lists the changes for the French version.
| French Name | Value |
|---|---|
| $this.Text (title of the form) | Le livre du jour |
| labelItemsSold.Text | Des livres vendus: |
| labelBookOfTheDay.Text | Le livre du jour: |
With .NET 2.0, images are no longer moved, by default, to the satellite assemblies. However, in the sample application the flag should be different depending on the country. To do this you have to add the image of the American flag to the file Resources.resx. You can find this file in the Properties section of the Visual Studio Solution Explorer. With the resource editor, select the Images categories as shown in Figure 20-14, and add the file americanflag.bmp. To make localization with images possible, the image must have the same name in all languages. Here the image in the file Resources.resx has the name Flag. You can rename the image in the properties editor. Within the properties editor, you can also change whether the image should be linked or embedded. For better performance with resources, Visual Studio 2005 changed the default behavior, because here images are linked by default. With linked images, the image file must be delivered together with the application. If you want to embed the image within the assembly, you can change the Persistence property to Embedded.
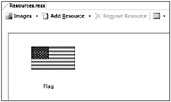
Figure 20-14
The localized versions of the flags can be added by copying the file Resource.resx to Resource.de.resx and Resource.fr.resx and replacing the flags with GermanFlag.bmp and FranceFlag.bmp. Because a strongly typed resource class is only needed with the neutral resource, the property CustomTool can be cleared with the resource files of all specific languages.
Compiling the project now creates a satellite assembly for each language. Inside the debug directory (or the release, depending on your active configuration), language subdirectories like de and fr are created. In such a subdirectory, you will find the file BookOfTheDay.resources.dll. Such a file is a satellite assembly that only includes localized resources. Opening this assembly with ildasm (see Figure 20-15), you see a manifest with the embedded resources and a defined locale. The assembly has the locale de in the assembly attributes, so it can be found in the de subdirectory. You can also see the name of the resource with .mresource; it is prefixed with the namespace name Wrox.ProCSharp.Localization, followed by the class name BookOfTheDayForm and the language code de.
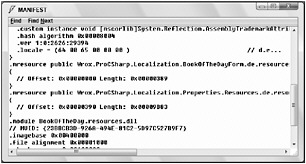
Figure 20-15
Changing the Culture Programmatically
After translating the resources and building the satellite assemblies, you will get the correct translations depending on the configured culture for the user. The welcome message is not translated at this time. This needs to be done in a different way, as you see shortly.
In addition to the system configuration, it should be possible to send the language code as a command-line argument to your application for testing purposes. The BookOfTheDayForm constructor is changed to allow passing a culture string, and setting the culture depending on this string. A CultureInfo instance is created to pass it to the CurrentCulture and CurrentUICulture properties of the current thread. Remember that the CurrentCulture is used for formatting, and the CurrentUICulture is used for loading of resources.
public BookOfTheDayForm(string culture) { if (culture != "") { CultureInfo ci = new CultureInfo(culture); // set culture for formatting Thread.CurrentThread.CurrentCulture = ci; // set culture for resources Thread.CurrentThread.CurrentUICulture = ci; } WelcomeMessage(); InitializeComponent(); SetDateAndNumber(); }
The BookOfTheDayForm is instantiated in the Main method, which can be found in the file Program.cs. In this method, you pass the culture string to the BookOfTheDayForm constructor:
[STAThread] static void Main(string[] args) { string culture = ""; if (args.Length == 1) { culture = args[0]; } Application.EnableVisualStyles(); Application.Run(new BookOfTheDayForm(culture)); }
Now you can start the application by using command-line options. With the running application, you can see that the formatting options and the resources that were generated from the Windows Forms Designer show up. Figures 20-16 and 20-17 show two localizations where the application is started with the command-line options de-DE and fr-FR.
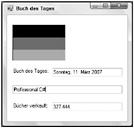
Figure 20-16
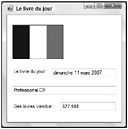
Figure 20-17
There is still a problem with the welcome message box: the strings are hard-coded inside the program. Because these strings are not properties of elements inside the form, the Forms Designer does not extract XML resources as it does from the properties for Windows controls when changing the Localizable property of the form. You have to change this code yourself.
Using Custom Resource Messages
For the welcome message, you have to translate the hard-coded strings. The following table shows the translations for German and French. You can write custom resource messages directly in the file Resources.resx and the language-specific derivations. Of course, you can also create a new resource file.
| Name | English | German | French |
|---|---|---|---|
| GoodMorning | Good Morning | Guten Morgen | Bonjour |
| GoodAfternoon | Good Afternoon | Guten | Tag Bonjour |
| GoodEvening | Good Evening | Guten Abend | Bonsoir |
| Message1 | This is a localization sample. | Das ist ein Beispiel mit Lokalisierung. | C’est un exemple avec la localisation |
The source code of the method WelcomeMessage() must also be changed to use the resources. With strongly typed resources, there’s no need to instantiate the ResourceManager class. Instead, the properties of the strongly typed resource can be used:
public void WelcomeMessage() { DateTime now = DateTime.Now; string message; if (now.Hour <= 12) { message = Properties.Resources.GoodMorning; } else if (now.Hour <= 19) { message = Properties.Resources.GoodAfternoon; } else { message = Properties.Resources.GoodEvening; } MessageBox.Show(message + "\n" + Properties.Resources.Message1); } When the program is started using English, German, or French, you will get the message boxes shown in Figures 20-18, 20-19, and 20-20, respectively.

Figure 20-18

Figure 20-19

Figure 20-20
Automatic Fallback for Resources
For the French and German versions, in the example all the resources are inside the satellite assemblies. If not, all the values of labels or text boxes are changed, this is not a problem at all. You must have only the values that will change in the satellite assembly; the other values will be taken from the parent assembly. For example, for de-at (Austria), you could change the value for the Good Afternoon resource to Grüß Gott while leaving the other values intact. During runtime when looking for the value of the resource Good Morning, which is not located in the de-at satellite assembly, the parent assembly would be searched. The parent for de-at is de. In cases where the de assembly does not have this resource either, the value would be searched for in the parent assembly of de, the neutral assembly. The neutral assembly does not have a culture code.
| Important | Keep in mind that with the culture code of the main assembly you shouldn’t define any culture! |
Outsourcing Translations
It is an easy task to outsource translations using resource files. It is not necessary to install Visual Studio for translating resource files; a simple XML editor will suffice. The disadvantage of using an XML editor is that there is no real chance to rearrange Windows Forms elements and change the sizes if the translated text does not fit into the original borders of a label or button. Using a Windows Forms Designer to do translations is a natural choice.
Microsoft provides a tool as part of the .NET Framework SDK that fulfills all these requirements: the Windows Resource Localization Editor winres.exe (see Figure 20-21). Users working with this tool do not need access to the C# source files; only binary or XML-based resource files are needed for translations. After these translations are completed, you can import the resource files to the Visual Studio project to build satellite assemblies.
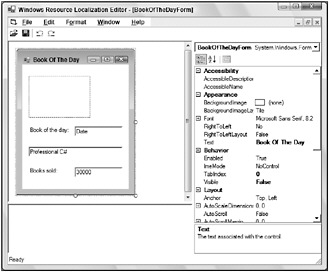
Figure 20-21
If you don’t want your translation bureau to change the sizes and locations of labels and buttons, and they cannot deal with XML files, you can send a simple text-based file. With the command-line utility resgen.exe you can create a text file from an XML file:
resgen myresource.resX myresource.txt
And after you’ve received the translation from the translation bureau, you can create an XML file from the returned text file:
resgen myresource.es.txt myresource.es.resX