The Properties Panel
One of the most important panels in the authoring tool is called the Properties panel. It's a short, wide panel that looks something like Figure 1.10. It's possible that your Properties panel might look somewhat different from the one in the figure. Let me explain.

Figure 1.10: The Properties panel allows you to edit properties of anything on the stage.
The Properties panel is adaptive in the sense that when you select an item on the stage, the contents of the Properties panel change to reflect properties of the object you selected. Different types of elements on the stage have different properties, and the Properties panel changes to reflect that. For example, movie clips have a position and a size property in the panel, and although text fields have these two properties as well, text fields also have properties that a movie clip does not, such as font, font size , and kerning. When you select a movie clip on the stage and then look at the Properties panel, you see only the properties that pertain to a movie clip. If you select something else, such as a text field, you see all the properties available for that, which include font.
When you're using the Properties panel to manipulate stage elements, the properties pertain to the instance on the stage, not to the symbol in the library. That means that if you have five ball instances on the stage (remember when we created ball instances earlier this chapter) and you increase the size of one ball on the stage by selecting it and altering the fields in the Properties panel, only the selected ball changes. The symbol in your library is unaffected, as are the other balls on the stage.
Now that you know what the Properties panel does, go ahead and click on the text field (the one we created a couple sections ago) if it is not already selected. Now look at the Properties panel and compare it with Figure 1.11. Notice that the font, font size, auto kerning, and several other text properties are available to you now. The upper-left option defines the type of the text field and is labeled in Figure 1.11 as well.
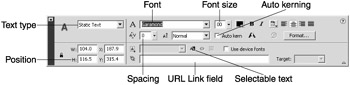
Figure 1.11: The Properties panel shows properties for a text field when one is selected.
| Caution | Don't confuse the use of the Properties panel to change an instance with actually editing the library object, which is done by right-clicking on a symbol or instance and selecting Edit. |
| Caution | Make sure that when you try to change the properties of an instance that only one instance on the stage is selected. If you have more than one instance selected and you try to change some properties, Flash will apply all the properties to all the instances. |
Because we only know how to use static text, make sure that's the type defined for this text field. Below that are the position (X and Y) and size properties (W and H). Try changing those four blanks and see what happens. Two of them, labeled W and H, should change the scaling of the text field on the stage. The other two blanks, labeled X and Y, should change the position of the text field. There is also a block of properties that includes the font, font size, color , bold, italic, centering, aliasing, and so on. Feel free to experiment with these different text options and consult the tutorial if you have problems. You can also check the Selectable text field on the Properties panel if you want your user to be able to highlight and copy text in your game or Web site with the mouse. Selectable text is labeled in Figure 1.11.
Selectable text is useful if the user needs to copy and paste text from your site to some-where else. There is also a URL Link field, labeled in Figure 1.11, where you can define a hyperlink to another site. If you place a URL in this field and the user clicks on the text field, the user is redirected to whatever URL you filled in.
Finally, you can use the Properties panel to change some of the properties of the main movie. If you click somewhere off the stage or somewhere on the stage where there are no movie clips, your Properties panel shows the main movie properties. This can be seen in Figure 1.10.
The Size field indicates the size that the movie will be in the Web browser when it's published. Whatever size you set this to is reflected by the size of your stage background. The next field is labeled Publish. It determines which Flash Player your final movie is playable on. The new ActionScript features introduced with version 6 of the Player don't work if you publish for anything other than Flash 6. Therefore, we won't change this field in any of our games . Essentially, the only reason to use Publish is if you don't have the Flash 6 ActionScript commands and you want users who have older versions of the player to be able to view your movie without downloading the latest player from Macromedia.
Although the Properties panel provides many properties to fiddle with based on the stage object we select, it only lists the most commonly used properties. To access all possible properties of an object, you must use some additional panels. One excellent example of this is the Transform panel.
| Tip | You are encouraged to search around and discover other options and properties in Flash. Rolling up your sleeves and getting your hands dirty is an important part of the learning process. |
EAN: 2147483647
Pages: 161