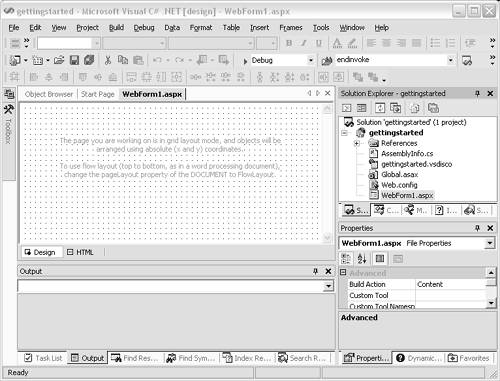
Creating a Web Project with Visual Studio .NET


This book focuses on C# in the context of creating ASP .NET applications, so it's fitting to show how to create a simple one. Perhaps the most common way to create ASP .NET applications is to use Visual Studio .NET.

To create an ASP.NET application with Visual Studio .NET:

  1. Choose Start > All Programs > Microsoft Visual Studio .NET > Microsoft Visual Studio .NET to start Visual Studio .NET ( Figure 1.8 ).

    Figure 1.8. Start Visual Studio .NET to create a Web application. Click New Project.

    graphics/01fig08.gif

  2. Click the New Project button. You will see the New Project Wizard ( Figure 1.9 ).

    Figure 1.9. To create a Web application with visual elements select ASP.NETWeb Application from the list of Visual C# Projects. Notice the ASP.NETWeb Service icon. A Web service is a Web application that doesn't have visual elements. It enables a client program to execute a function in the Web application and get a result via XML rather than HTML.

    graphics/01fig09.gif

  3. On the Project Types side click Visual C# Projects. Then, on the Templates side choose ASP.NET Web application.

  4. The Location field in the dialog will read " http://localhost/WebApplication1 ." Change WebApplication1 to the name you wish to give your application. For this example name it gettingstarted . Then click OK to continue. The project wizard will create a new project and display a Web Form in the editor ( Figure 1.10 ).

    Figure 1.10. Creating an ASP.NETWeb Application with the VS .NETWizard creates a project with a Web Form. The editor displays the empty Web Form.

    graphics/01fig10.jpg

  5. Click View > Toolbox from the top menu. You will see the toolbox window on the left ( Figure 1.11 ).

    Figure 1.11. The Toolbox displays all the available Web controls.

    graphics/01fig11.gif

  6. Double-click the TextBox icon in the toolbox to add a TextBox control to the form.

  7. Double-click the Button icon in the toolbox to add a Button to the form.

  8. Click on the newly created Button control to select it.

  9. Click View > Properties Window from the top menu.

  10. In the Properties window change the Text property to Say Hello, then move the button to the right of the TextBox ( Figure 1.12 ).

    Figure 1.12. In essence, you can draw your Web Form. First you draw the controls onto the form, then you modify their properties.

    graphics/01fig12.gif

  11. Double-click the button control (which now reads Say Hello) to go into the code editor window. The editor will position the cursor inside a new function Button1_Click .

  12. Type TextBox1.Text = "Hello there!"; ( Figure 1.13 ).

    Figure 1.13. Controls have events that trigger when the user interacts with them. For example, the Button control recognizes the Click action. You then write code for the Click event of the button. Double-clicking on the control in the visual designer causes VS .NET to open the code editor and add the control's default event.

    graphics/01fig13.gif

  13. Choose Debug > Start from the top menu bar. You will see Internet Explorer displaying your Web Form with a TextBox and a Button that reads Say Hello.

  14. Click the Say Hello button, and the TextBox control should now read "Hello there!" ( Figure 1.14 ).

    Figure 1.14. Clicking the Say Hello button causes the Web browser to contact the Web server, IIS, and request a new page. IIS then runs your application and triggers the code you entered for the Click event. The code then sets the Text property of the TextBox to Hello there!, which causes the TextBox control to generate an HTML edit control with the phrase Hello there! in it.

    graphics/01fig14.gif

graphics/tick.gif Tips

  • The Web Form you created has two elements to it. It contains an ASPX page with visual elements such as the TextBox and the Button. This page is named WebForm1.aspx by default. The code you typed is saved in a separate file, known as the code-behind file named WebForm1.aspx.cs.

  • When you choose Debug > Start from the menu, Visual Studio .NET enters debugging mode. However, VS .NET compiles your program before entering debugging mode. It takes all the codebehind files and combines them into a single DLL, which it then places into a subdirectory called bin. The DLL's name is the name of the project plus the DLL extension. VS.NET leaves the .aspx visual pages as text files. They will be compiled separately into DLLs by the ASP.NET architecture when requested by the client's browser.


C#
C# & VB.NET Conversion Pocket Reference
ISBN: 0596003196
EAN: 2147483647
Year: 2003
Pages: 198
Authors: Jose Mojica

flylib.com © 2008-2017.
If you may any questions please contact us: flylib@qtcs.net