Section 6.4. cat Your Hard Drive
6.4. cat Your Hard DriveI'll begin with the cat p-to-v process because it was the first p-to-v migration process shown to me (Ron McKelvey developed it and instructed me). More importantly, it works 100 percent of the time with any physical server running any operating system. This is the most difficult p-to-v method by far, but, again, it's worked perfectly every time I've seen someone proficient with Linux use it. If you're not a Linux guru and want to skip ahead to a more "friendly" method, such as the BartPE or other methodologies, that's fine. Just the same, I recommend that everyoneLinux expert or nolook through this methodology and understand its components. The concept of this p-to-v process, or any p-to-v process, is really quite simple: you are making a copy of your hard drive and piping it eventually into a virtual server. With this method, you make a copy of your hard drive at the block level, and then pipe the standard output of the cat command into another file located on a swing server. From the swing server, you pipe it back into a target virtual server. The cat command can be used to display the contents of a file. Linux views everything, including hard drives as files, so running cat against your hard drive generates an output of your hard drive's contents. I don't recommend you do this, but I have, and it's a fast and furious output. However, if you cat your hard drive and redirect the output to somewhere else, say another file, then you have a replica or image of your hard drive. That's what this and (really) all p-to-v methods docreate an image of your hard drive. So let's get to it. Initially, this is a two-step process: cat the hard drive of your source server, pipe it to the swing server, and then from your target virtual server you pipe that copy from the swing server onto the virtual disk of your target vm. The process flow is illustrated in Figure 6.1 Figure 6-1. Source Server Image Flow 6.4.1. cat P-to-V PrerequisitesSome prerequisites to this method are as follows:
6.4.2. cat ProcessThe following is the basic method for catting your hard drive and creating a virtual machine from its standard output:
One caveat to this particular method is that since this is a block-level copy of your hard drive and not an image of its contents, if your physical hard drive is 36GB, your virtual hard drive will need to be 36GB as well. Even if you are only using, for example, 10GB of space on the physical hard drive the virtual hard drive needs all 36GB. Once you've virtualized your server by using a combination of vmkfstoolsx and disk repartitioning tools within the operating system of the virtual server itself, you can easily regain the space no longer needed by the virtual machine (see Figure 6.2). Figure 6-2. Space Use on Hard Drives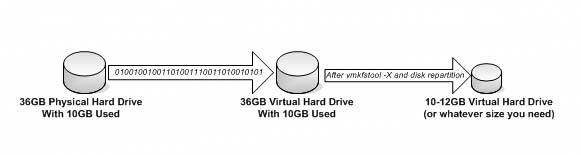 Notice from Figure 6.2 that one of the immediate efficiencies of using virtualization is that you use all the space you need, such as 1012GB instead of wasting one-half to two-thirds of the hard drive. Of course, this p-to-v method can be scripted. A generic version of these scripts is available on this book's Web site. In addition, an advanced version of this process that cuts in half the time it takes to p-to-v your server should also be available there. In using it, you basically pipe the output of the cat command directly into a target virtual machine bypassing the swing serve altogether. See Chapter 11 for more on vmkfstools. |
EAN: 2147483647
Pages: 173