The JButton
|
|
The JButton is one of the most useful objects in the Java GUI library. It allows us to perform an action if the user clicks by implementing an ActionListener. Basically, we make our class that handles the events implement an ActionListener, which in turn allows us to override a method called actionPerformed, which is called every time a button is clicked. Which button was clicked can then be determined by the ActionEvent parameter, which is passed into the actionPerformed method. Let's take a look at an example now to try and make this clearer. In the example we will create three buttons, each of which will update a JLabel to inform you which button was pressed last.
Code Listing 2: Using the JButton object
import java.awt.*; import java.awt.event.*; import javax.swing.*; public class JButtonExample extends JFrame implements ActionListener { public static void main(String[] argv) { JButtonExample mainApp = new JButtonExample(); } public JButtonExample() { super("JButton Example"); setBounds(0, 0, 300, 300); getContentPane().setLayout(null); setDefaultCloseOperation(EXIT_ON_CLOSE); // Create the label... label = new JLabel("No button pressed"); label.setLocation(10, 10); label.setSize(label.getPreferredSize()); // Create the three buttons... button1 = new JButton("Button 1"); button1.setLocation(10, 40); button1.setSize(button1.getPreferredSize()); button2 = new JButton("Button 2"); button2.setBounds(10, 80, 270, 40); button3 = new JButton("Button 3"); button3.setBounds(60, 140, 160, 100); button3.setBackground(new Color(255, 0, 0)); button3.setForeground(new Color(0, 255, 0)); // Add the action listeners button1.addActionListener(this); button2.addActionListener(this); button3.addActionListener(this); // Add the objects to the content pane... getContentPane().add(label); getContentPane().add(button1); getContentPane().add(button2); getContentPane().add(button3); setVisible(true); } public void actionPerformed(ActionEvent e) { if(e.getSource() == button1) { label.setText("Button 1 was pressed last"); label.setSize(label.getPreferredSize()); } else if(e.getSource() == button2) { label.setText("Button 2 was pressed last"); label.setSize(label.getPreferredSize()); } else if(e.getSource() == button3) { label.setText("Button 3 was pressed last"); label.setSize(label.getPreferredSize()); } } JLabel label; JButton button1; JButton button2; JButton button3; } When we execute the JButton example code, we can see that it looks like the following:
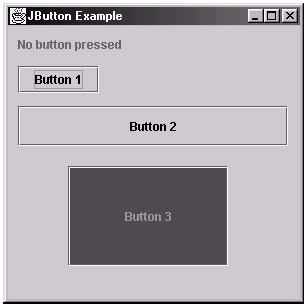
Figure 2: The JButton example application
As you can see from the above figure, our application shows the three buttons that we added. When we press each of the buttons, the JLabel above the buttons is updated to show which button was pressed last. Let's look at the code that we used to create the buttons.
To create Button 1, we simply specify the text to appear on the button by passing it to the JButton constructor (in the same way we set the text for labels). This can be seen in the following line of code:
button1 = new JButton("Button 1"); Next we set the position of the button by calling the setLocation method, and then we use the "preferred" size for the button that ensures the text on the button is visible. Here is the code that we use to accomplish this:
button1.setLocation(10, 40); button1.setSize(button1.getPreferredSize());
For our second button, we use the setBounds method instead of the setLocation and setSize methods to simply specify the dimensions of the button. This can be seen in the following line of code:
button2.setBounds(10, 80, 270, 40);
In this case, the top-left corner of the button will be positioned at 10, 80, and it will be 270 pixels wide and 40 pixels high.
For our final button, we again call the setBounds method, but this time we also set the background color of the button to red and the text color (foreground color) to green. This is achieved with the following two lines of code:
button3.setBackground(new Color(255, 0, 0)); button3.setForeground(new Color(0, 255, 0));
Once we have all our buttons created, we add action listeners to each of the buttons. We do this using the addActionListener method, which is part of the JButton class. In this particular case, the listener is the class itself (as it implements the ActionListener interface), and therefore this is delivered to the addActionListener() method by using the this keyword. The action listener handles the user clicking on the button and allows us to execute code when this happens. Here is our complete actionPerformed method:
public void actionPerformed(ActionEvent e) { if(e.getSource() == button1) { label.setText("Button 1 was pressed last"); label.setSize(label.getPreferredSize()); } else if(e.getSource() == button2) { label.setText("Button 2 was pressed last"); label.setSize(label.getPreferredSize()); } else if(e.getSource() == button3) { label.setText("Button 3 was pressed last"); label.setSize(label.getPreferredSize()); } } Notice how we use the getSource method of the ActionEvent class, which is automatically passed into the actionPerformed method to determine which button the user has clicked. In this example to test if the button1 object was clicked, we use the following segment of code:
if(e.getSource() == button1) { // code to be executed when the button is clicked goes here } | Note | It is also possible to make multiple actionPerformed methods, even one for each button. Sometimes it is useful to make classes handle their own buttons, rather than clutter up a single actionPerformed method. It is also possible to create the actionPerformed class directly when adding the ActionListener for the button, i.e.: button3.addActionListener(new ActionListener( { public void actionPerformed(ActionEvent e) { System.out.println("Button 3 pressed!"); } }); |
Creating an Image Button
Although text buttons allow us to show a string of text to inform the user of the function of the button, it is more likely in a game context that we will require the button to be a set of images that represent the up, over, and down states of the button. This is very easy to implement in Java, as we will see in the following example.
Code Listing 3: Using the JButton object
import java.awt.*; import java.awt.event.*; import javax.swing.*; public class ImageButtonExample extends JFrame implements ActionListener { public static void main(String[] argv) { ImageButtonExample mainApp = new ImageButtonExample(); } public ImageButtonExample() { super("Image Button Example"); setBounds(0, 0, 300, 300); getContentPane().setLayout(null); setDefaultCloseOperation(EXIT_ON_CLOSE); // Create the label... label = new JLabel("No button pressed"); label.setLocation(10, 10); label.setSize(label.getPreferredSize()); // Create the two buttons... button1 = new JButton(new ImageIcon("button1_up.gif")); button1.setPressedIcon(new ImageIcon("button1_down.gif")); button1.setRolloverIcon(new ImageIcon("button1_over.gif")); button1.setFocusPainted(false); button1.setContentAreaFilled(false); button1.setBorderPainted(false); button1.setMargin(new Insets(0, 0, 0, 0)); button1.setLocation(10, 40); button1.setSize(button1.getPreferredSize()); button2 = new JButton(new ImageIcon("button2_up.gif")); button2.setPressedIcon(new ImageIcon("button2_down.gif")); button2.setRolloverIcon(new ImageIcon("button2_over.gif")); button2.setFocusPainted(false); button2.setContentAreaFilled(false); button2.setBorderPainted(false); button2.setMargin(new Insets(0, 0, 0, 0)); button2.setLocation(150, 150); button2.setSize(button1.getPreferredSize()); // Add the action listeners button1.addActionListener(this); button2.addActionListener(this); // Add the objects to the content pane... getContentPane().add(label); getContentPane().add(button1); getContentPane().add(button2); setVisible(true); } public void actionPerformed(ActionEvent e) { if(e.getSource() == button1) { label.setText("Button 1 was pressed last"); label.setSize(label.getPreferredSize()); } else if(e.getSource() == button2) { label.setText("Button 2 was pressed last"); label.setSize(label.getPreferredSize()); } } JLabel label; JButton button1; JButton button2; } When we execute this code with the appropriate image files that can be found in the example directory on this CD-ROM, the following application will be visible.

Figure 3: The Image Button example application
As you can see from this figure, we have loaded images in to represent the buttons. The code is very similar to the previous example, as all we have really changed is the way that we create the JButton objects. Let's look at the code that we have used to create Button 1 now.
First we call the constructor specifying the up image of the button instead of the text that we wish the button to display. The image is loaded by creating an instance of the ImageIcon class, specifying the filename of the image in its constructor. This can be seen in the following line of code:
button1 = new JButton(new ImageIcon("button1_up.gif")); Once our button object is created, we then want to set another two images so that the button will change both when the mouse is over the button and when the button is pressed. This is accomplished by calling the setRolloverIcon and setPressedIcon methods respectively. These functions again take an icon object as the parameter, which is created by means of the ImageIcon constructor. Here are the two lines of code that accomplish this:
button1.setPressedIcon(new ImageIcon("button1_down.gif")); button1.setRolloverIcon(new ImageIcon("button1_over.gif")); Note that it is also possible to specify a disabled image by calling the setDisabledIcon method in the same way the over and pressed images.
Next we need to remove the decorations that Java adds to the button by default, such as the border, focus rectangle (when the button is highlighted), and gray background. This is achieved by calling the following three methods:
button1.setFocusPainted(false); button1.setContentAreaFilled(false); button1.setBorderPainted(false);
Finally we call the setMargin method to remove the preset margin that Java assigns to the button by specifying the insets as 0. This can be seen in the following line of code:
button1.setMargin(new Insets(0, 0, 0, 0));
We then do exactly the same for the second button, except we specify a different location for it to be displayed. Note also that the rest of the example code is the same as the previous example—the exception being that we are only using two buttons instead of three.
|
|
EAN: 2147483647
Pages: 237