Creating Your Own GUI System
|
|
In our opinion, it is better to write your own GUI system to ensure that you have full control over it. C/C++ programmers using DirectX or OpenGL would have to write their own anyway, so writing your own in Java is no different.
A quick note before we start, however. The greatest advantage of creating your own GUI system is that it gives you control of all aspects of it. So we are really saying is this is how we would implement the base of a GUI system, but you may have an equally valid alternative that would suit your purposes better (i.e., using Java's AWT or Swing GUI). But really in our opinion, ours is a pretty solid foundation to work from and build upon.
As we mentioned before, all GUI components in Swing extend the JComponent class, which contains all the base methods that are relevant to all GUI components, such as setting the bounds and the background color, etc. This is a really good system, so we should start by looking at creating a base component class for our GUI system.
We'll call this base component class GUIComponent. Let's first look at the complete class definition, and then we'll go over the purpose of each of the methods.
Code Listing 13-4: The GUIComponent class
import java.awt.*; import java.awt.event.*; public class GUIComponent <> public GUIComponent() <> visible = true; bgColor = Color.black; <> public boolean withinBounds(int x, int y) <> if(x >= this.x && x < this.x+this.w && y >= this.y && y < this.y+this.h) return true; else return false; <> public GUIComponent getComponentAt(int x, int y) <> if(visible && x >= this.x && x < this.x+this.w && y >= this.y && y < this.y+this.h) return this; else return null; <> public void handleMouse(MouseEvent e) <> <> public void render(Graphics g) <> if(visible) <> g.setColor(bgColor); g.fillRect(x, y, w, h); <> <> public void setLocation(int x, int y) <> this.x = x; this.y = y; <> public void setSize(int w, int h) <> this.w = w; this.h = h; <> public void setBounds(int x, int y, int w, int h) <> this.x = x; this.y = y; this.w = w; this.h = h; <> public void setBackground(Color c) <> bgColor = c; <> public void setVisible(boolean v) <> visible = v; <> public void notifyMouseClicked(MouseEvent e, GUIComponent c) <> <> public void notifyMousePressed(MouseEvent e, GUIComponent c) <> <> public void notifyMouseReleased(MouseEvent e, GUIComponent c) <> <> public void notifyMouseDragged(MouseEvent e, GUIComponent c) <> <> public void notifyMouseMoved(MouseEvent e, GUIComponent c) <> <> Color bgColor; int x, y, w, h; boolean visible; <>
Let's look at each of the methods in our base GUIComponent class now, starting with the constructor.
public GUIComponent() <> visible = true; bgColor = Color.black; <>
All we do in the constructor is set the defaults for the component (i.e., we want it to be visible and have the standard background color of black).
Next we create a method called withinBounds, which simply tests if the x, y coordinates passed into the method are within the boundaries of the component or not. If the specified point was within the boundaries, we return true; otherwise, we return false. This can be seen here:
public boolean withinBounds(int x, int y) <> if(x >= this.x && x < this.x+this.w && y >= this.y && y < this.y+this.h) return true; else return false; <>
Now we create a very similar method called getComponentAt, which again takes an x, y coordinate and tests if the point is within the bounds. This time, however, it takes into account whether or not the component is visible and either returns the object if it was within the bounds and visible or null if it was not. This method is used when we implement the mouse handling into the GUI for testing which component the mouse is over. It can be seen in full here:
public GUIComponent getComponentAt(int x, int y) <> if(visible && x >= this.x && x < this.x+this.w && y >= this.y && y < this.y+this.h) return this; else return null; <>
Next on the list to create is the handleMouse method, which does not have any functionality. The method is simply there for us to override if the component that is extending the GUIComponent class requires mouse interaction. We will see later in this section how it is used to handle the mouse input for a button style component.
After the handleMouse method, we implement a basic render method, which will be used to render the component to the supplied Graphics object (passed in as g). Again, it is expected that this method will be overridden by a subclass to correctly render the particular GUI component that is overriding it. However, all the default render method does is render a filled rectangle (using the component's background color) to the supplied Graphics object. The complete definition for the render method can be seen here:
public void render(Graphics g) <> if(visible) <> g.setColor(bgColor); g.fillRect(x, y, w, h); <> <>
Next we have five setter methods that simply allow us to set the bounds of the component (i.e., the position, width, and height), the background color, and finally whether the component is visible or not.
Then we declare another five methods to handle notifications. These are used when we override the GUIComponent class to handle any events that should occur when the mouse performs an action that's not in the bounds of the component. But the component still needs to react to this event (we'll see a good example of these methods when we look at how to create a button later in this example).
That's all there is to the base class. Now comes the clever stuff! What we want to be able to do within the GUI system is have many GUI components on the screen at once and position them within containers so they are relevant to the containers rather than the actual screen. A good example of this is a movable window; when you move a window, all the components inside a window move relative to the parent window, giving the effect that they are contained within the window.
In addition though, it would be useful if we could place containers within containers, as this would allow us to create a completely hierarchical GUI system. See Figure 13-5 for a visual representation of this.
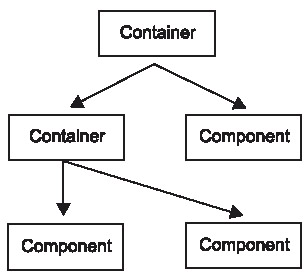
Figure 13-5:
So now let's look at how we can create a container can be used to contain the components and also other containers. Our idea for this is that once all components are added together, we can simply call the render method for what would be our own top-level container, which will proceed to render all component children added to it. We'll look at the complete class definition of GUIContainer first. Then we'll look at the methods in more detail.
Code Listing 13-5: The GUIContainer class
import java.awt.*; import java.awt.event.*; import java.util.*; public class GUIContainer extends GUIComponent <> public GUIContainer() <> componentList = new ArrayList(); <> public GUIComponent getComponentAt(int x, int y) <> if(withinBounds(x, y)) <> x -= this.x; y -= this.y; for(int i=componentList.size()-1; i>=0; i--) <> GUIComponent tempComponent = (GUIComponent) componentList.get(i); tempComponent = tempComponent.getComponentAt(x, y); if(tempComponent != null) return tempComponent; <> if(visible) return this; // i.e., it was not one of the children else return null; <> else return null; <> public void render(Graphics g) <> super.render(g); g.translate(x, y); for(int i=0; i<componentList.size(); i++) <> GUIComponent tempComponent = (GUIComponent) componentList.get(i); tempComponent.render(g); <> g.translate(-x, -y); <> public void add(GUIComponent c) <> componentList.add(c); <> public void remove(GUIComponent c) <> componentList.remove(c); <> ArrayList componentList; <>
The first thing you will probably notice is that we first extend the GUIComponent class, as the container is itself a component but with the ability to contain children (e.g., as containers are components too, a container can contain other containers). For this, it will require some very clever but altogether quite straightforward code.
Keeping in mind that we have all the functionality of the GUIComponent class, we first define a member called componentList, which is simply an ArrayList that will hold a list of all the references to this container's children (other containers and components). As we mentioned before, we want to be able to add components (and containers) to the container and also have the facility to remove them. To do this, all we need is two simple methods, add and remove, which add GUIComponent objects to and remove them from the ArrayList componentList. Note that because this GUIContainer class extends the GUIComponent class, we can cast up easily to a GUIComponent so we can add a GUIContainer reference into the componentList via the same add and remove methods and any object derived from the GUIComponent class, such as the GUIButton that we will make a little later.
For rendering the container, we first need to call the super class's render method (i.e., call the render method of the GUIComponent class), which will simply render a filled rectangle of where the container is (note also that we can make the container invisible by calling the setVisible method with a false parameter, meaning its background will not be drawn). Earlier, we said that components (and containers) within a container should be relative to the actual container, so to do this we simply translate the graphics to the x, y position of this container by calling the translate method of the Graphics object. After this, we then cycle through the list of children (componentList) and for each one we call its render method.
You should now start to see the nifty idea behind this. If the reference in the componentList is a GUIComponent, it will render the component; however, if the reference is a container, thanks to polymorphism, it will call the render method of the container that overrides the render method of the GUIComponent, which will then in turn render its own children, too (which could also contain more containers), running through the entire hierarchy rendering everything. So we get this great recursive system, which will handle all of our rendering perfectly and in a very neat way. Note also that after we finish rendering the children, we translate the Graphics object back to the original position because if we didn't, we could adversely affect any rendering that was performed after the translation. Here is the listing for the render method.
public void render(Graphics g) <> super.render(g); g.translate(x, y); for(int i=0; i<componentList.size(); i++) <> GUIComponent tempComponent = (GUIComponent) componentList.get(i); tempComponent.render(g); <> g.translate(-x, -y); <>
Now let's look at the final method in the GUIContainer class, which is the getComponentAt method (another little stunner!). Recall that in the GUIComponent class, this method checked if the mouse was within the bounds of the component and if it was visible; if so, it returned a reference to itself. So for the container, we are overriding this method and first checking if the mouse is within the bounds of the container. If it is within the bounds, we then adjust the coordinates that we passed in to make them suitable for testing the container's children (remember that all the component's coordinates are relative to the container, so we need to deduct the x, y coordinates of the container to make the passed-in coordinates relative to it).
After this, we then cycle through the list of components backward. Why, you say? Well, we want to get the topmost component that the specified coordinates are within the bounds of. We need to perform this task backward because the list of components is drawn from start to finish in the list order, so the topmost component is at the end of the list, which would be the first to check collisions.
For each component in the list, we call the getComponentAt method and store a reference to the returned object (which will either be a GUIComponent or a null value). Remember that the list componentList can contain both GUIContainer objects and GUIComponent objects, as discussed on the previous page. But again, thanks to the wonder that is polymorphism, this works to our advantage. If the object we refer to, which we are currently calling the getComponentAt method on in the list, is a GUIContainer, it will then call the overridden method (i.e., this one) and check all its children (which again could contain more containers). So after we get the tempComponent object returned from the getComponentAt method, we then check to see if it was a valid GUIComponent reference (i.e., not null), and if so, we return it (which works nicely with the recursion, as it will just filter back through to the top). Finally, if none of the children return any valid references, we resort to returning a reference to the container if it is a visible one, as we have already checked that the coordinates are in this container's bounds. Otherwise, we simply return null. The complete listing for this method can be seen here:
public GUIComponent getComponentAt(int x, int y) <> if(withinBounds(x, y)) <> x -= this.x; y -= this.y; for(int i=componentList.size()-1; i>=0; i--) <> GUIComponent tempComponent = (GUIComponent) componentList.get(i); tempComponent = tempComponent.getComponentAt(x, y); if(tempComponent != null) return tempComponent; <> if(visible) return this; // i.e. it was not one of the children else return null; <> else return null; <>
We just have one part missing from the base of our GUI system now. We need to create a top-level container (think JFrame, JApplet) to control the mouse events through the GUI system. So we have aptly named this final part of the base GUI system the GUISystem class. Here is the complete listing for the GUISystem class:
Code Listing 13-6: The GUISystem class
import java.awt.*; import java.awt.event.*; import java.util.*; public class GUISystem extends GUIContainer <> public void handleMouse(MouseEvent e) <> GUIComponent c = getComponentAt(e.getX(), e.getY()); if(c != null && c != this) c.handleMouse(e); // determine the mouse event type... // notify events lost to last active component switch(e.getID()) <> case MouseEvent.MOUSE_MOVED: if(lastMouseOver != null && lastMouseOver != c) lastMouseOver.notifyMouseMoved(e, c); lastMouseOver = c; break; case MouseEvent.MOUSE_RELEASED: if(lastMouseOver != null && lastMouseOver != c) lastMouseOver.notifyMouseReleased(e, c); lastMouseOver = c; break; <> <> GUIComponent lastMouseOver; <>
As you can see, we extend our GUIContainer class since we want our GUISystem class to be the container that will hold all other containers and components and will also be the controller for mouse input events. So all we have overridden here is the handleMouse method, which was defined originally in the GUIComponent class. For this method, we pass in any mouse events that occur (which are contained within a MouseEvent object, created by the MouseListener and MouseMotionListener interfaces that we looked at in Chapter 10).
So when a mouse event is passed in, we first find out which component the mouse is on top of by calling the getComponentAt method, passing in the x, y position of the mouse that can be retrieved from the MouseEvent object by calling the getX and getY methods. We then store the reference that was returned from this method in a temporary reference to a GUIComponent called c. This can be seen in the following line of code:
GUIComponent c = getComponentAt(e.getX(), e.getY());
Then, if the component that is returned is valid, we simply call the handleMouse method of the component, passing in the MouseEvent object. As we mentioned before, each custom GUI component you create will override the standard handleMouse method declared in the GUIComponent class. So in effect, your component's handleMouse method will be called, and you can then add code to handle the mouse event yourself.
However, in addition, if you recall, we also defined five notify methods for mouse events within the GUIComponent object. This again is because a component may need to react if the mouse performed an action that was not on the component but the component needs to be notified of this event. So we first switch the type of event that the MouseEvent relates to and then call the appropriate notify method. In this GUISystem class we only deal with the MOUSE_MOVED and MOUSE_RELEASED events, but you can add the rest if you need them.
In each of these events, we check if the current object the mouse is over is not the same as the last object. We also check that the last object is not null. Then we simply call the appropriate notify method, again passing in the MouseEvent object. After this, we set the lastMouseOver component to refer to the temporary GUIComponent that we are dealing with at the moment (i.e., c). The switch statement for this can be seen here:
switch(e.getID()) <> case MouseEvent.MOUSE_MOVED: if(lastMouseOver != null && lastMouseOver != c) lastMouseOver.notifyMouseMoved(e, c); lastMouseOver = c; break; case MouseEvent.MOUSE_RELEASED: if(lastMouseOver != null && lastMouseOver != c) lastMouseOver.notifyMouseReleased(e, c); lastMouseOver = c; break; <>
That is our base to the GUI system. We can now extend our GUI by creating custom components. Let's look at how we can create a push button by extending the GUIComponent class. We'll call this new class GUIButton and have a look at the complete definition now:
Code Listing 13-7: The GUIButton class
import java.awt.*; import java.awt.event.*; import java.awt.image.*; public class GUIButton extends GUIComponent <> public GUIButton(Image up, Image down) <> upImage = up; downImage = down; currentState = BUTTON_NORMAL; <> public GUIButton(Image up, Image down, Image over) <> this(up, down); overImage = over; <> public void setButtonListener(GUIButtonListener l) <> listener = l; <> public void handleMouse(MouseEvent e) <> switch(e.getID()) <> case MouseEvent.MOUSE_PRESSED: currentState = BUTTON_PRESSED; break; case MouseEvent.MOUSE_RELEASED: if(currentState == BUTTON_PRESSED) onClick(); currentState = BUTTON_NORMAL; break; case MouseEvent.MOUSE_MOVED: currentState = BUTTON_MOUSE_OVER; break; <> <> public void render(Graphics g) <> if(visible) <> switch(currentState) <> case BUTTON_NORMAL: g.drawImage(upImage, x, y, null); break; case BUTTON_PRESSED: g.drawImage(downImage, x, y, null); break; case BUTTON_MOUSE_OVER: if(overImage != null) g.drawImage(overImage, x, y, null); else g.drawImage(upImage, x, y, null); break; <> <> <> public void notifyMouseMoved(MouseEvent e, GUIComponent c) <> currentState = BUTTON_NORMAL; <> public void notifyMouseReleased(MouseEvent e, GUIComponent c) <> currentState = BUTTON_NORMAL; <> public void onClick() <> if(listener != null) <> listener.buttonClicked(this); <> <> int currentState; public static final int BUTTON_MOUSE_OVER = 0; public static final int BUTTON_NORMAL = 1; public static final int BUTTON_PRESSED = 2; Image upImage; Image downImage; Image overImage; GUIButtonListener listener; <>
We first define the three states that the button can have—up, mouse over, and down—as final integer values and also an integer that holds the current state of the button, which can be seen here:
int currentState; public static final int BUTTON_MOUSE_OVER = 0; public static final int BUTTON_NORMAL = 1; public static final int BUTTON_PRESSED = 2;
Then we create references to the three possible images that the button requires—the up, down, and over images. This can be seen here:
Image upImage; Image downImage; Image overImage;
Once we have the image references, we then create a reference to a GUIButtonListener interface, which looks as follows and should be placed in a file called GUIButtonListener.java.
public interface GUIButtonListener <> public void buttonClicked(GUIButton b); <>
We'll see the use for this listener soon. However, let's now look at the methods in the GUIButton class. Note that we first create the class by extending the GUIComponent class, giving us the functionality of a standard GUI component and also allowing us to use our button with the GUI system (i.e., we will be able to add it to containers, etc.).
First, we define two constructors, one that takes two images (the up and down image) and another that calls the first constructor and then sets an over image for the button. Additionally, the constructors set the currentState of the button to BUTTON_NORMAL, which means that it does not have the mouse over it and is not currently pressed.
Once we have our constructors in place, we then create a simple setter method called setButtonListener, which will take an object that implements the GUIButtonListener interface handle the event of the button being clicked (note this method will be optional, as there will be two ways to handle a button click, which we will see in the example program later in this chapter).
Next we want to override the handleMouse method defined in the GUIComponent class (which has no functionality in it) and replace it with code to handle how the button should react to mouse events. All we need to do here is find out what the event was and set the button state accordingly. This can be seen here:
public void handleMouse(MouseEvent e) <> switch(e.getID()) <> case MouseEvent.MOUSE_PRESSED: currentState = BUTTON_PRESSED; break; case MouseEvent.MOUSE_RELEASED: if(currentState == BUTTON_PRESSED) onClick(); currentState = BUTTON_NORMAL; break; case MouseEvent.MOUSE_MOVED: currentState = BUTTON_MOUSE_OVER; break; <> <>
Note the only special case here is when the mouse button is released over the button (and the button is currently in a pressed state). When this happens, we want to trigger the onClick method, which we will look at now.
Because we have no idea of the purpose of a generic button, we need to allow the user to define the actions to be performed when the button is clicked, so we have given two options for this with our system. The first is to override the onClick method, which can be done on the fly, as you will see in the example application soon. The second is to make your class implement a GUIButtonListener (which we defined earlier) and then set your class to be the listener for the button. If you have not overridden the onClick method, it first checks to see that the listener is a valid reference (not null) and then calls the abstract buttonClicked method, which is declared in the GUIButtonListener interface, passing in the current object as a parameter so the class that is listening can determine which button was clicked (in the same way as you would use the getSource method with standard listeners in Java, such as mouse and keyboard listeners). The definition for the onClick method can be seen here:
public void onClick() <> if(listener != null) <> listener.buttonClicked(this); <> <>
While we are still on the subject of input and the mouse, let's mention the notify methods that we have also overridden from the GUIComponent class. If the mouse has moved or has been released outside the bounds of the button, we want to reset its state back to normal. This functionality is controlled by the GUISystem object itself.
Finally, we have the render method, which again overrides the render method in the GUIComponent class and handles the actual drawing of the button. In this method, we first check if the button is visible; if so, we have a switch statement to determine the state of the button and then draw the appropriate image by calling the drawImage method of the Graphics object, which is passed into the render method. The complete definition for the render method can be seen here:
public void render(Graphics g) <> if(visible) <> switch(currentState) <> case BUTTON_NORMAL: g.drawImage(upImage, x, y, null); break; case BUTTON_PRESSED: g.drawImage(downImage, x, y, null); break; case BUTTON_MOUSE_OVER: if(overImage != null) g.drawImage(overImage, x, y, null); else g.drawImage(upImage, x, y, null); break; <> <> <>
|
|
EAN: 2147483647
Pages: 237