Setting Images for Buttons
|
|
Although text buttons allow us to show a string of text to inform the user of the function of the button, it is more likely in a game context that we will require the button to be a set of images that represent the up, over, and down states of the button. This is very easy to implement using Swing, as we will see in the following example.
Code Listing 13-3: Using the JButton object
import java.awt.*; import java.awt.event.*; import javax.swing.*; public class ImageButtonExample extends JFrame implements ActionListener <> public ImageButtonExample() <> super("Image Button Example"); setBounds(0, 0, 300, 300); getContentPane().setLayout(null); setResizable(false); setDefaultCloseOperation(EXIT_ON_CLOSE); // Create the label... label = new JLabel("No button pressed"); label.setLocation(10, 10); label.setSize(label.getPreferredSize()); // Create the three buttons... button1 = new JButton(new ImageIcon("button1_up.gif")); button1.setPressedIcon(new ImageIcon("button1_down.gif")); button1.setRolloverIcon(new ImageIcon("button1_over.gif")); button1.setFocusPainted(false); button1.setContentAreaFilled(false); button1.setBorderPainted(false); button1.setMargin(new Insets(0, 0, 0, 0)); button1.setLocation(10, 40); button1.setSize(button1.getPreferredSize()); button2 = new JButton(new ImageIcon("button2_up.gif")); button2.setPressedIcon(new ImageIcon("button2_down.gif")); button2.setRolloverIcon(new ImageIcon("button2_over.gif")); button2.setFocusPainted(false); button2.setContentAreaFilled(false); button2.setBorderPainted(false); button2.setMargin(new Insets(0, 0, 0, 0)); button2.setLocation(150, 150); button2.setSize(button1.getPreferredSize()); // Add the action listeners button1.addActionListener(this); button2.addActionListener(this); // Add the objects to the content pane... getContentPane().add(label); getContentPane().add(button1); getContentPane().add(button2); setVisible(true); <> public void actionPerformed(ActionEvent e) <> if(e.getSource() == button1) <> label.setText("Button 1 was pressed last"); label.setSize(label.getPreferredSize()); <> else if(e.getSource() == button2) <> label.setText("Button 2 was pressed last"); label.setSize(label.getPreferredSize()); <> <> public static void main(String[] args) <> ImageButtonExample mainApp = new ImageButtonExample(); <> JLabel label; JButton button1; JButton button2; <> When we execute this code with the appropriate image files, which can be found in the example directory on the companion CD-ROM, the application shown here will be visible.
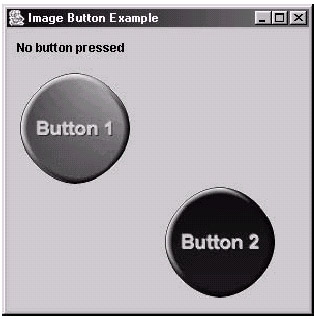
Figure 13-4: The Image Button Example application
As you can see from this figure, we have loaded images in to represent the buttons. The code is very similar to the previous example, as all we have really changed is the way that we create the JButton objects. Let's look at the code that we have used to create Button 1.
First, we call the constructor specifying the up image of the button instead of the text we wish the button to display. The image is loaded by creating an instance of the ImageIcon class, specifying the filename of the image into its constructor. This can be seen in the following line of code:
button1 = new JButton(new ImageIcon("button1_up.gif")); Once our button object is created, we then want to set another two images so that the button will change when both the mouse is over the button and when the button is pressed. This is accomplished by calling setRolloverIcon and setPressedIcon respectively. These functions again take an ImageIcon object as the parameter, which is created by means of the ImageIcon constructor. This handles loading in the image for you. Here are the two lines of code that accomplish this:
button1.setPressedIcon(new ImageIcon("button1_down.gif")); button1.setRolloverIcon(new ImageIcon("button1_over.gif")); Note that it is also possible to specify a disabled-button image by calling the setDisabledIcon method in the same way we did for the over and pressed images.
Next we need to remove the decorations that Java adds to the button by default, such as the border, focus rectangle (when the button is highlighted), and gray background. This is achieved by calling the following three methods:
button1.setFocusPainted(false); button1.setContentAreaFilled(false); button1.setBorderPainted(false);
Finally, we call the setMargin method to remove the preset margin that Java assigns to the button by specifying the insets to zero. This can be seen in the following line of code:
button1.setMargin(new Insets(0, 0, 0, 0));
Then we do exactly the same for the second button, except we specify a different location for it to be displayed. Note also that the rest of the example code is the same as the previous example, the exception being that we are only using two buttons instead of three.
|
|
EAN: 2147483647
Pages: 237