Installing RAM Upgrades
| Adding memory to a system is one of the most useful upgrades you can perform and also one of the least expensive. Boosting a server's available memory is an excellent way to get more performance out of an older server rather than replacing it, and it enables you to support more clients in a given configuration without reducing performance. More memory enables servers to handle a greater number of requests in a given time and provide faster data throughput by increasing the workspace available for data. For example, a study commissioned by Crucial Technology found that a webserver upgraded from 512MB of RAM to 2GB of RAM increased the number of HTTP requests per second and MBps data throughput by more than 70%. Upgrading from 512MB to 4GB provided a performance increase of more than 800% compared to the 512MB baseline and more than 400% compared to the performance at 2GB. (See the study at www.crucial.com/library/server_memory_benchmark_tests.asp for more information.) The following sections discuss adding memory, including selecting memory, installing memory, and testing the installation. Upgrade Options and StrategiesThere are two options for adding server memory:
Note Some servers, primarily very high-end servers, don't use conventional motherboards with traditional memory sockets. Instead, they use modular designs that include proprietary memory cartridges. The memory cartridge, rather than the motherboard, is where memory is installed. To upgrade memory in a cartridge-based system, you remove the cartridge, add additional memory (or remove and then add memory), and replace it in the system. To determine the current amount of memory in your system, you can use system analysis programs such as SiSoftware Sandra (www.sisoftware.net) or the memory-analysis utilities provided by major memory vendors. These programs help you determine the amount of memory currently installed as well as whether your system has empty sockets you can use for upgrades or whether you must remove low-capacity memory to make room for larger modules. To determine at what point you should add memory, you can use the Performance Monitor (Perfmon.msc) that is built into Windows NT Server, Windows 2000 Server, Windows 2000, Professional, Windows XP, and Windows Server 2003. You can launch it remotely or from the server's own console. To check memory usage, you select Memory as the Performance object and enable the following counters:
Linux users can run the command-line tool vmstat on their servers to view memory, CPU, and other factors affecting performance. If vmstat reveals a lot of paging happening frequently, add more RAM to your server. System Performance Monitor 2 (http://sourceforge.net/projects/cspm/) is a graphical performance monitor developed from Complete System Performance Monitor 2. Although you can consult your system documentation to determine what memory to use, the original documentation shipped with your system or server motherboard might not take into account BIOS upgrades or memory products released after the system was designed that are compatible with the system. For those reasons, you should use the memory configuration tools available on most memory vendors' websites. Given the price of server memory and the critical timing factors involved in memory operation, you want to make sure you choose memory that is designed to work in your system. If you need to replace a defective memory module and do not have the system documentation, you can determine the correct module for your system by inspecting the modules that are already installed. Each module has markings that indicate its capacity and speed. (RAM capacity and speed are discussed in detail earlier in this chapter.) If you do not have the documentation for your system and the manufacturer does not offer technical support, you can open your system case and carefully write down the markings that appear on your memory chips. Then contact a module vendor, such as Kingston, Micron (Crucial), or PNY, for help in determining the proper memory modules for your system. Adding the wrong modules to a system can make it as unreliable as leaving a defective module installed and trying to use the system in that condition. Selecting and Installing MemoryInstalling extra memory on your motherboard is an easy way to add memory to your server. Most systems have at least one vacant memory module socket where you can install extra memory to speed up your computer. If your system requires dual-channel memory, as some high-performance systems do, you must use two identical memory modules (of the same size, speed, and type). Many recent servers provide the option to run in dual-channel mode. If you install a single module or install two modules that aren't the same size or have the same performance, the system will run in a lower-performance single-channel mode. Purchasing MemoryWhen you purchase memory, you need to consider several issues. Some are related to the manufacturing and distribution of memory, whereas others depend on the type of memory you are purchasing. The following sections discuss some of the issues you should consider when purchasing memory. SuppliersMany companies sell memory, but only a few companies actually make memory. In addition, only a few companies make memory chips, but many more companies make memory modules such as SIMMs, DIMMs, and RIMMs. Most of the companies that make the actual RAM chips also make modules containing their own chips. Other companies, however, strictly make modules; these companies purchase memory chips from several chip makers and then produce modules with these chips. Finally, some companies don't make either the chips or modules. Instead, they purchase modules made by other companies and relabel them. You can think of memory modules made by the chip manufacturers as first-party modules, and you can think of those made by module (but not chip) manufacturers as second-party modules. Finally, those that are simply relabeled first- or second-party modules under a different name can be called third-party modules. It's a good idea to purchase first- or second-party modules if you can because they are better documented. In essence, they have a better pedigree, and their quality is generally more assured. Furthermore, purchasing from a first or second party eliminates one or more middlemen in the distribution process. First-party manufacturers (that make both the chips and the modules) include Micron (www.crucial.com), Infineon (formerly Siemens), Samsung, Mitsubishi, Toshiba, NEC, and others. Second-party companies (that make the modules but not the chips) include Kingston, Viking, PNY, Simple Tech, Smart, Mushkin, and OCZ Technologies. At the third-party level, you are not purchasing from a manufacturer but from a reseller or remarketer. Most of the large manufacturers don't sell small quantities of memory to individuals, but some have set up factory outlet stores where individuals can purchase as little as a single module. One of the largest memory manufacturers in the world, Micron, sells direct to the consumer (see www.crucial.com). Because you are buying direct, the pricing at these outlets is often highly competitive with the second- and third-party suppliers. Considerations in Purchasing DIMMsWhen purchasing DIMMs, these are the main things to consider:
Currently, DIMMs come in SDR (SDRAM), DDR, and DDR2 versions. Most servers use DDR, but there are some servers now on the market using DDR2 memory. SDRAM, DDR, and DDR2 modules are not interchangeable because they use completely different signaling and have different notches to prevent mismatches. Generally, servers use ECC versions, and servers designed to support very large amounts of memory might require registered DIMMs (registered DIMMs also include ECC support). Registered DIMMs contain their own memory registers (buffer chips), enabling the module to hold more memory than a standard DIMM. DIMMs come in a variety of speeds, with the rule that you can always substitute a faster one for a slower one, but not vice versa. As an example, if your system requires PC2100 DDR DIMMs, you can install faster PC2700 DDR DIMMs but not slower PC1600 versions. Another speed-related issue is CAS latency (sometimes called CL). This is expressed in a number of cycles, with lower numbers indicating higher speeds (fewer cycles). A lower CAS latency shaves a cycle off a burst mode read, which marginally improves memory performance. SDR DIMMs are available in CL3 or CL2 versions, with CL2 being faster. DDR DIMMs are available in CL2.5 or CL2 versions, with CL2 being the faster and better version in that case. You can mix DIMMs with different CAS latency ratings, but the system usually defaults to cycling at the slower speeds of the lowest common denominator. Considerations in Purchasing RIMMsWhen purchasing RIMMs, these are the main things to consider:
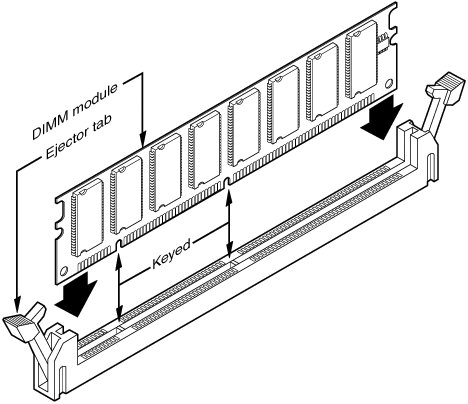
RIMMs are available in 184-pin and 232-pin versions, and although they appear to be the same size, they are not interchangeable. Differences exist in the notches that prevent mismatches. High-reliability systems might want or need ECC versions, which have extra ECC bits. As with other memory types, you can mix ECC and non-ECC types, but when you do, the system can't use the ECC capability. Replacing Modules with Higher-Capacity VersionsIf all the memory module slots on a motherboard are occupied, your best option is to remove an existing bank of memory and replace it with higher-capacity modules. For example, if you have a motherboard that supports two DIMM modules (each representing one bank on a processor with a 64-bit data bus), you could remove one of them and replace it with a higher-capacity version. For example, if you have two 256MB modules, giving a total of 512MB, you could remove one of the 256MB modules and replace it with a 512MB unit, in which case you'd then have a total of 768MB of RAM. However, just because higher-capacity modules are available that are the correct pin count to plug in to your motherboard, you shouldn't automatically assume that the higher-capacity memory will work. Your system's chipset and BIOS set limit the capacity of the memory you can use. You should check your system or motherboard documentation to see which size modules work with it before purchasing new RAM. You should also make sure you have the latest BIOS for your motherboard when installing new memory. If your system supports dual-channel memory, you must use matched pairs of DDR or DDR2 modules (depending on which type your system supports) and install them in the correct location on the motherboard to achieve the superior memory performance that dual-channel access offers. You should see your server or motherboard manual for details. Installing MemoryThis section discusses installing memoryspecifically DIMM modules. It also covers the problems you are most likely to encounter and how to avoid them. Finally, it provides information on configuring your system to use new memory. When you install or remove memory, you are most likely to encounter the following problems:
To prevent ESD when you install sensitive memory chips or boards, you shouldn't wear synthetic-fiber clothing or leather-soled shoes, which promote the generation of static charges. You should remove any static charge you are carrying by touching the system chassis before you begin, or, better yet, wear a good commercial grounding strap on your wrist. You can order one from any electronics parts store. A grounding strap consists of a conductive wristband grounded at the other end through a 1-Megohm resistor by a wire clipped to the system chassis. Be sure the system you are working on is unplugged. Caution Be sure to use a properly designed commercial grounding strap; do not make one yourself. Commercial units have a 1-Megohm resistor that serves as protection if you accidentally touch live power. The resistor ensures that you do not become the path of least resistance to the ground and therefore become electrocuted. An improperly designed strap can cause the power to conduct through you to the ground, possibly killing you. Follow this procedure to upgrade memory on a typical server:
After adding memory and putting the system back together, you might have to run the BIOS Setup and resave with the new amount of memory being reported. Most newer systems automatically detect the new amount of memory and reconfigure the BIOS Setup settings for you. Most newer systems also don't require setting any jumpers or switches on the motherboard to configure it for your new memory. After configuring your system to work properly with the additional memory, you might want to run a memory-diagnostics program to ensure that the new memory works properly. Some are run automatically for you. At least two and sometimes three memory-diagnostics programs are available for all systems. In order of accuracy, these programs are as follows:
The POST is used every time you power up the system. Many additional diagnostics programs are available from aftermarket utility software companies. |
EAN: 2147483647
Pages: 240
- Chapter III Two Models of Online Patronage: Why Do Consumers Shop on the Internet?
- Chapter V Consumer Complaint Behavior in the Online Environment
- Chapter XI User Satisfaction with Web Portals: An Empirical Study
- Chapter XIV Product Catalog and Shopping Cart Effective Design
- Chapter XVI Turning Web Surfers into Loyal Customers: Cognitive Lock-In Through Interface Design and Web Site Usability