Working with COM
|
Working with COM+
The .NET Framework provides full support for COM+. In fact, if you want to create a distributed component that works equally well for managed and unmanaged clients, this is the way to do it. When using COM+ 1.5 (supported on Windows XP and the Windows 2003 Server), you can even make your COM+ application into a Web service by making extremely small changes to the COM+ application setup. In short, you can create a local and remote access setup using relatively little code and few setups. Unlike other technologies, you don’t need separate component setups for each need—one setup does everything. (I’m not saying that COM+ is easy; it’s just better than anything Microsoft produced in the past.) Of course, all of this functionality comes at the price of increased security needs.
| Note | This section doesn’t provide a description of COM+, but does describe security concerns for COM+ in a .NET environment completely. I’m assuming that you already have some knowledge of how COM+ works with the .NET Framework. If you need a good .NET COM+ reference, my book, COM Programming with .NET (Microsoft Press, 2003) contains everything you need. This book also includes message queuing examples, so you can see how disconnected applications work with .NET. |
The following sections look only at COM+ security. Reading them won’t make you a COM+ wizard. However, you’ll find that even security can become interesting when you don’t do a little advance planning. These sections help you get your component started in the right direction.
Creating a COM+ Component
From a functional perspective, the component in this example isn’t much different from the one shown in Listing 8.3. In fact, I purposely made them similar for comparison purposes. Listing 8.5 shows a version of the MathFunctions class designed to work in a COM+ environment. Notice that I changed the [Guid] attributes to ensure this component doesn’t clash with the one in the previous example. You’ll find this example in the \Chapter 08\C#\COMPlusComp and \Chapter 08\VB\COMPlusComp folders of the source code located on the Sybex Web site.
Listing 8.5 Creating Math Function Methods for the COM+ Environment
// Control the COM+ access requirements. [assembly: ApplicationAccessControl( true, Authentication = AuthenticationOption.Call, AccessChecksLevel = AccessChecksLevelOption.ApplicationComponent, ImpersonationLevel = ImpersonationLevelOption.Default)] namespace COMPlusComp { [Guid("19D3ED98-1F80-4983-89CA-CA84FD054110"), InterfaceType(ComInterfaceType.InterfaceIsDual)] public interface IMathFunctions { Int32 DoAdd(Int32 Value1, Int32 Value2); Int32 DoSubtract(Int32 Value1, Int32 Value2); Int32 DoMultiply(Int32 Value1, Int32 Value2); Int32 DoDivide(Int32 Value1, Int32 Value2); } [Guid("A4A59B2B-08FC-48d7-9D56-F9EA915242EE"), ClassInterface(ClassInterfaceType.None)] public class MathFunctions : ServicedComponent, IMathFunctions { public Int32 DoAdd(Int32 Value1, Int32 Value2) { return Value1 + Value2; } public Int32 DoSubtract(Int32 Value1, Int32 Value2) { return Value1 - Value2; } public Int32 DoMultiply(Int32 Value1, Int32 Value2) { return Value1 * Value2; } public Int32 DoDivide(Int32 Value1, Int32 Value2) { return Value1 / Value2; } } } The first piece of code to consider is the assembly level [ApplicationAccessControl] attribute. Always set this attribute to true because otherwise, your component won’t use COM+ security (unless the administrator sets it up manually). The remaining properties define various security elements. The administrator can change these elements, but at least the code provides a starting point and sets the security to a reasonable default level if the administrator doesn’t configure it. Here’s a description of each property:
Authentication This property defines how the server authenticates the caller. The default level only checks the caller’s credentials at the beginning of a session. This option ensures that the application functions at the maximum speed that still allows some level of authentication check. However, checking the credentials during each call is far more secure, especially if you plan to use this component as part of a Web services solution.
AccessChecksLevel This property determines how far COM+ applies security checks to a component. You can choose to check security at just the process level. However, it’s a lot more secure to perform checks at the component, interface, and method levels as well. The AccessChecksLevelOption.ApplicationComponent option does incur a small performance penalty, but the benefit is that you can perform security checks at a granular level. For example, you can grant individual users access to one method, but not another, depending on the role they perform in the organization.
ImpersonationLevel This property determines how the component can impersonate the caller when it requires services from another component or service. Impersonation is important because it allows the component to request resources on behalf of the caller. If you set this property to ImpersonationLevelOption.Anonymous, at least some calls will fail due to a lack of resources or services. The ImpersonationLevelOption.Delegate option can become dangerous because it gives the component the ability to impersonate the caller at any level. The ImpersonationLevelOption.Default option shown in the code is the safest setting because it changes the impersonation level to meet enterprise policies.
The other major change in this component code is that it derives from the ServicedComponent class. Even though the Microsoft documentation just assumes that everyone will derive from this class, the fact is that you can use the code from Listing 8.3 just fine from COM+. You can also derive from the Component class, should you wish to. However, deriving from the ServicedComponent class is safest from a security perspective because it provides full access to all of the required COM+ interfaces, including those used to perform full security checks. For example, you’ll want to check the caller’s role in some cases and that means creating the required COM+ interface. The disadvantages of this particular class are that it adds a little to the size of your component and can incur a small performance penalty.
Working with the SecurityCallContext Class
Now that you have a component to use, let’s discuss how you use those interfaces in a little more detail. The main security interface that you need to know about when creating a COM+ component is ISecurityCallContext. You’ll find the functionality of this unmanaged interface in the SecurityCallContext class of the EnterpriseServices namespace. Don’t add a reference to the COM+ Services Type Library to your application to gain access to the ISecurityCallContext support. The IDE will allow the addition, but it’s important that you use the SecurityCallContext class members instead because they provide full marshaling of any data.
The SecurityCallContext class provides access to the security data for a particular component in a particular context. What this means to you as a developer is that you determine what role the current user is in and what their rights are. The fact that this interface is for a particular context means that you can only work with the request associated with this particular instance of the component. In addition, you won’t be able to gain information about the component as a whole.
This interface is normally accessible to your COM+ component if the administrator enables role-based security, but you won’t always need to use it. The only time you’ll need to use the methods of this class is when you decide to handle security within the component, rather than allow the administrator to handle security as part of the component’s configuration.
You’ll normally use the SecurityCallContext class methods to learn specific kinds of information about the current component context. All of this information is contained in the security call context collection—essentially an array of information about the currently executing instance of your component. Here’s a list of the information that you can obtain from the security call context collection.
-
Number of callers
-
Minimum authentication level
-
Callers
-
Direct caller
-
Original caller
In addition to the security call context collection information, the SecurityCallContext class helps you to determine if a caller or user is in a specific role. You’d use this kind of information to either grant or reject a request for access to specific methods within the component. You can also determine if the administrator has enabled role-based security for this component (versus being available on the server).
Now that you have a little better idea of what the SecurityCallContext class can do for you, let’s look at the available methods. Here’s a list of the methods that you’ll use most often.
IsCallerInRole This method determines whether the direct caller is in a specified role. Although the method doesn’t list all of the roles that the caller is in, it does allow you to determine whether the caller is a member of the role you specify. You can use this method to determine whether a caller should have access to a specific method or resource within the component.
IsUserInRole This method performs essentially the same task as IsCallerInRole, but for a specific user. The difference between the caller and a user is that the caller is the one currently using the component. The user call can refer to any user who has access to the server—not necessarily the user making the current call.
The SecurityCallContext class also supports a number of interesting properties. In most cases, these properties replace method calls used by the ISecurityCallContext interface, which means you need to consider which technique will work best. Here’s a list of common properties.
Callers This property returns one or more SecurityCallers objects. Each object describes a specific caller in the list of callers to the component method. Consider this a paper trail type of property. This property accesses the Callers item in the ISecurityCallContext collection in COM+.
CurrentCall This static property obtains a SecurityCallContext object for the current call. Essentially, this is your gateway for gaining access to the information provided by the ISecurityCallContext interface.
DirectCaller This property returns the SecurityIdentity object for the direct caller of this method. The direct caller is the last caller in the caller hierarchy list. Use this property to determine whether the last caller in the list has the proper rights to request access to the component. Otherwise, there’s little point in continuing to process the request.
IsSecurityEnabled This property determines whether the administrator has enabled role-based security for this instance of the component. The method won’t determine whether the administrator has enabled role-based security for other instances of the component.
MinAuthenticationLevel This property returns the security information for the least secure caller in the caller hierarchy. By examining this property, you can determine if any of the callers in the caller chain lack the proper credentials for component access.
NumCallers This property returns the number of callers in the caller list. This property accesses the NumCallers item in the ISecurityCallContext collection in COM+.
OriginalCaller This property returns the SecurityIdentity object for the original caller of this method. The original caller is the first caller in the caller hierarchy list. Use this property to determine whether the first caller in the list has the proper rights to request access to the component. Sometimes the original caller tries to overcome security issues by hiding behind the rights of another caller.
Adding Security to a COM+ Application
At some point, you’ll create a COM+ application using Component Services and add the example component to it. I’m assuming you know how to perform those tasks and won’t cover them here. (The example COM+ application has a name of TestCOMPlus, as you’ll see in the figures in this section.) Figure 8.2 shows the general setup I’ve used for this example, including all of the interfaces added by the SecurityCallContext class and the IMathFunctions interface added by the component.
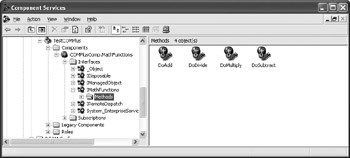
Figure 8.2: The COM+ application setup for this example
Unfortunately, many developers stop immediately after setting up security and never get any further. Theoretically, you could get by without adding security since Windows already protects the application. However, role-based security is one of the features of COM+ that makes life a lot easier for network administrator and developer alike because you can refine the security measures used to protect a component, the interfaces it contains, and the methods required to perform the application’s work. Unlike Windows security where you have to use a one-size fits all approach to security, role-based security allows you to base security on the work a user will perform.
Adding COM+ Component Roles
To add role-based security to the component, you’ll need to create at least one, preferably two, roles. We’ll call the first role Administrator so that someone logged in as this role will be able to access all of the methods within the COMPlusComp component shown in Listing 8.5. The second role can be any other value, but for this example, we’ll use User. The User role will be able to access just the four math functions.
-
Highlight the Roles folder, then use the Action>New>Role command to display the Role dialog box.
-
Type a name for the role, and then click OK. For the example, use Administrator for one role and User for the second.
-
Open the Administrator (or User) folder, and then highlight the Users folder. Use the Action>New>User command to display the Select Users or Groups dialog box shown in Figure 8.3. You’ll choose the users that can access components using the Administrator role at this point.
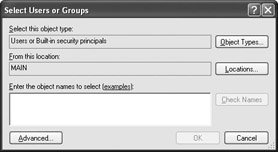
Figure 8.3: Choose which users or groups will perform the task specified by the role. -
Type the users or groups that you want to include for each role in the field provided. The example uses the Administrators group for the Administrator role and a test user for the User role. Make sure you separate multiple entries using a semicolon and that you use the proper form for the entries. If you want Windows to do the work, click Advanced and you’ll see a Select Users or Groups dialog box that will help you find individual users or groups.
-
Click OK. Component Services will add the selected users or groups to the Users folder for the appropriate role in the Component Services window.
-
Repeat Steps 1 through 5 for the User role. However, in this case, use your own name, a test username, or the Users group instead of the Administrators group for the Users folder. Figure 8.4 shows a typical example of the security setup for this example. Obviously, any production components you create will have a more complex security setup that allows users to access the components you create in specific roles.
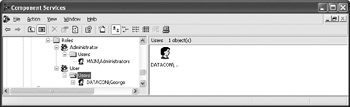
Figure 8.4: Creating a typical role-based security setup
Changing COM+ Component Security
COM+ doesn’t include security at just one level—you need to monitor it at the application, component, interface, and method levels. To check application level security, right-click the TestCOMPlus entry, and then choose Properties from the context menu. You’ll see TestCOMPlus Properties dialog box. Choose the Security tab of this dialog box and you’ll see the security options shown in Figure 8.5. This dialog determines the kind of security an application will use.
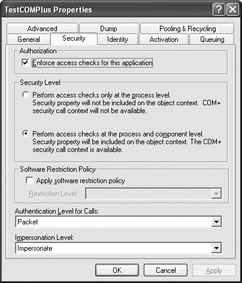
Figure 8.5: Set security at the application level before you can use role-based security.
| Warning | You can’t use role-based security with library applications. This feature only works with server applications, which means that library applications are inherently less secure than server applications. The Component Services console will let you set role-based security for a library application, but generally, this change results in a malfunctioning application, rather than a secure application. Library applications are also less secure because they execute in the client memory space, rather than on the server. A cracker could use a variety of methods to gain access to the component image in memory and save it to a local disk drive. |
You need to consider two of the settings in this dialog box. First, make sure you check the Enforce access checks for this application option. This setting enforces security at the component, interface, and method levels. Second, make sure you allow access checks at both the process and component levels. That’s the second option in the Security level group shown in Figure 8.5 (the figure shows the Security level properly configured). You need to select this option if you plan to use role-based security within your components as well. Otherwise, your components will be limited to whatever security Windows provides at the application level.
The next security level is the component. To check component security, right-click the COMPlusComp.MathFunctions component and choose Properties from the context menu. You’ll see a COMPlusComp.MathFunctions Properties dialog box. Click the Security tab and you’ll see a dialog box similar to the one shown in Figure 8.6. Notice that both of the roles you’ve created are available for use with this component.
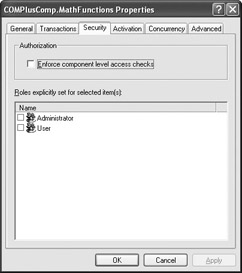
Figure 8.6: You can use any roles that you’ve created for a COM+ application at all application levels.
As you can see in Figure 8.6, none of the role-based security options are checked. The way that the Security tab of the COMPlusComp.MathFunctions Properties dialog box is set, no one can access the component right now. What you’ll need to do is check the roles that you want to access the component. Let’s assume that the Administrator role will have full access to this component, so check the Administrator entry, then click OK to make the change permanent.
Now, let’s look at the effect of your decision at a lower level of the application. Right-click the IMathFunctions interface (located in the Interfaces folder for the application), and then choose Properties from the context menu. Click the Security tab. Notice that you still have two options to choose from with regard to role-based security, but that Administrator appears in the Roles Inherited by Selected Item(s) list box. This means that you don’t have a choice about the Administrator role—anyone in this role already has access to this interface. You’ll find that the same rule holds true for methods. In other words, everyone in the Administrators group can access everything that this component has to offer. On the other hand, the Users role still hasn’t been defined.
Right-click the DoAdd entry in the Methods folder and choose Properties. Select the Security tab. You’ll see the same list of inherited roles and defined roles as before. This time, select the User role and click OK. The User role now has access to the DoAdd() method. Perform the same task for the other three simple math entries: DoSubtract, DoMultiply, and DoDivide.
|
EAN: 2147483647
Pages: 168