Using File Check In and Check Out
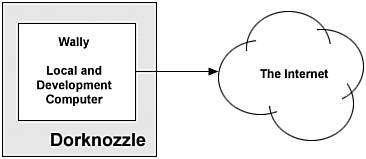
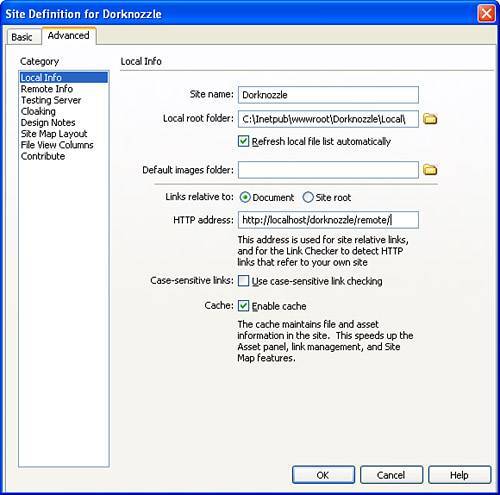
| As I've just mentioned, your collaborative team can use Dreamweaver's file Check In and Check Out functionality to work with individual files. The benefit to using file Check In and Check Out is simple and is best explained given the following scenario. Assume that you're working in a team of two or more developers. Also assume that although you're the primary developer for the project, a second developer decides to help you out and copies a file from the remote server to his local computer to do some work on the file. Unbeknownst to the other developer, you've already copied the file and begun doing work on it. When you've finished work for the day, you copy the file back to the remote server and assume everything is fine. The other developer, thinking he's helping you out, makes changes to the file and also uploads the file to the remote server, essentially overwriting all the work that you just spent a better part of a day working on. Situations such as this can easily be prevented by enabling and working with the file Ccheck In and Check Out features built directly into Dreamweaver. Working with these features, however, requires some initial setup. Up until this point we've been working specifically with local files, meaning that you downloaded the files from the book's web site, you extracted them, copied them to a folder on your hard drive, and then defined a site directly to the local files in Dreamweaver. With file Check In and Check Out, this simplistic model wouldn't make sense. Remember that file Check In and Check Out assumes that you're working with teams. Members of your team won't be connecting directly to your computer; instead, they'll be connecting to a remote server, possibly even the company's web server. The remote server in this case not only acts as the web server, but as a central repository for web files. Because this is the case, we'll have to emulate our fictitious company's web architecture model by defining a remote server (the fictitious company's web server) and a local site (your computer). When we're finished, the model will resemble Figure 12.1. Figure 12.1. The ideal scenario has you as a single developer connecting to a remote computer that acts as the company's web server.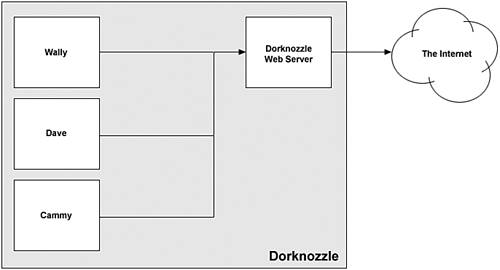 Before you scramble to find a web hosting provider, it's important to understand that the file Check In and Check Out features can easily be integrated with computers that reside within the same network (because your company's web server could be a computer that resides on the company's network). What this means is that you can work with examples in this chapter using your computer (assuming your computer is the development and web server) or two computers that might share the same network. If you're using your computer as both the development and web server, your web architecture model might resemble Figure 12.2. Figure 12.2. Realistically, many readers of this book will be developing and testing from the same computer they use to access the Internet.
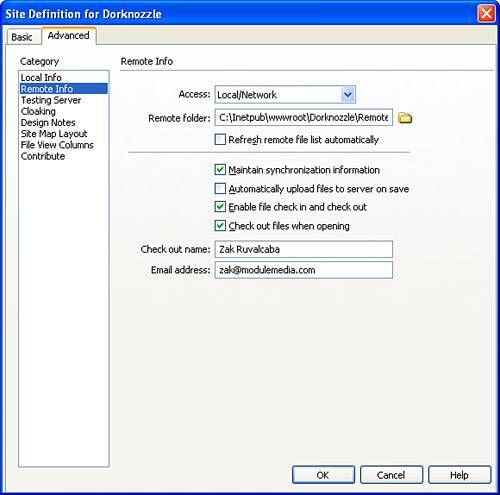
Either model you choose to implement is fine. Although the first model is much more flexible when it comes to working in teams, the second model works just fine for the examples in this chapter. NOTE If you've downloaded the files form the web site, you'll notice that files contained in the Dorknozzle folder are separated into two folders called Local and Remote. I'll make the assumption that most readers of this book don't have a second server running on their home network or don't have the ability to connect to a web hosting provider. Because this is the case, I'll run through the examples in this chapter using the second model, shown in Figure 12.2. Enabling Check-In and Check-OutNow that you understand the model that the file Check In and Check Out functionality works under, let's set it up. To do this, follow these steps:
Before we start checking out files, we'll want to synchronize the local folder with the files contained in the remote folder. This will ensure that the files in the local folder are exact copies of those in the remote folder. You can synchronize the files by following these steps:
Now you can click the Expand/Collapse icon in the Files panel to expand the Files panel into the Site Management window. As you can see from Figure 12.5, the remote files (located in the C:\Dorknozzle\Remote\ folder) appear in the left pane while the local files (located in the C:\Dorknozzle\Local\ folder) appear on the right. Figure 12.5. Opening the Site Management window reveals the remote files on the left and the local files on the right.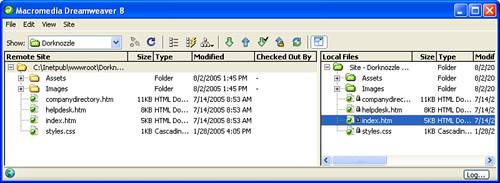 Also notice that the local files appear with small lock icons next to them. Because we haven't checked these files out, we can view them in only read-only mode. To edit these files, we'll have to check them out. Let's do that now. Checking Files In and OutNow that you've enabled the Check In and Check Out feature, you can begin using it for the Dorknozzle project. To do so, simply right-click a file in the Files panel and choose the Check Out option from the context menu. Dreamweaver then asks you if you want to include dependent files when checking out the HTML file. Because we have read-only copies in our local folder, we'll select No. As you can see from Figure 12.6, the file is checked out to you. Figure 12.6. The file is checked out to you. You can tell by the icon change and the user's name in the Checked Out By column.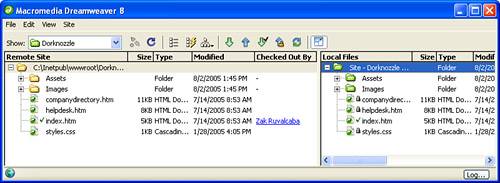 TIP When we defined our site in Chapter 4, "Dreamweaver Site Management," we enabled the Check Out Files When Opening check box. Because this is the case, we need only to open the local file (by double-clicking to open it) in Dreamweaver. As soon as you do this, the file is automatically checked out. You can tell the file is checked out to you because the file's icon changes from a lock icon to a green check mark icon. This means the file is checked out. Furthermore, your name appears in the Checked Out By column. As you can see, these properties are set in both the Remote and Local panes. What this means is that when a member of your collaborative team defines a site to the same remote folder, your name appears as the user who has checked out the file. If the other user tries to check out the same file, he won't be able to. He can only view the file, not write to it. Now that the file has been checked out to you, you can open it and make any necessary changes. When you finish, you can check it back in by right-clicking the file in the Files panel and choosing the Check In option. If you check out a file and aren't happy with the changes you've made, you can also select the Undo Check Out option from the context menu. This command replaces the local file with the last version that was checked in from the remote. |
EAN: 2147483647
Pages: 237