Using Toolbars


Using Toolbars

A toolbar is similar to a menu because it categorizes related commands to make it easier for you to perform a specific task. Toolbars use a graphical representation, or button, rather than a menu-based text representation. Even though toolbars use buttons rather than text, you can still display a text description of what the button does by pausing the mouse over it. A ScreenTip appears, identifying the button's function. Figure 1.5 illustrates a ScreenTip.

Figure 1.5. ScreenTips identify toolbar buttons.

graphics/01fig05.jpg

graphics/troubleshoot_icon.jpg

ScreenTips don't appear ? See the " Troubleshooting " section near the end of the chapter.


The Standard and Formatting toolbars are the two most commonly used PowerPoint toolbars. Table 1.1 describes the buttons on the Standard toolbar, which you'll use frequently in PowerPoint.

NOTE

You can switch between displaying the Standard and Formatting toolbars on either two rows or one with the Show Standard and Formatting Toolbars on Two Rows check box on the Options tab of the Customize dialog box. Open this dialog box by selecting Tools, Customize. Although it's usually easier having access to all these buttons on two rows, you might want to combine these toolbars if you want to save screen space.


To view a table of the buttons on the Formatting toolbar, see "Using the Formatting Toolbar" in Chapter 3, "Working with Text," p. 67 .
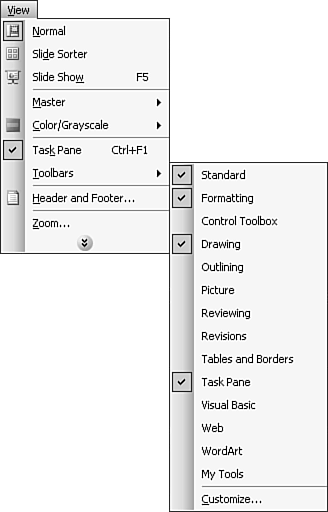

Table 1.1. Standard Toolbar Buttons

Button

Name

Description

graphics/new1.gif

New

Creates a new presentation and opens the New Slide dialog box in which you can choose from a variety of slide layouts.

graphics/open.gif

Open

Opens the Open dialog box from which you can open an existing presentation.

graphics/save.gif

Save

Opens the Save As dialog box in which you can save your open presentation.

graphics/permission.gif

Permission

Lets you control who can open or change the document and set expiration dates to end their access.

graphics/email.gif

E-mail

Creates an email message with your presentation attached as a file.

graphics/print.gif

Print

Prints the presentation on the default printer.

graphics/preview.gif

Print Preview

Displays the current presentation in Print Preview.

graphics/spelling.gif

Spelling

Checks the spelling and style of the open presentation.

graphics/cut.gif

Cut

Cuts the selected text or object, which is deleted from the presentation, and places it on the Clipboard.

graphics/copy.gif

Copy

Copies the selected text or object, which remains on the presentation, and places it on the Clipboard.

graphics/paste.gif

Paste

Pastes the selected Clipboard object into the location in the presentation you specify. If you haven't selected an object, the most recently cut or copied object is pasted.

graphics/painter.gif

Format Painter

Copies the format of the selected text or object and applies this formatting to the next object you click.

graphics/undo.gif

Undo

Undoes the last action.

graphics/redo.gif

Redo

Does the previous action again.

graphics/insertchart.gif

Insert Chart

Activates Microsoft Graph, with which you can insert a chart in your presentation.

graphics/inserttable.gif

Insert Table

Displays a palette in which you can choose the size of table you want to insert.

graphics/border.gif

Tables and Borders

Displays the Tables and Borders toolbar.

graphics/hyperlink.gif

Insert Hyperlink

Opens the Insert Hyperlink dialog box, from which you can insert a hyperlink to a Web page, email address, or another document or presentation.

graphics/xlsheet.gif

Insert Microsoft Excel Worksheet

Places an Excel worksheet in the current slide.

graphics/expandall.gif

Expand All

Expands the content of the Outline tab in Normal view to display all titles and body text for each slide. Click the button again to contract the outline.

graphics/showformatting.gif

Show Formatting

Displays text formatting in the Outline pane.

graphics/grid.gif

Show/Hide Grid

Displays and hides a grid on your presentation, which you can use to more accurately position objects on your slides.

graphics/color.gif

Color /Grayscale

Opens a menu that lets you preview your presentation in color, grayscale, or pure black and white.

graphics/zoom.gif

Zoom

Lets you select a zoom percentage from the drop-down list from 25% to 400%, or enter your own percentage from 10% to 400%.

graphics/help.gif

Microsoft PowerPoint Help

Opens the Help task pane.

Displaying Toolbars

To open and close toolbars manually, choose View, Toolbars and then select or deselect toolbars from the list of available options. Figure 1.6 shows this menu and the available toolbars.

Figure 1.6. Select a toolbar from this menu to display it.

graphics/01fig06.gif

To learn how to customize and modify PowerPoint toolbars to fit your needs, see "Customizing Toolbars" in Chapter 21, p. 430 .


Moving Toolbars

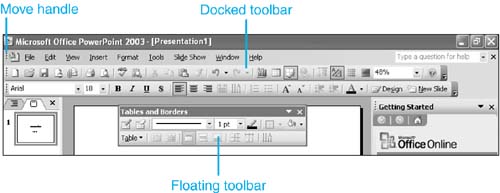
You can easily move a toolbar to a new location. How you do this depends on whether the toolbar is docked or floating . Figure 1.7 illustrates both types of toolbars.

Figure 1.7. You can move PowerPoint toolbars to make the program easier to use.

graphics/01fig07.jpg

To move a docked toolbar, drag the move handle on its left side to a new location. To move a floating toolbar, drag its title bar. You can easily switch a toolbar from docked to floating and vice versa. To float a docked toolbar, drag it to another location on the screen. To dock a floating toolbar, drag it to the edge of the window.

TIP

You can resize a floating toolbar by dragging on any side. This way, you can display the buttons straight across in one row or in several rows, depending on which way you like best.


graphics/troubleshoot_icon.jpg

Can't find a toolbar button you've used before ? See the " Troubleshooting " section near the end of the chapter.


Special Edition Using Microsoft Office PowerPoint 2003
ISBN: 0789729571
EAN: 2147483647
Year: 2003
Pages: 261

flylib.com © 2008-2017.
If you may any questions please contact us: flylib@qtcs.net