Linking Office Objects
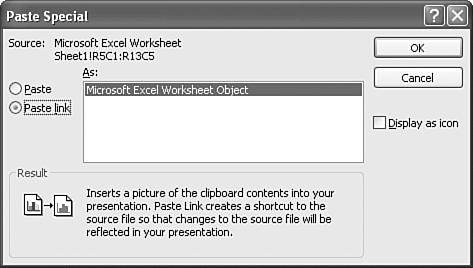
| By now, you've probably used the Clipboard to cut or copy content between and within Office applications. The Clipboard is one of the most significant tools that Windows offers, and Office makes it even more powerful by letting you cut, copy, and paste several objects as a group or one at a time. Despite all that power and convenience, the pasting process is limited. For example, after you paste an Excel chart into your PowerPoint slide, the pasted chart doesn't reflect any changes you make to the original Excel chart or its data. Simple pasting establishes no connection between the copied chart and its source. To establish such a connection, you must link the source and the target so that the target can be kept in sync with the source. Using Paste Special to Create a LinkThe Paste Special command lets you control the format of what you paste. You can establish a link between two applications using the Edit, Paste Special command, as these steps explain:
After you insert the linked object, test the linkgo back to the source application and make a change to the content. Switch back to the target slide, and view the updated content. It now reflects the change made to the source. NOTE You can resize the linked object by dragging diagonally from the object's corner handles. Drag inward to shrink the object, outward to increase its size. CAUTION Excel doesn't work properly unless you make sure that you save the workbook file before creating the link the first time.
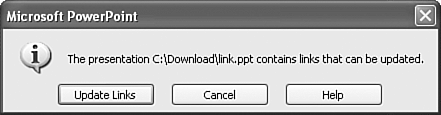
Updating LinksAfter a link is established, PowerPoint asks you whether you want to update that link each time you open the target presentation (see Figure 19.3). Figure 19.3. You can update the target file with any changes that have been made to the source content. This lets you choose whether to allow any changes that have occurred in the source document to update the linked content in your PowerPoint presentation. To update, click the Update Links button. TIP Why would you choose not to update your target file? Maybe you need to print the presentation with the older data or save it before changes are made. Or perhaps your presentation pertains to second quarter sales, and the source content has been updated with third quarter data, which you're not ready to use. If for any reason you want to maintain the target data in its current form, click Cancel. If you choose not to update the links when you open the file, you can always update them later by following these steps:
Maintaining LinksFor the most part, links you establish between files with Paste Special require little or no active maintenance on your part. To be sure that your links remain intact, simply follow these basic rules:
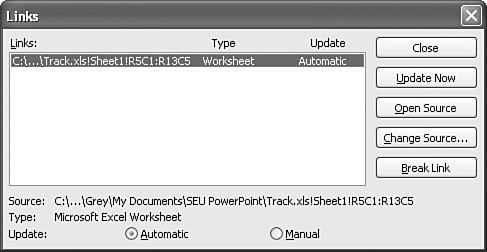
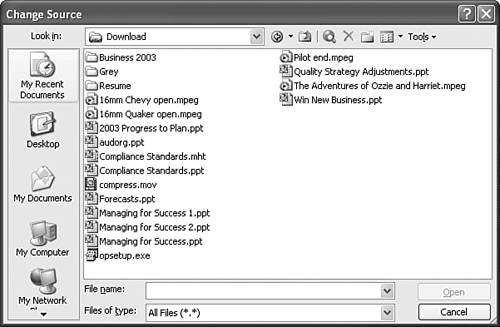
If you must move or rename either the source or target file, you will have to reestablish the link through the Links dialog box while in the target file. Click the Change Source button and navigate to the source file's new location, as shown in Figure 19.5. Figure 19.5. The Change Source dialog box lets you find, select, and reestablish a link between a source and target if one of the files has been moved or renamed . When you change your source document, remember that it is linked to a target file. Whether you're editing content or applying formats, make sure that these changes are useful in the target document. If you need to make changes to the source that won't be appropriate in the target, consider breaking the link. You'll have to update the former target manually (to make content changes), but you won't risk unwanted changes to the target file. CAUTION If you aren't the only person using the source or target file, be sure to alert other users to changes you make to the source that might not be appropriate in the target file. If another user chooses to update a link, he might be unhappy with the resulting changes. Removing the Link Between Source and Target FilesAfter you establish a link, it remains in force (even if updates between the source and target are rarely or never performed) unless one or both of the files are moved or renamed. Moving or renaming either the source or target file breaks the link between the files because the files can't find each other anymore. Although this method technically breaks the link, it doesn't do a very clean job. The target document continues to store a record of a link to a moved or renamed file. To make a clean break, severing all ties and any record between your source and target files, follow these steps:
After you break the link, the pasted content remains in the target document, but it retains no connection to the source data. Changes you make to the source don't appear in the target, and when you open the target file, PowerPoint doesn't ask you to update your link. NOTE A linked paragraph or table from Word or a worksheet section from Excel is seen as an object. After a link is broken, the pasted content is seen as a picture, a simple graphic component of your slide. TIP One benefit of breaking a link by moving or renaming the source or target file is that the link can be reestablished easily by putting the file back where it was or renaming it to the original filename. Many users use this technique to make a temporary break, allowing changes to the source without the risk of updating the target until it becomes appropriate. |

EAN: 2147483647
Pages: 261