Configuring Network Components
To add or change the settings for core network components such as clients, services, and protocols, open the Network And Dial-Up Connections folder, right-click the Local Area Connection icon, and choose Properties from the shortcut menu. This procedure opens the Local Area Connection Properties window shown in Figure 6-6, which you can use to view and change your server's networking components.
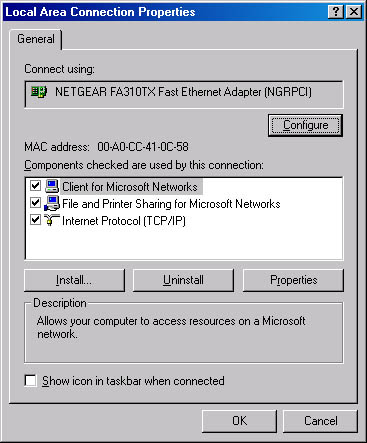
Figure 6-6. The Local Area Connection Properties window.
The top of the dialog box shows the network adapter to which you are binding networking services. Beneath that is the media access control (MAC) address for the network interface card, the unique identifier of your network card that is used for communications with other hosts in your subnet.
To install a network component, select Install, choose the type of component you want to install (Client, Service, or Protocol), and then click Add. Select the component from the list presented and click OK. To configure the component (if the component has a configurable option), select the component and click Properties.

TIP
If you have a multihomed server (a server with more than one network adapter), give your local area connections a name indicating to which network the adapters are connected.
Configuring TCP/IP
TCP/IP is the most important protocol in today's networks, and it's the backbone for Microsoft's vision of networking in Windows 2000. The protocol is well-suited to enterprise networking, and it's required for accessing the Internet. If you're unfamiliar with TCP/IP, see Chapter 13 for an introduction.

PLANNING
Before installing and configuring protocols on your network, review the checklists in the Windows 2000 Help files. Once you understand the following three areas, you can install all the necessary interlocking pieces.
- TCP/IP concepts such as IP addressing, subnet masks, and gateways
- Whether your network supports DHCP to configure TCP/IP dynamically
- How computers on your network will handle name resolution
Installing TCP/IP
TCP/IP is installed as the default network protocol if a network adapter was detected during installation. If the default was overridden during installation, you can add TCP/IP by following these steps:
- Click the Start button, select Settings, and then choose Network And Dialup Connections.
- Right-click the connection for which you want to install TCP/IP, and select Properties.
- If TCP/IP isn't in the list of components used, as shown in Figure 6-6, click Install.
- Highlight Protocol, and click Add.
- In the Select Network Protocol box, highlight Internet Protocol (TCP/IP), and click OK.
- Verify that the Internet Protocol (TCP/IP) check box is selected, and then click OK.
Using Dynamic Addressing
The easiest and most reliable way to configure machines on a network running the TCP/IP suite is to use a DHCP server to automatically distribute IP addresses. DHCP can also inform clients of the appropriate DNS servers and gateways to use. A DHCP server not only simplifies client configuration, but also saves headaches for the poor soul who would otherwise have to track the use of IP addresses, because it manages the database of available IP addresses dynamically and automatically.
Dynamic addressing using DHCP is the Windows 2000 default setting. If you need to check this or change a statically assigned host to a dynamically configured host, follow these steps:
- Select the Internet Protocol (TCP/IP) component in your Local Area Connection Properties window, and click Properties (Figure 6-7).
- Select the Obtain An IP Address Automatically option. But don't select this option on a machine that is to act as a DHCP server. A DHCP server must have a fixed, static IP address.
- Select the Obtain DNS Server Address Automatically option if your DHCP server is set up to provide the DNS server addresses to clients; otherwise, select the Use The Following DNS Server Addresses option, and enter the IP addresses for the DNS servers you want to use.
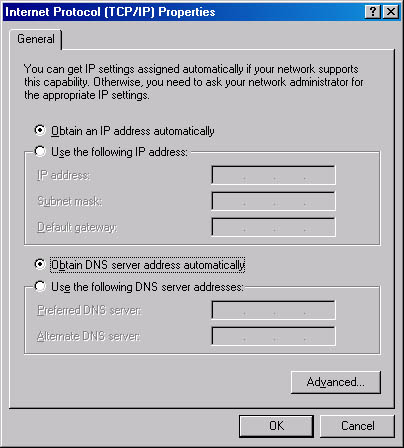
Figure 6-7. The General tab of the Internet Protocol (TCP/IP) Properties window.
Using Static Addressing
If your network doesn't have a DHCP server or if you're setting up a DHCP server, you need to manually configure TCP/IP to use a static IP address and DNS information. To do this, obtain an IP address from the person who maintains the database of IP addresses that your organization can use. If using DHCP, all DHCP servers also need to be updated to exclude your static IP address. Accomplish this by following these steps:
- Select the Internet Protocol (TCP/IP) component in the Local Area Connection Properties dialog box, and click Properties.
- Select the Use The Following IP Address option, enter the address you obtain in the IP Address field, and then click Tab to automatically fill in the default subnet mask. Most likely, you'll be able to use the default subnet mask, but if your network is using a specific subnet mask, you need to find the proper mask and enter it in the Subnet Mask field.
- Enter the IP address for your default gateway or router in the Default Gateway field. The default gateway forwards, or routes, any traffic destined for hosts outside your local subnet, possibly to another portion of your wide area network (WAN) or to the Internet.
- Choose the Use The Following DNS Server Addresses option to specify the IP addresses for your DNS servers. Enter the primary and secondary DNS server addresses in the fields provided.
![]()
REAL WORLD Assigning IP Addresses for DNS and WINS Servers
If you're setting up your server to be a DNS or WINS server, you're probably tempted to use a static IP address. While this is an acceptable use of static IPs, a much better method is to take a dynamically assigned address from the DHCP server and then have the DHCP server administrator create an IP reservation for your server with an unlimited lease duration. This step gives you a permanent lease on the IP address you were assigned, making it easy to configure client machines while at the same time allowing the DHCP administrator to take back the address if your server is moved or decommissioned.
![]()
NOTE
The DNS service is critical for resolving hostnames such as www.microsoft.com into IP addresses that your computer can access. Without the DNS service, you could access resources only by typing in their IP addresses directly. Or if the resources are on your local network and you have NetBIOS over TCP/IP enabled on the WINS tab of the Advanced TCP/IP Properties dialog box, you could access resources only by broadcasting their names over the network, consuming network bandwidth.
Setting Advanced TCP/IP Options
If you aren't using a DHCP server to configure your server's IP address and associated settings and you need to enter other settings besides just your server's IP address and DNS servers, select Advanced in the TCP/IP Properties window, discussed in "Configuring TCP/IP". This opens the Advanced TCP/IP Settings dialog box, shown in Figure 6-8, which you use to specify additional settings, including WINS servers, NetBIOS over TCP/IP, and optional TCP/IP parameters. Chapter 13 contains more on configuring TCP/IP.
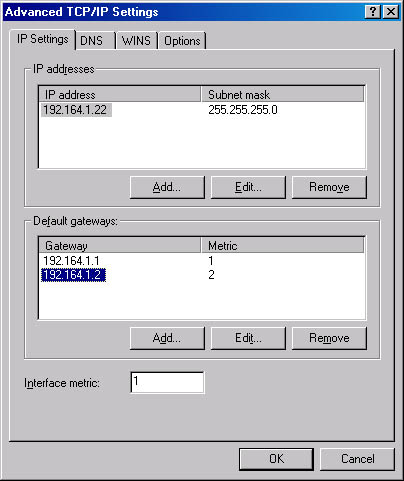
Figure 6-8. The IP Settings tab of the Advanced TCP/IP Settings dialog box.
Configuring IP Settings
The Advanced TCP/IP Settings dialog box contains four tabs, the first of which is the IP Settings tab. You use this tab to add the IP address and subnet mask for your network connection as well as the gateways your server should use. To change the options on this tab, follow the steps below.
- Use the Add, Edit, and Remove buttons under the IP Addresses box to modify your IP address and subnet mask settings. You can use up to five IP addresses and subnet masks for your network connection—either to access different logical IP networks, or to use different IP addresses in a single, logical IP network.
- To add a default gateway or router, select Add and enter the IP address for the router.
- Now add the interface metric for the connection. The interface metric assigns a relative cost to using a particular router to access a particular IP address. Assign lower interface metrics with routers connecting to fast networks, such as another section of a local network; assign higher numbers to slower connections, such as an Integrated Services Digital Network (ISDN) or a slow digital subscriber line (DSL) connection to the Internet.
Configuring DNS Settings
Click the DNS tab to access the advanced DNS settings for your network connection, as shown in Figure 6-9. Then use the following procedure to configure your DNS settings:
- Use the Add, Edit, and Remove buttons beneath the DNS addresses box to add or modify the DNS servers you want to use for this connection. Use the up and down arrows next to the box to change the order in which your server queries the DNS servers.
- Select the options for unqualified names.
- Append Primary and Connection Specific DNS Suffixes Limits the resolution for unqualified names to the domain suffixes and connection-specific suffixes. So if your primary DNS suffix is eng.scribes.com and you type ping srv4 at a command prompt, DNS will look for srv4.eng.scribes.com. If you also specify a connection-specific name (under DNS Suffix for This Connection) such as dev.scribes.com, DNS will query srv4.eng.scribes.com and srv4.dev.scribes.com.
- Append Parent Suffixes of the Primary DNS Suffix Includes parent suffixes up to the second-level domain in the resolution of unqualified names. So if the primary DNS suffix is eng.uk.corp.scribes.com and you type ping srv4 at a command prompt, DNS will query for the following:
- srv4.eng.uk.corp.scribes.com
- srv4.uk.corp.scribes.com
- srv4.corp.scribes.com
- srv4.scribes.com
- Append These DNS Suffixes (in order) Specifies the only domain suffixes to be appended to unqualified domain names during the name resolution process. If you specify domain suffixes here, the primary and connection-specific suffixes are not used.
- To override the parent DNS domain name specified for your computer on the Network Identification tab of the System Properties Control Panel tool, type the DNS domain name you want to use in the DNS Suffix for this Connection text box.
- To prevent the full DNS name of your server's IP address from being registered with the DNS server, clear the Register This Connection's Addresses In DNS check box.
- To register the IP addresses of your network connections in DNS based on the domain name of the connections as well as by the FQDN for your server, select the Register This Connection's DNS Suffix in DNS Registration check box. The domain name of the connection is entered in the DNS Suffix for this connection text box or assigned by the DHCP server.
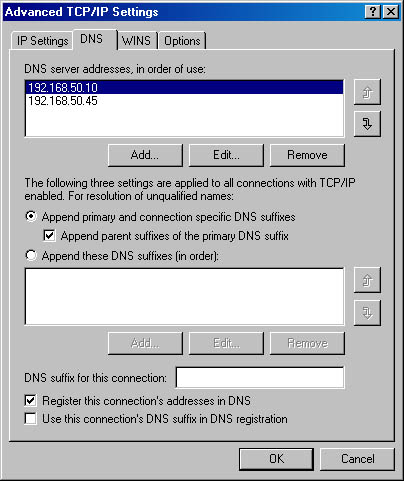
Figure 6-9. The DNS tab of the Advanced TCP/IP Settings window.
Configuring WINS Settings
To configure the WINS settings for your computer, click the WINS tab in the Advanced TCP/IP Settings dialog box (Figure 6-10). If WINS servers are operating on your network, you should add their addresses here. Doing so will give you the best results when communicating with hosts that are running Microsoft pre–Windows 2000 operating systems. As with the other tabs in the Advanced TCP/IP Settings dialog box, use the Add, Edit, and Remove buttons to modify your WINS server list. For a more thorough discussion of when to use WINS servers on your network, see the "Setting Up a WINS Server" section later in this chapter.
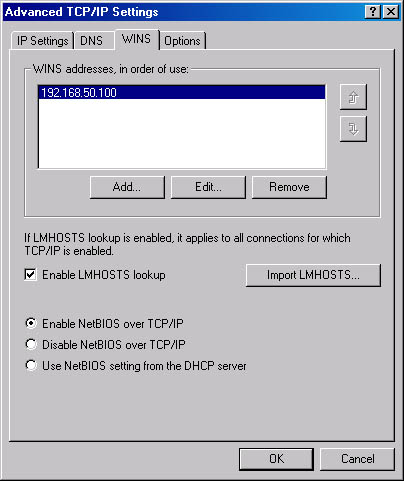
Figure 6-10. The WINS tab of the Advanced TCP/IP Settings dialog box.
To enable the use of an LMHOSTS file for resolving NetBIOS names to IP addresses, select the Enable LMHOSTS Lookup check box, and click the Import LMHOSTS button to import an LMHOSTS file. We recommend not using LMHOSTS files unless absolutely necessary because trying to keep them up-to-date can be tricky—the miniscule reduction of network traffic that LMHOSTS files offer isn't worth it.
TIP
When you configure a WINS server, use the Ipconfig command at a command prompt to obtain your current IP address, and then enter that address in the WINS Addresses field. Don't enter any other WINS server in this field; you don't want your WINS server registering its NetBIOS name with another WINS server if your WINS service hasn't started in time to respond at boot up.
In all likelihood, you'll need to communicate with clients that are running Microsoft operating systems earlier than Windows 2000, so make sure the Enable NetBIOS Over TCP/IP option is selected. Disable this only if you communicate exclusively with other computers running Windows 2000 or computers that rely soley on DNS for name resolution services (for example, UNIX). Also, note that any applications that use NetBIOS won't work if you disable NetBIOS Over TCP/IP.
Configuring TCP/IP Options
If you need to configure any TCP/IP options, click the Options tab in the Advanced TCP/IP Settings dialog box. Select an option you want to configure, and then click Properties. For more information on TCP/IP properties and secure TCP/IP connections, see Chapter 13.
Configuring NWLink IPX/SPX
The NWLink IPX/SPX protocol was designed as an easy-to-use-and-configure, routable protocol that is compatible with NetWare's IPX/SPX protocol. As such, it's a popular protocol in many companies and can be key to maintaining interoperability with different network environments. For detailed information on interoperating with NetWare, see Chapter 20. Fortunately, configuring the NWLink IPX/SPX protocol is easy. Just follow these steps.
- Install the protocol in the Local Area Connection Properties dialog box, which can be accessed by right-clicking the Local Area Connection icon in the Network and Dial-Up Connections folder and then selecting Properties.
- Select the protocol and click Properties.
- To advertise the services running on your server (such as File and Print Services For NetWare or IPX routing) to native NetWare clients, enter a unique eight-digit hexadecimal number to identify your server in the Internal network number text box (Figure 6-11).
- In most cases, you can also let Windows 2000 handle your frame type detection by selecting the Auto Frame Type Detection option. Windows 2000 then detects the proper frame type by sending out a Routing Information Protocol (RIP) request for all frame types and then waiting for a response back. The frame type for which Windows 2000 received a response then becomes the default. If responses were received for multiple frame types, Windows 2000 sets the default frame types for which the responses were received in this order: Ethernet 802.2, Ethernet 802.3, Ethernet II, SNAP.
- If you want to specify the frame type manually or add multiple frame types, select the Manual Frame Type Detection option, select Add, and then choose a frame type and enter the network number for that frame type.
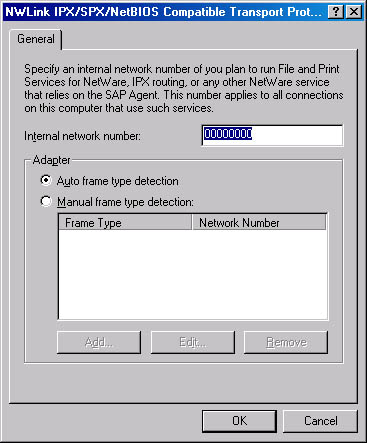
Figure 6-11. The General tab of the NWLink IPX/SPX NetBIOS-Compatible Transport dialog box.
EAN: 2147483647
Pages: 366